Lesson 2: Left hand technique / Lezione 2: La tecnica della mano sinistra
Lesson 2: Left hand technique.
Steemians friends, well back!
In the second appointment with music lessons, today we are going to see a practical aspect, or the technique of the left hand, the hand that will play the notes on the neck of the guitar, so its function is to press the strings on the keys to get the corresponding notes.
Before even pressing the strings, the hand will obviously already have to be in position to be able to play that particular combination of notes.
Many virtuoso guitarist techniques such as Satriani, Vai, Malmsteen and so on use legacies, hammer-ons, slides, vibrato and many other virtuous techniques that are part of the "tricks" of the modern guitarist.
Instead, a purely rhythmic guitarist will have a hand that will tend to deal more with the fingered positions of the chords, as well as syncopated and stopping techniques.
There are different rules and conventions on the position of the left hand and the fingers on the keys that the guitarist must hold.
For example, classical guitarists learn to use a specific technique that allows them to play without ever altering the fundamental position of the left hand.
The rock guitarists (but also the blues ones) use instead every trick and possible position that is functional to the purpose.
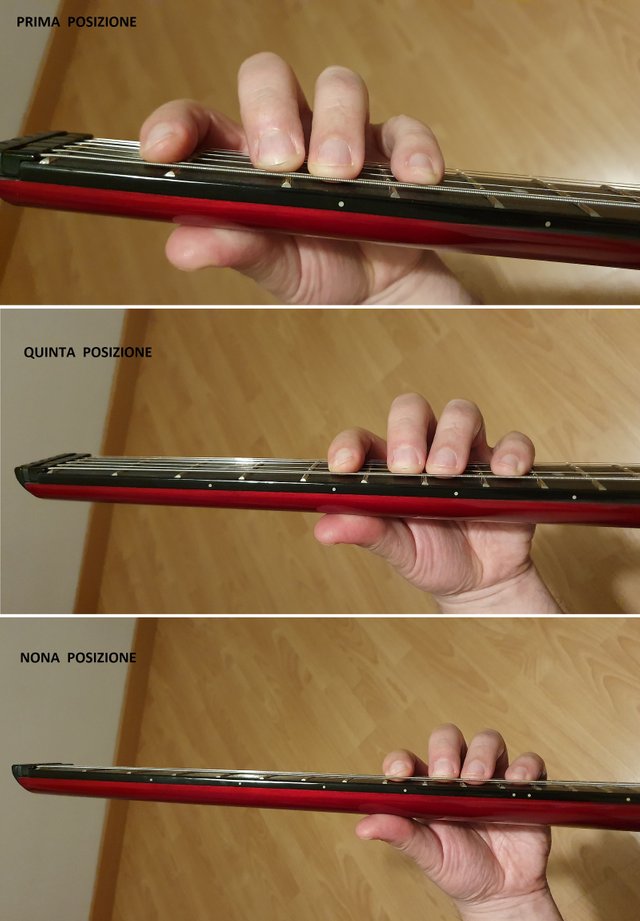
Now let's see the positions on the handle and keyboard.
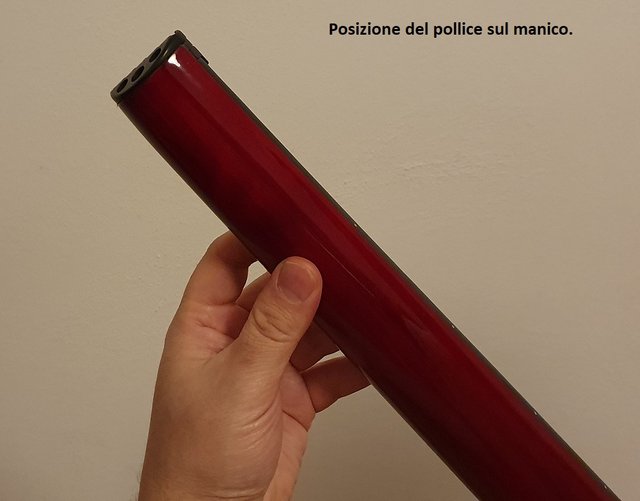
Thumb position:
The classic approach is to always keep the thumb at the center of the handle, so to leave a certain space between the palm of the hand and the handle of the guitar, so in this way the wrist must always be slightly bent to give the fingers the possibility of resting to the keyboard. The thumb finger acts as a fulcrum, allowing the right pressure of the fingers on the keys, so as to obtain a clear and distinct sound.
Many guitarists hold their thumbs higher than the center of the handle, almost holding the handle in the left hand.
It is a habit that is taken very easily as it is more natural and convenient; it is effective for playing certain musical genres.
Position of other fingers:
Here it is fundamental to have very short nails so as not to create a sort of thickness between fingertips and cords that can give dirty and unclear sounds. The fingers must be well arched so as to have the last phalanx almost like a hammer, as much as possible perpendicular to the keyboard. The pressure on the rope must be pressed as close as possible to the bar to the right of the relative button, string will vibrate only from this point to the bridge fixed on the body, thus determining the relative sound.
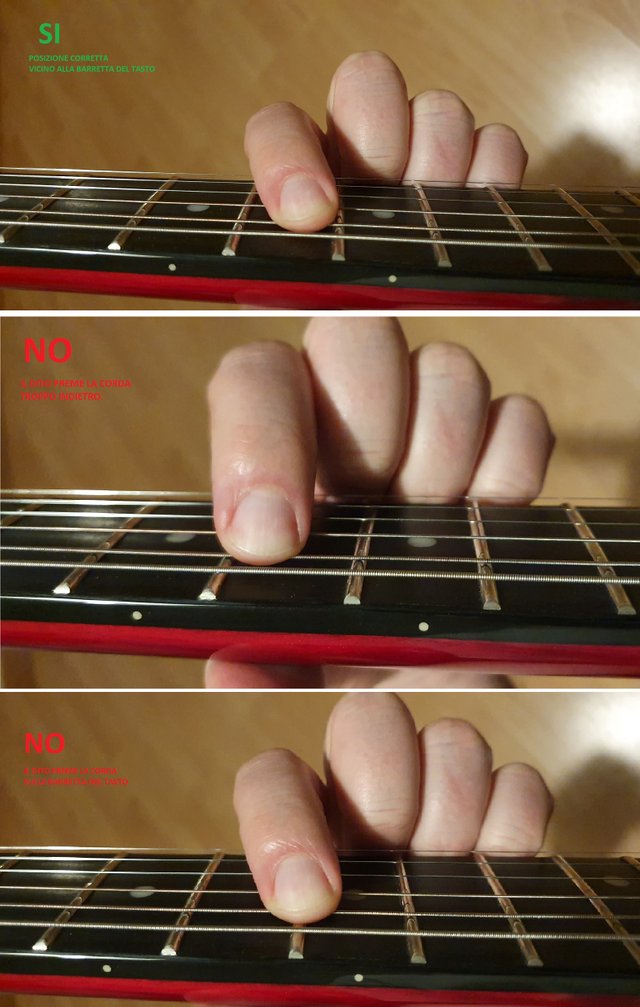
You have to learn to exert the right pressure until you get a clear and clean sound, without exaggerating so as not to hurt you or strain your fingers too much. Stop a few minutes at the first signs of soreness.
As you practice, your fingertips will harden and the tendons of the hand will untie, allowing you to exercise longer. In the next lessons, we will see the technical exercises to be performed to untie the hand.
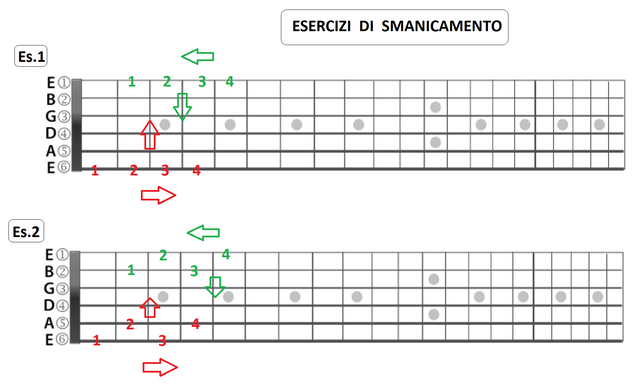
Now let's see below some exercises to perform along the whole neck of the guitar, in descending (red) and ascending (green) way. They are useful exercises to always carry in our musical baggage, they serve to accustom the fingers on the keyboard for the beginners and successively for the heating, before beginning to play:
Thank you for your contribution to reading this article, see you soon dear friends Steemians. Bye!
La tecnica della mano sinistra.
Amici Steemians, ben ritrovati!
Nel secondo appuntamento con le lezioni di musica, oggi andiamo a vedere un aspetto pratico, ovvero la tecnica della mano sinistra, la mano che andrà a suonare le note sul manico della chitarra, quindi la sua funzione è quella di premere le corde sui tasti per ottenere le note corrispondenti.
Prima ancora di premere le corde, la mano ovviamente dovrà già trovarsi in posizione per poter suonare quella particolare combinazione di note.
Molte tecniche di chitarristi solisti virtuosi come Satriani, Vai, Malmsteen e via discorrendo utilizzano legati, hammer-on, slide, vibrato e molte altre tecniche virtuose che fanno parte dei "trucchi" del chitarrista moderno.
Un chitarrista prettamente ritmico invece avrà una mano che tenderà ad occuparsi maggiormente delle posizioni diteggiate degli accordi, nonché di tecniche sincopate e di stoppatura.
Esistono diverse regole e convenzioni sulla posizione della mano sinistra e delle dita sui tasti che il chitarrista deve tenere.
Ad esempio i chitarristi classici imparano ad usare una specifica tecnica che permetto loro di suonare senza mai alterare la posizione fondamentale della mano sinistra.
I chitarristi rock (ma anche quelli blues) usano invece ogni escamotage e posizione possibile che sia funzionale allo scopo.
Andiamo ora a vedere le posizioni sul manico e tastiera.
Posizione del pollice:
L'approccio classico prevede di mantenere sempre il pollice al centro del manico quindi di lasciare un certo spazio tra il palmo della mano ed il manico della chitarra, in questo modo quindi il polso dovrà essere sempre leggermente piegato per dare la possibilità alle dita di appoggiarsi alla tastiera. Il dito pollice funge da fulcro, permettendo la giusta pressione delle dita sui tasti, in modo da ottenere un suono chiaro e distinto.
Molti chitarristi tengono il pollice più in alto rispetto al centro del manico, quasi impugnando il manico nella mano sinistra.
E' un'abitudine che si prende molto facilmente in quanto risulta più naturale e comodo; risulta efficace per suonare certi generi musicali.
Posizione delle altre dita:
Fondamentale qui è avere le unghie molto corte in modo da non creare una sorta di spessore tra polpastrelli e corde che può dare suoni sporchi e non chiari. Le dita devono essere ben arcuate in modo da avere l'ultima falange quasi a martello, il più possibile perpendicolare alla tastiera. La pressione sulla corda va premuta il più possibile vicino alla barretta più a destra del relativo tasto, corda vibrerà solo da questo punto fino al ponte fissato sul body determinando così il relativo suono.
Dovete imparare ad esercitare la giusta pressione fino a che otterrete un suono chiaro e pulito, senza esagerare per non farvi male o affaticare troppo le dita. Smettete qualche minuto ai primi segni di indolenzimento.
Man mano che farete pratica i polpastrelli si induriranno ed i tendini della mano si slegheranno, permettendovi di esercitarvi più a lungo. Nelle prossime lezioni, vedremo gli esercizi di tecnica da effettuare per slegare la mano.
Vediamo ora qui sotto, alcuni esercizi da effettuare lungo tutto il manico della chitarra, in modo discendente (rosso) ed ascendente (verde). Sono utili esercizi da portare sempre nel nostro bagaglio musicale, servono ad abituare le dita sulla tastiera per i principianti e successivamente per il riscaldamento, prima di cominciare a suonare:
Grazie per il vostro contributo alla lettura di questo articolo, a presto cari amici Steemians, a presto! Ciao!
Foto ed esercizi dell'autore.
This post was shared in the Curation Collective Discord community for curators, and upvoted and resteemed by the @c-squared community account after manual review.
@c-squared runs a community witness. Please consider using one of your witness votes on us here
thanks