How To: Host Your Own Photos And Videos For Steemit (For Free).
Into to my upcoming "How To" Articles...
I am going to start a collection of "How To's" on several different topics. At first I plan to just create How To Articles based off of what I feel could be beneficial to the Steemit community, and hopefully if this picks up I can start doing How To's on requested topics or things!
To Begin My How To Articles:
I see a lot of really cool steem tools and hosting sites to allow you to keep all of your steemit photo's and video's in one place... but most of them have a really crappy low amount of storage for the free versions or you have to pay to host. Who want's to pay to host pictures? No one...
Many people are already aware of things like Dropbox and Google Drive, but they probably don't know that you can "Host" (Publicly Share) your images and videos directly from either one of them for free and easily. This How To will show you just how easy it is with Dropbox in 3 easy steps!
Dropbox:
Using Dropbox, its about 3 steps once you have an account setup.
After you create a Dropbox account, you will have 5GB of storage for free! Your "Public" folder is where we are going to get everything set up. Go ahead and go to your public folder and we will begin:
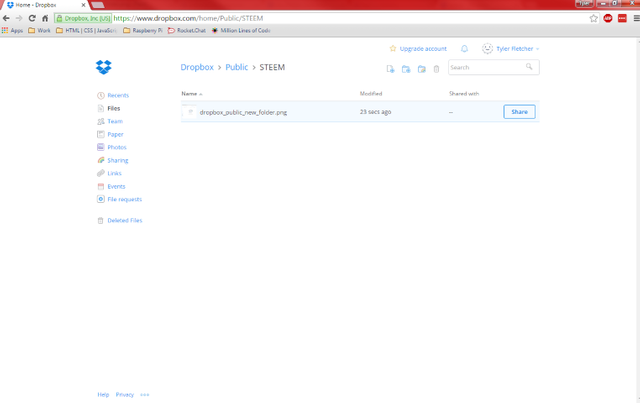
Step 1) Create a STEEM Folder in your Public folder.
This way all of your STEEM media will stay in it's own designated place. Of Course, This is optional, but recommended. You could even take it a step further and create sub folders for your tags.
IE: #Introduceyourself photo's can go in /Public/STEEM/IntroduceYourself.
Step 2) Upload your Pictures and/or Videos.
As you can see in the picture above, I have already uploaded a single picture into my Dropbox STEEM folder.
To Upload a Picture or Video, You can simply Drag and Drop it onto the window.
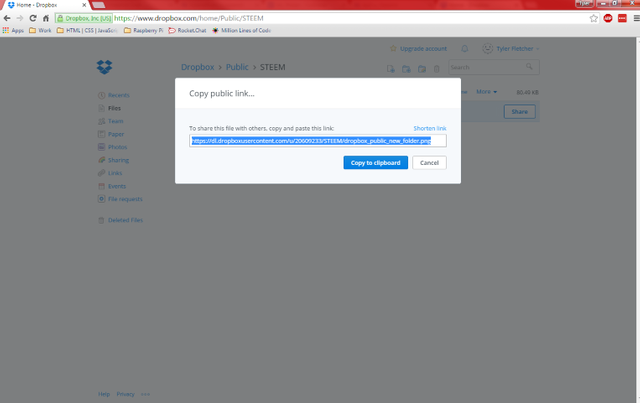
Step 3) Copy Public Link.
You may have noticed to the right side of the image in Dropbox you see a "Share" button. To see this button you just simply hover over the image you want to share and the share button will appear. Click on the share button and you will get a "Copy Public Link" page overlay:
Now Just click "Copy to Clipboard" and use this URL just as any that you would use in Steemit!
Easy, Right?
Hopefully this will be beneficial to some of the newer users here on Steemit. I am going to make some more "How To's" in the near future and I hope to get some request on some new How To Articles! So if you have any idea's or anything you want to learn (In regards to Steemit or Not!), Please leave me a comment request and I will put together a "How To" on it! Also, any feedback is greatly appreciated!
#steemit #flsteem #howto #howtoarticles


I upvote U
Dear User known as @tyler-fletcher
Steemit has a BOT problem! Your Vote Counts... Maybe
https://steemit.com/steemit/@weenis/bots-steemit-s-first-community-based-decision-on-bots-your-vote-counts-to-be-or-not-to-be-details-inside