How to | Build A-Frame Picnic Benches
I just spent a year in Greece as a volunteer on refugee camps. While I was there we realised that it'd be good for the residents to have somewhere to sit, eat, socialise...so I drew up some designs to build our own benches - they cost us around 150€ per bench (excluding my time of course!), and they're a damn sight better than anything you'd buy around that price.
Thought I'd share my design with measurements hopefully it helps someone who'd like to build their own as it took me a little while to get the measurements nice, and having the confidence that someone can show it was used as a design always helps.
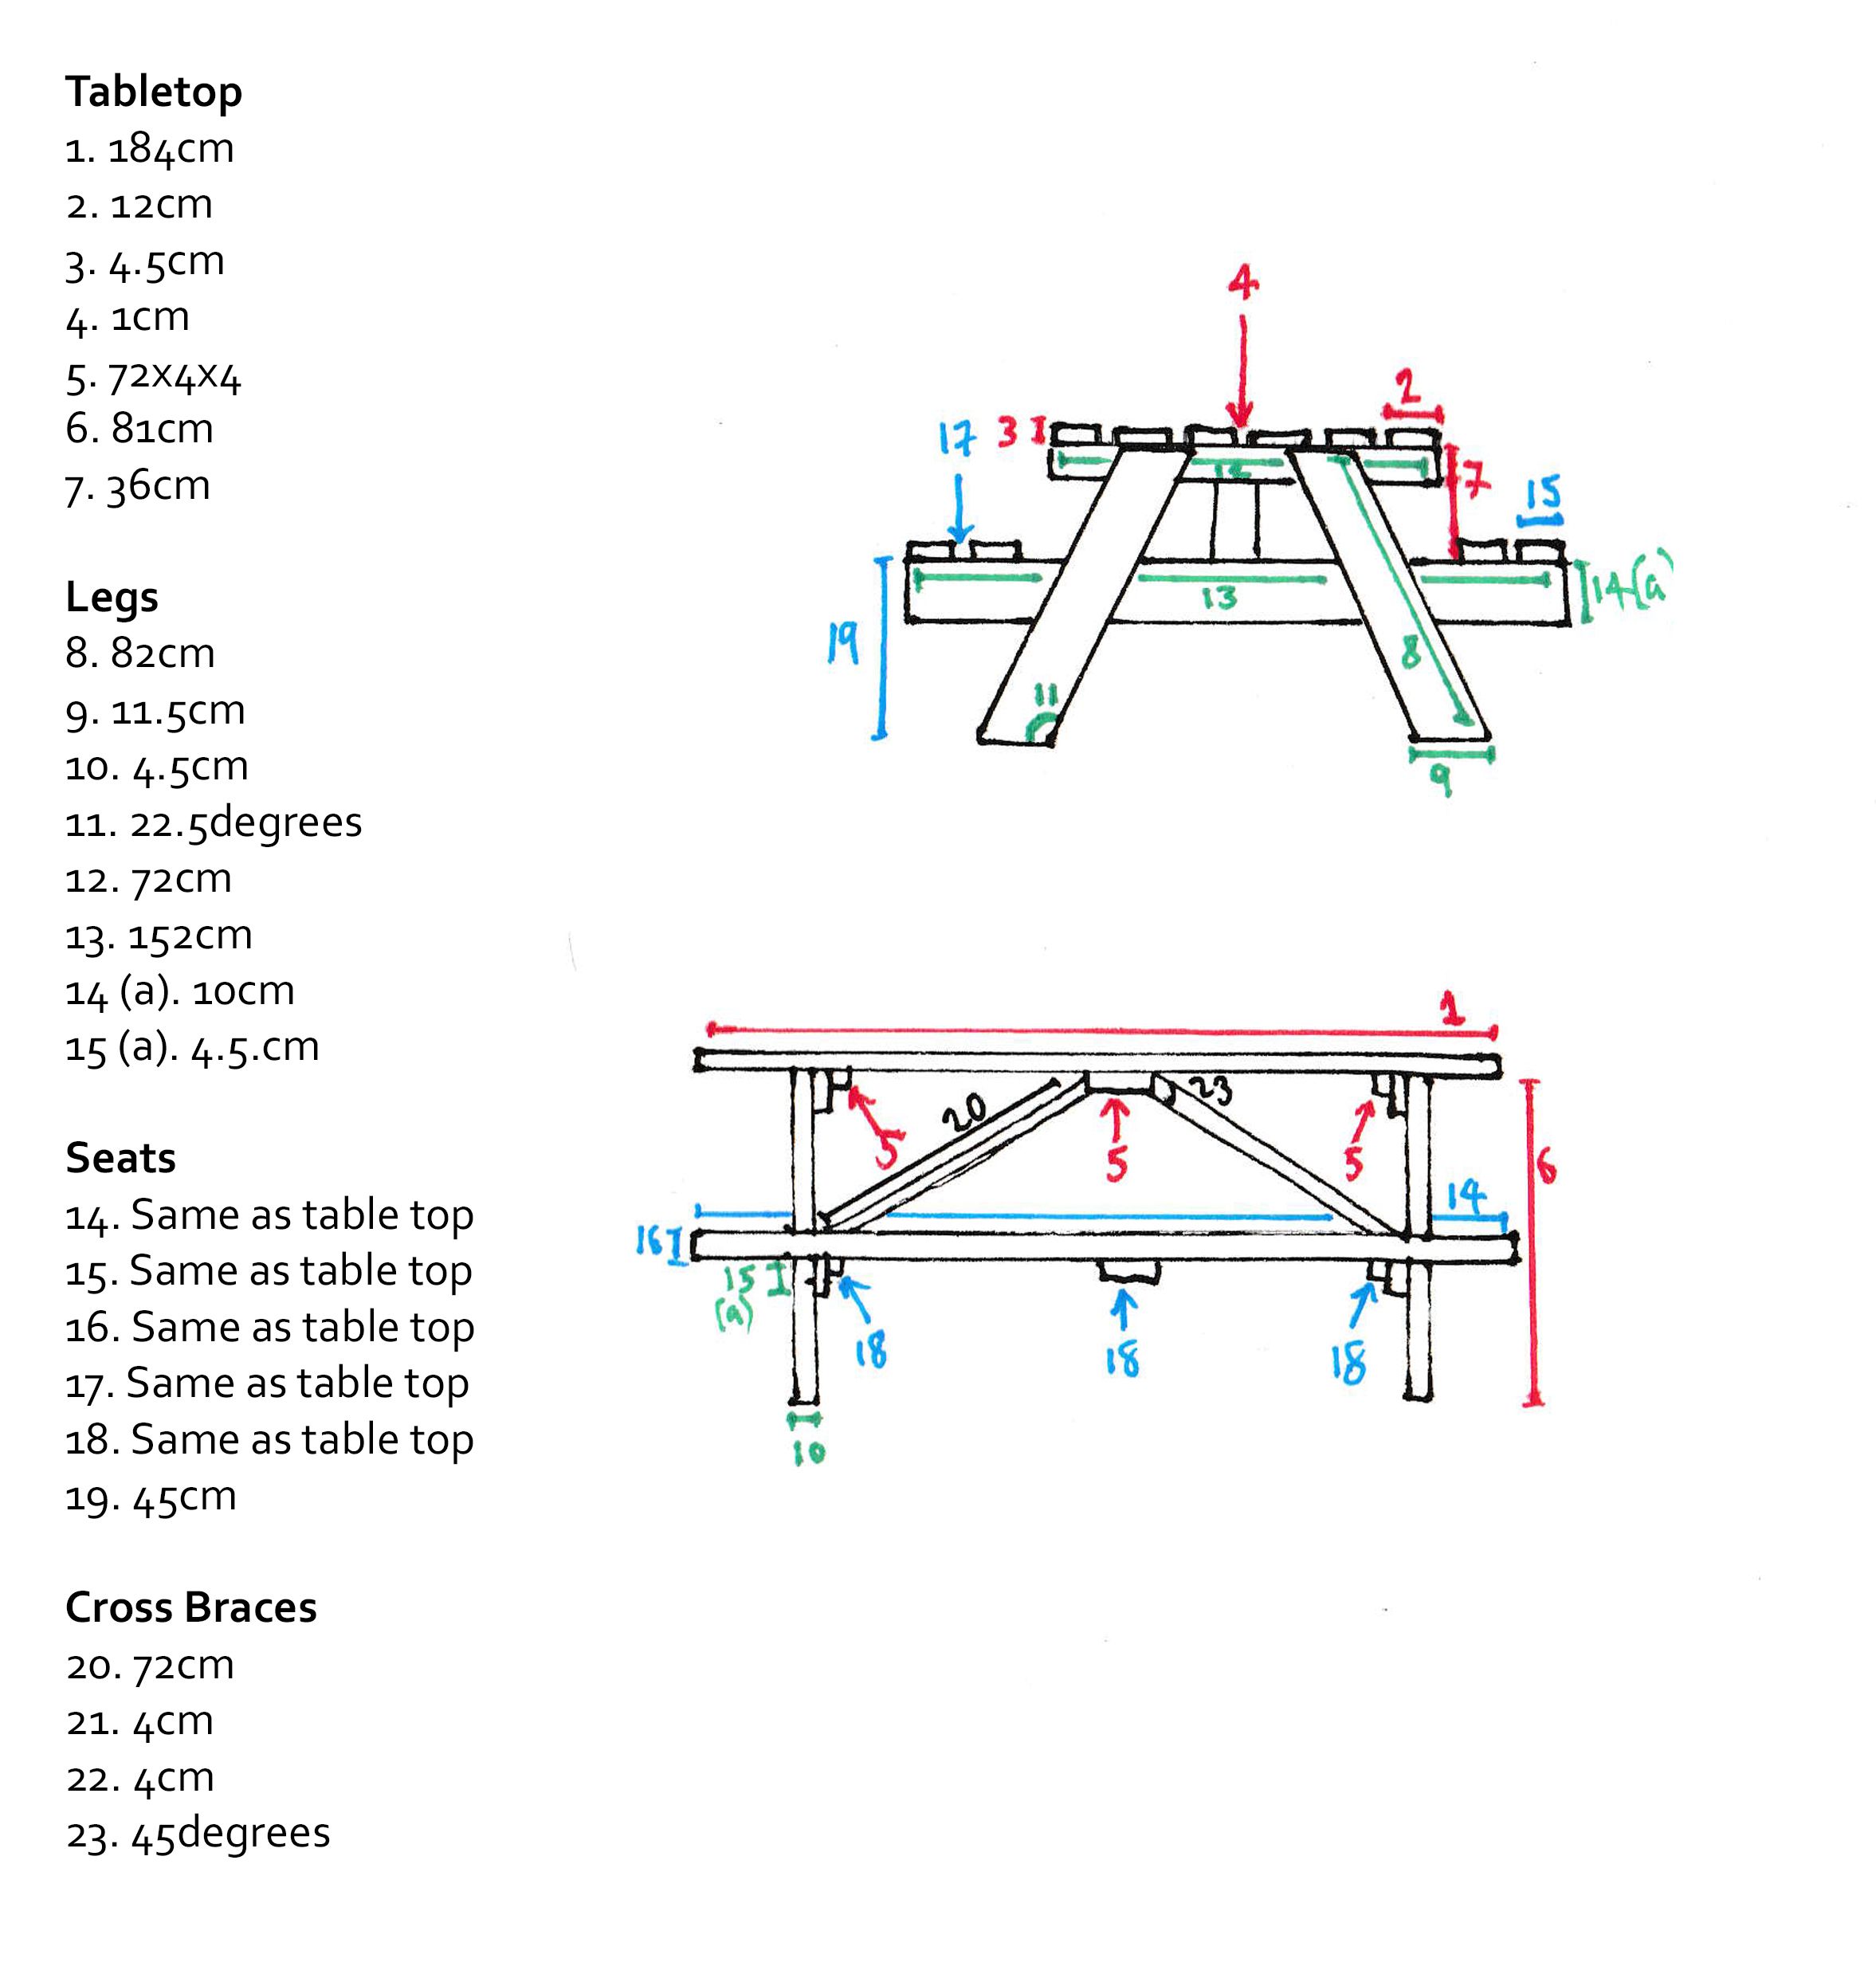
Drawn by hand and scanned in, so excuse the sketchiness, the measurements are sound, we built 9 benches on that camp and I built another 2 elsewhere.
Built from Pine, you can use any wood however Pine is cheap and not too heavy. You can also play around with the amount of beams you use for the table top, change the spacing so the tabletop is solid, make the whole thing smaller...whatever you want!
How to:
We made multiple units, so I found it much easier to build a jig (or template) so we could quickly and easily mass produce the legs and the tabletops.
What you'll need:
- Ideally a tablesaw, failing that handsaw and a mitre or some way to measure angles
- Decent drill
- Wood drill pieces
- Torx head drill bits
- T25x80 screws
- T25x100 screws
- M8x120 Coach Bolts and Nuts (Full Thread)
- Socket to tighten the coach bolts
First you make the Tabletop
- Cut wood down to the sizes stated, for Tabletop only.
- Cut the beams for the table top, including the rafters that hold it together (1-5).
- You're gonna need some spacers for the tabletop so you can have that 1cm gap, so, cut 10-15 chunks of wood at 1cm.
- Screw down a baton of wood onto a flat surface - you're going to lay down your beams one the flat surface and push the ends against the baton so you have a nice ending edge with the beams in line.
- Use your spacers to give you a consistent 1cm gap between each beam for the table top
- Screw in number 5s - there are 3 of these - one on each end and one bang in the middle. The ones on each end need to be 20cm from the edge. I used 2 screws per tabletop beam and countersunk them. Make sure the tabletop beams screw in nice and flush.
You've just made a tabletop. Marvel at your skills!
Next is time to make the Legs.
- Cut wood down to the sizes stated, for Legs only.
- You need to build the legs at this point. This can be a bit tricky. The legs need to be flush with the top edge of 12, and 15cm from the end if that makes sense(??). Attach with the coach bolts.
- Use 17 & 19 measurements to figure how low dow you need to attach 13. It won't look like it's tall enough, but trust me, it is! Attach with the coach bolts.
- Now repeat that process! You need to make it twice...
- Next it's time to attach the legs to the table top. Easy, just screw them together!!
Seats
- It's as simple as building the table top, just less beams. Do your measurements first as always! Especially when attaching 18, you need to make sure it'll fit, should be a little tight.
Cross Braces
- As simple as in the drawing really, cut them to size and attach. I found that I needed a little extra piece to make the middle look nice and tidy.
I've explained in a way that assumes you have a basic command of tools and some common sense to boot so you can fill any gaps I've left. Please get in touch if you want anything explaining more, I'll be happy to supply to help!
In build and finished - http://www.bridge2.gg/projects/greece/picnic-benches
post resteemed
aljazeera did a wonderful documentary about groups that started up in one of the big collapsed towns in the US think it was Baltimore. A charity was started by people who at least had some money and they supported projects that had a cummunity purpose. one small group made bus shelters. Good people all over the place.
Nice!
This post has received a 2.40 % upvote from @buildawhale thanks to: @sammarkjames. Send at least 0.50 SBD to @buildawhale with a post link in the memo field for a portion of the next vote.
To support our curation initiative, please vote on my owner, @themarkymark, as a Steem Witness
This post has received a 4.51 % upvote from @booster thanks to: @sammarkjames.
This gem of a post was discovered by the OCD Team! Reply to this comment if you accept, and are willing to let us share your gem of a post! By accepting this, you have a chance to receive extra rewards and one of your photos in this article may be used in our compilation post!
You can follow @ocd – learn more about the project and see other Gems! We strive for transparency.
If you would like to be resteemed by @ocd and reach a bigger audience, use the tag ocd-resteem. Three posts using this tag will be chosen each day by our curators to be RS. Good Luck!
Of course @ocd @mobbs, please do share! :)
This wonderful post has received a bellyrub 0.60 % upvote from @bellyrub thanks to this cool cat: @sammarkjames. My pops @zeartul is one of your top steemit witness, if you like my bellyrubs please go vote for him, if you love what he is doing vote for this comment as well.