Layer Coop Amenities Part III

Ernie February 2013
This is Part III of a 3 part series.
You can find Part I here: https://steemit.com/homesteading/@goldenoakfarm/layer-coop-amenities-part-i
And Part II here: https://steemit.com/homesteading/@goldenoakfarm/layer-coop-amenities-part-ii
This part will cover feeders, waterers, grit and oystershell feeders, and dustbaths.

Hopper feeder
Feeders: Be sure to have enough feeders and waterers so that all of your chickens have access at the same time. This is important because the chickens on the low end of the pecking order are sometimes pushed away from the feed and water if there is not enough space. Feeders need to provide 2½” to 3” of space per bird. The lip of the feeder should be level with the bird’s back height to prevent feed wastage. Only fill a trough feeder 1/3 to 1/2 full in order to minimize feed wastage.

Trough feeder with grit tray
There are several designs of feeders: trough, hoppers, and ground feeding.
Troughs can be as simple as ½ of a 3” or 4” PVC pipe cut in half, or can be made of wood or galvanized metal and have covers for outdoor use (known as range feeders). Any trough should have some sort of barrier to keep chickens out/off of it. It can have a cover that serves double duty outside of weather protection or a simple dowel that spins, running across the top of the trough, about 2” above it, for indoor use. Whatever design you select, it should be easy to clean.
Another consideration is if the trough is free standing, not hanging, and especially if it’s outside, rats may take up residence under it. It also may not be adjustable in height, to accommodate growing chickens.
Hoppers hold enough feed for a week or more. They may have trouble with different size particles and feed flow. They often have adjustable openings for this problem. If food is left in the hopper for a week or more, there can be a problem with mold.
If the feed gets wet, it will not flow. They often do not have covers. They can be hung (watch for too much weight bowing structural supports) or be standing.
The height of the hopper top should not be so high it’s hard to heft the bag of feed up to fill it. It also should not be so high it’s hard to thoroughly clean moldy feed out of the bottom.
The amount of feeder space you need depends partly on how likely the chickens are to run out of feed. If you let them run out of feed on purpose, you need to provide enough feeder space that all the chickens can eat at the same time (or scatter some of the feed on the ground to prevent pile-ups). Otherwise follow the guidelines in the following table:

The table specifies a lot more feeder space than most farmers provide. Lack of feeder space causes subtle problems, where the weaker or more timid chickens are excluded from the feeders by their more aggressive flock mates. The flock is healthier, more uniform, and more productive if there's plenty of feeder space.
Ground feeding allows enough space but it also allows contamination of the feed by parasites or wild birds if done outside in an unenclosed area. With the threat of bird flu crisscrossing the continent, avoiding encouraging wild birds to feed near your birds is a good idea.

Grit and oystershell dispensers
Grit and Oystershell
Also plan a method of feeding layers oystershell, and if necessary, providing grit for all birds. Oystershell provides the calcium needed for hard shells, but is not used in digestion.
Grit may be needed if the birds don’t have access to granite gravel for their crops. Oystershell for layers or grit for any birds can be sprinkled on the ground or offered separately in low feeders.
A simple grit or oystershell feeder can be made from a 9” x 13” aluminum baking pan nailed to an 8” x 8” x 12” block. It’s high enough to feed out of, but can’t be tipped over.
Another dispenser for grit or oystershell is a 3” piece of PVC suspended over a tray as above. You can make it both grit and oystershell by putting 2 PVC pipes side by side and dividing the tray in ½.

Galvanized vacuum waterer
Waterers: Waterers come in a number of designs. Choose a type which minimizes the surface area exposed, so the water will remain as clean and litter-free as possible. Placing it above floor level on a stand will also help minimize contamination with litter. Guard against wet spots under or around the waterer. Provide 1” of water space per bird. Place the waterers so that the lip is level with the bird’s back. If it is lower than this, the bird’s crop may empty into it as it drinks, fouling the water.

Bell waterer
There are several types of waterers: vacuum, gravity fed bell, and nipple or cup.
Vacuum waterers can either be galvanized metal or plastic. They rely on the water level in the access area to control filling. But sometimes they fail and the watering area will be dry. As chickens need water to digest their food, it can be a serious problem. In summer, it can become critical. The vacuum waterer usually stands, but can be hung up.
The gravity fed bell hangs as the weight under the bell keeps it level and allows the bell’s weight to regulate the water level. In taking down a bell to clean it, there’s little to grab hold of and one tends to grab the locking nut. Doing so will eventually change the water level as the nut moves. We designed a simple hook with wooden handle to carry the bells for cleaning and eliminated that problem.
Bells can either be hooked into a reservoir or a water line. If they are used in a pasture pen, a 5 gallon reservoir (preferably white to keep water cooler) is usually used. We use 2 in the pasture pen, in case one fails. The valve tends to clog with algae in the hot summertime. The bell needs to be cleaned daily in summer.

Keeping the bell waterer open down to -20F
Nipple waterers are easy for chickens to learn to use. They can wear and leak, or become blocked by particles in the water. If the flow rate is too low, it will affect feed consumption and health. They can be hooked into a reservoir or a main water line. It’s hard to know how much water the chickens are receiving if waterers are hooked into a main line vs. reservoir. But the water stays cleaner than other waterer types.
The nipples must be set at the right height so they will be used as often as needed. Because of this, different sized chickens would have trouble with access. They are not freeze proof and the water pressure can make them hard to regulate.
Cup waterers have tiny bowls that hold only a couple of tablespoons of water. Instead of a float valve, they have a yellow trigger arm that lets water in when the chickens peck at it. It’s easy for chickens to figure out how to use these waterers. They tend to get dirty, also have the problem of being at a set height, and are not freeze proof.
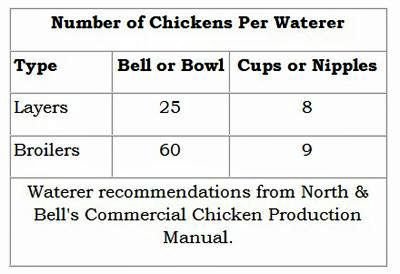
The following table gives the amount of waterer space recommended for hens and broilers:

Dust Bath Areas
Providing a dust bathing area for the birds will help keep mites and pests off the birds. Usually something 2½’ x 1½’ is a suitable size. Some people use old truck tires or build a box containment to keep the material in 1 place. Whatever you use, it must be kept dry.
The dust bath is made of 5 parts clean dirt, 2 parts diatomaceous earth, and 2 parts well leached wood ash. If the wood ash has not been leached (had the lye removed) and gets wet, it can burn feathers and skin.
Providing the best accommodations for your birds will make them happier and healthier. They will lay better. There will be fewer or no behavior problems. Planning ahead really pays off later!

References:
North & Bell's Commercial Chicken Production Manual
Credits:
Feeder and Waterer Charts: North & Bell's Commercial Chicken Production Manual
Your chickens hit the jackpot when they got to your farm. You have an amazing set up. Keep up the good work!!!
We say that we give them the very best life we can, then they have 1 bad day. I do wish I had a bigger coop, as that one is far too small for 18 birds. But outside of that, they do have a good life for 18 or 19 months....
Thanks for all the info on these three chicken post. I'm going to incorporate a bunch of these ideas into my coop this spring.
Your chicks have it made at your farm for sure! Thank you for all the awesome info - you have covered everything I would need to know to get started. Resteeming so I will have easy access.