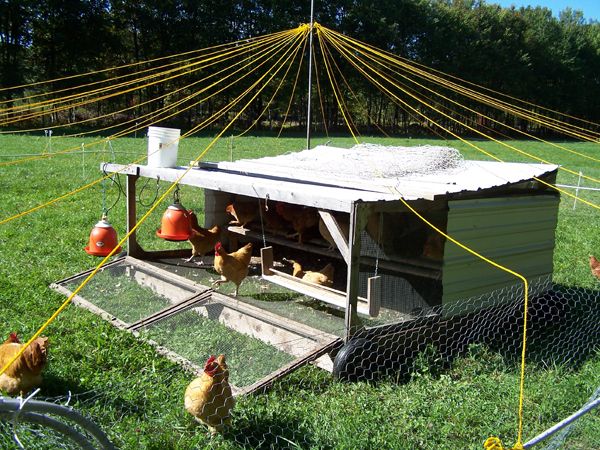
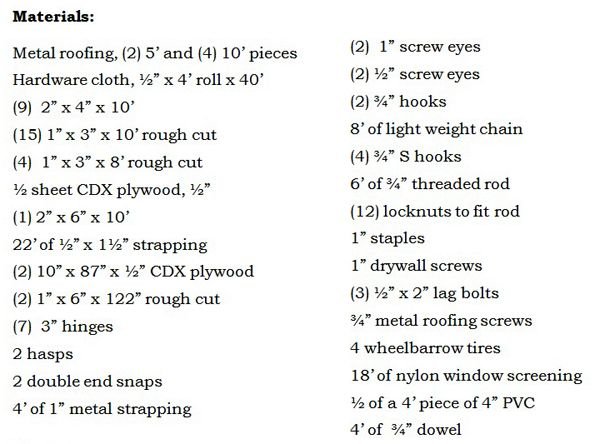
Building the Pasture Coop
We started off with a Salatin pen https://steemit.com/homesteading/@goldenoakfarm/building-the-salatin-pen
but it quickly became obvious that the heritage birds could not spend the next 12 weeks in that. They had to have more room. So we set about designing a more user friendly coop.
Some of the things we wanted in the new system:
• Easy human access
• A totally secure box
• Roosts
• Plenty of feeders/waterer room
• Ventilation
• Protection from weather
• Land predator protection
• Ability to move coop easily
For Human Access:
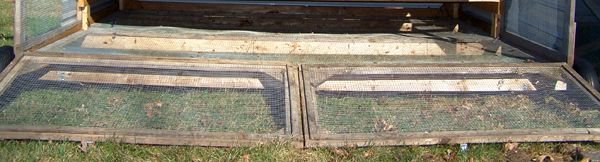
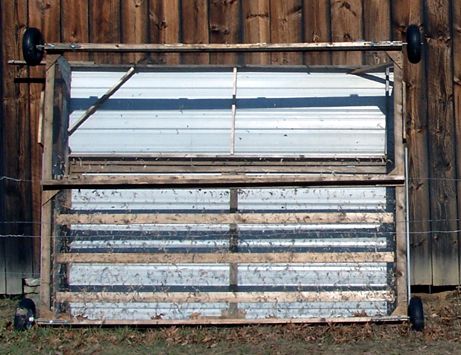
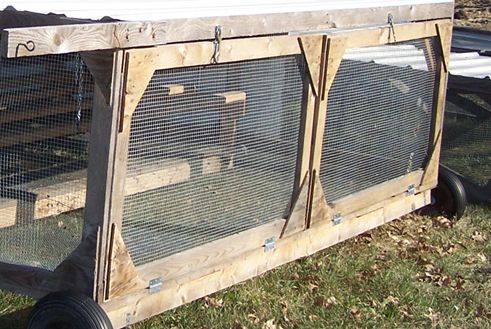
For better human access, the front was (2) 5’ x 3’ ½” hardware cloth ramps, each with 2 hinges, a hasp, and a double end snap for closure. The strapping is used on the inside of the frame to protect the chickens’ feet from the cut edges of the wire.
The coop measured 10’ wide by 8’ deep x 3’ high, large enough for us to get inside.
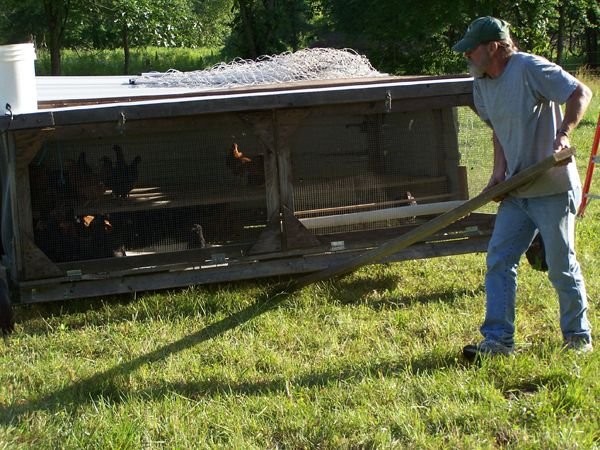
Totally Secure Box:
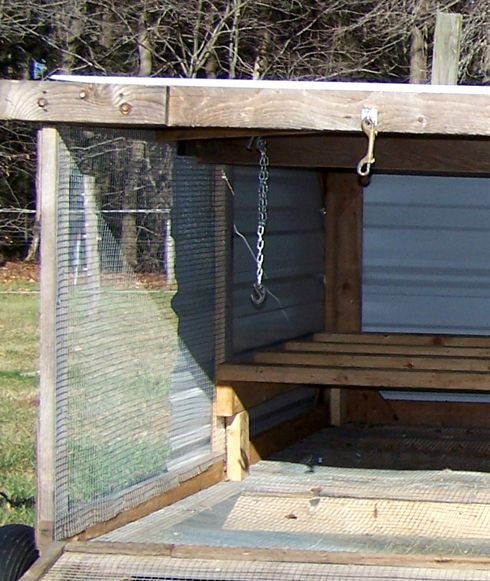
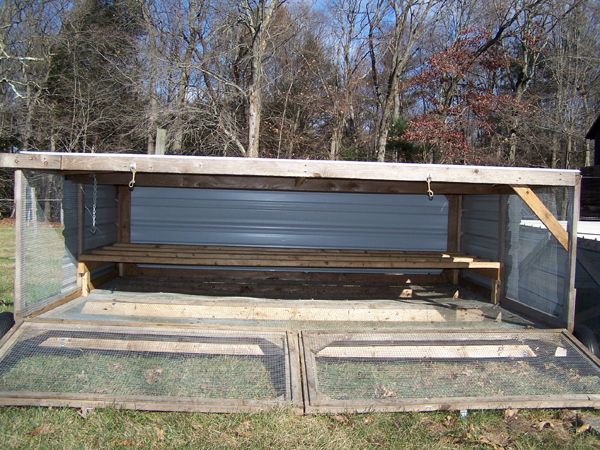
We created a totally secure box 3’ x 8’ long, with sides divided in half, the front half just ½” hardware cloth, overlapped 8” by the 60” roofing panel in the back. The reason for the overlap is to provide shelter for the birds on the front roost.
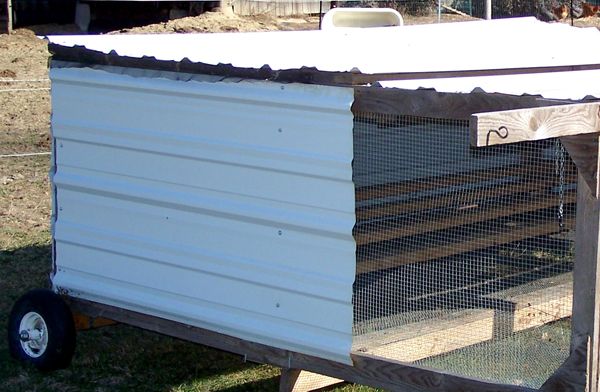
The top front is a 10’ x 3’ stationary roofing panel.
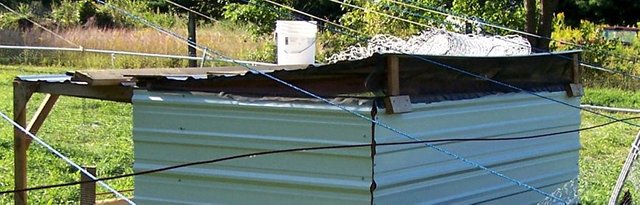
The back 2/3 of the roof is hinged for ventilation. The back is hinged with 3 hinges and covered with (2) 10’ x 3’ roofing panels, overlapped to measure 65” wide. It raises 8” high and is held open by a simple block on each end swinging on a nail. These blocks rest on a block screwed into the frame on the outside ends. The frame is 1” x 3” x 10’ rough cut. The opening on the hinged section is covered with the screening, stapled in place from the outside.
The back is a single 3’ x 10’ roofing panel. Metal roofing screws were used to secure the panels to the frame. For the hardware cloth 1” staples were put in at least every 8”, closer if needed.
The base is (3) 2” x 4” x 10’ narrow edge up, faced on top with a 1” x 3” x 10’. The front and back 2” x 4” serve as supports for the threaded rod axles at each corner. The middle 2” x 4” supports the floor and offers a nailing surface for where the wire overlaps.
The bottom outer frame on the sides is 1” x 3” x 8’ rough cut. The ½” hardware cloth floor is stapled to the top of the 1” x 3”, staples about 3-4” apart.
Roosts:

Carefully sand the flat surfaces and round the corners on the upper sides of the (4) 2” x 4” x 10” for the roosts. Build a 4’ long x 1’ high support on each of the sides to support the roosts out of the last (2) 2” x 4”.
Starting from the back, allow 1’ from the back to the first roost, and 1’ between each roost.
This allows 6” roosting space for 80 birds.
Feeders and Waterers:
Watering System:
Outside waterer support
There’s a 30” long arm off the front left side to support an outside waterer.
Inside waterer support
Just inside on that side is the support for the inside waterer. Both are gravity fed from a white 5 gallon pail on the roof. Adjust the height of the waterers at or just above the crops of the birds.
Feeders:
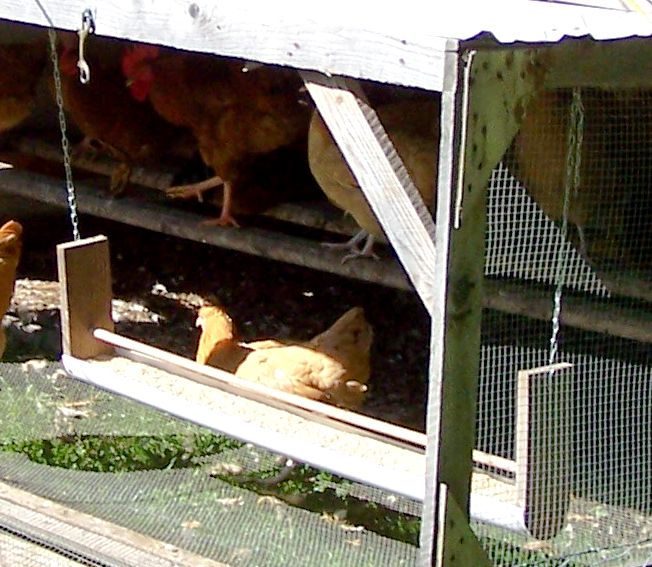
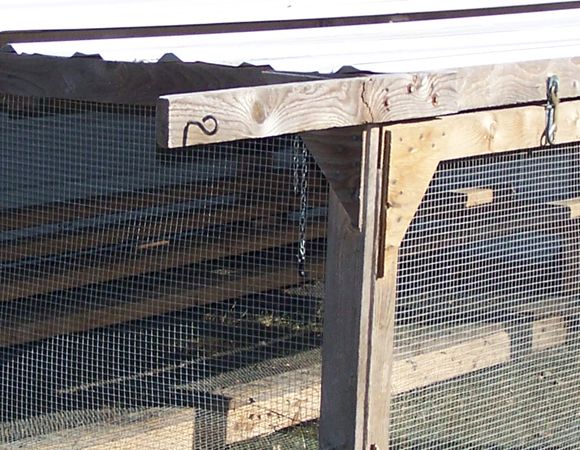
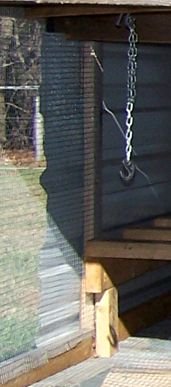
There’s a support across the middle of the stationary roofing that also serves as a support for 1 end of the feeder.
The feeder is 1’ inside the doors on the right side. It is a piece of 4” diameter PVC cut in ½. It’s 4’ long. Using the PVC as a template, scribe the inside on a piece of 1” x 4” about 12” long. Cut it out, fit it inside the end of the PVC and screw it into place. Put one of the ½” screw eyes in the center top of the board. Do the same to the other end. Use the ¾” S hooks to attach the chain to the eye screws.
From the roofing supports put the hooks in hanging down. If the hooks will go through the chain, adjust the chain so the feeders are the same height as the chickens’ backs. If not, use the remaining S hooks.
Land predator protection:
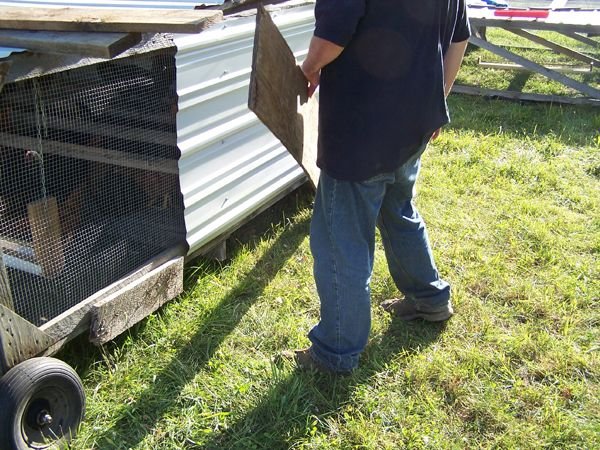
Sideboards of ½” plywood fit down between the wheels and the body on the sides
A 1” x 6” cut to length was wedged across the back and front sides
Once the coop was moved and before we let the birds out, we put side boards down on all 4 sides. This kept them out from underneath making it easier to put them in at night.

A 50’ x 48” high length of poultry netting had multiple uses. When not in use it was stored, rolled up, on top of the coop.
We would use it at night to create a barrier to get the birds into the coop. The coop was always positioned so one side was 5’ – 7’ from the mobile pen’s side. We’d use the netting to create a lane and just run them don it and into the coop. We’d have 1 ramp closed for this operation, to contain them.
We also started teaching them as soon as they were out in the pen to “go to bed!” We’d say this repeatedly each night and after a few weeks, just saying it would send most of them into the coop. This comes in very handy if you need to get them into a safe place quickly at any time of day.
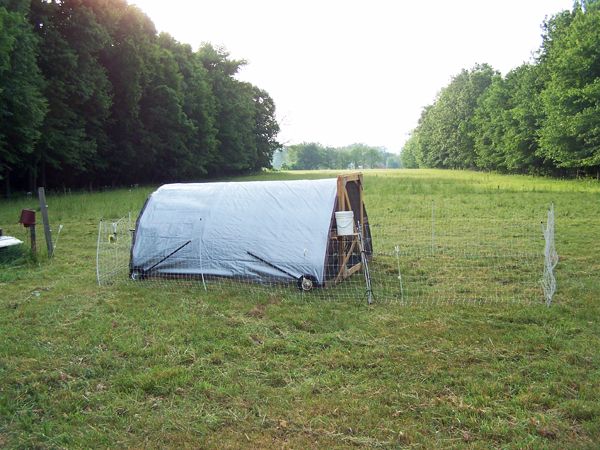
(No photo of pasture coop) We then put the 50’ netting around the pasture coop and hook it into a dedicated line from a dedicated fence charger. This was done inside the mobile pen. This gave them 3 layers of protection at night.
Shade:
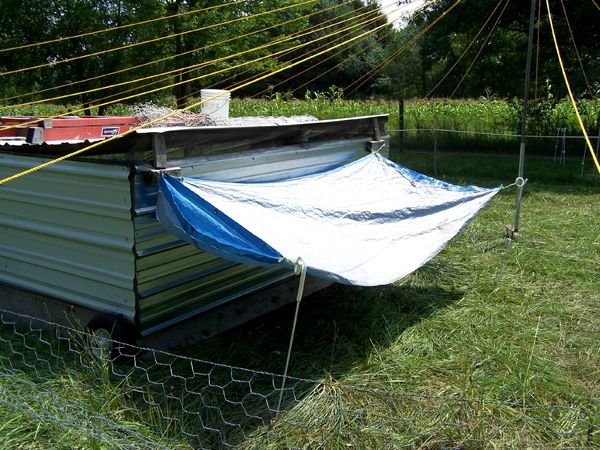
We found even with the vented back, the coop got hot. So we rigged up this tarp across the back.
Ability to move coop easily:
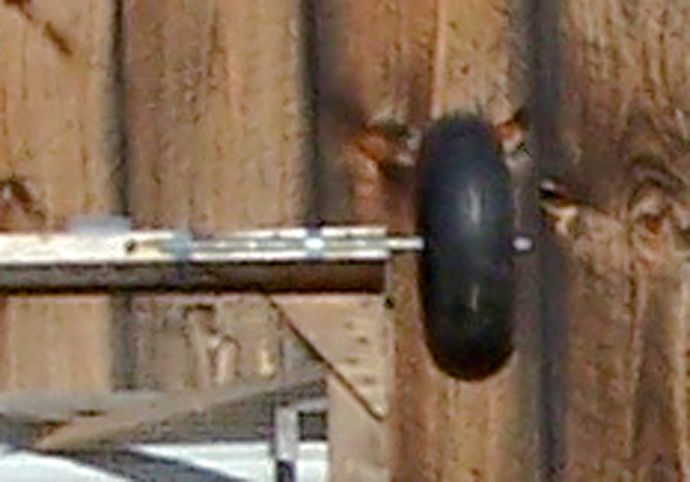
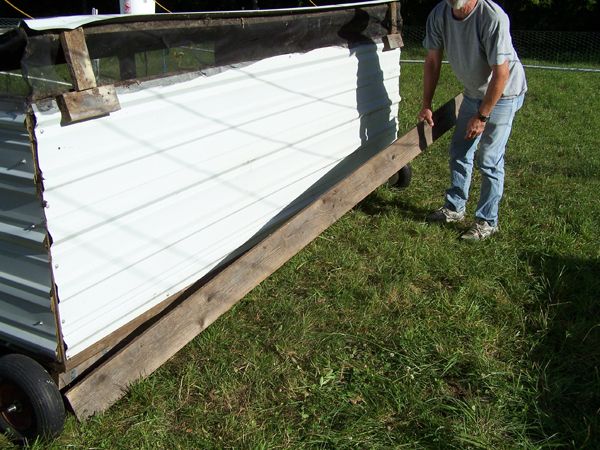
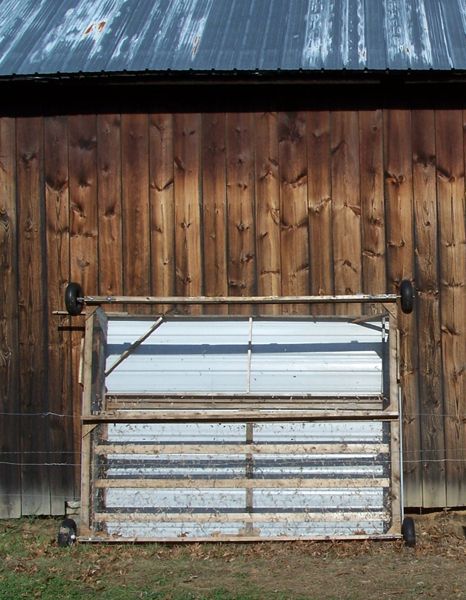
The wheels:
We drilled slightly smaller diameter holes than the threaded rod into the ends of the 2” x 4”. Each axle was 18” long and driven well into the 2” x 4”. The 2” x 4” was then supported with the metal strapping. On the axle, 2 locknuts were set to keep the wheel away from the coop. Then the wheel put on and a 3rd locknut to keep it on.
Moving the coop:
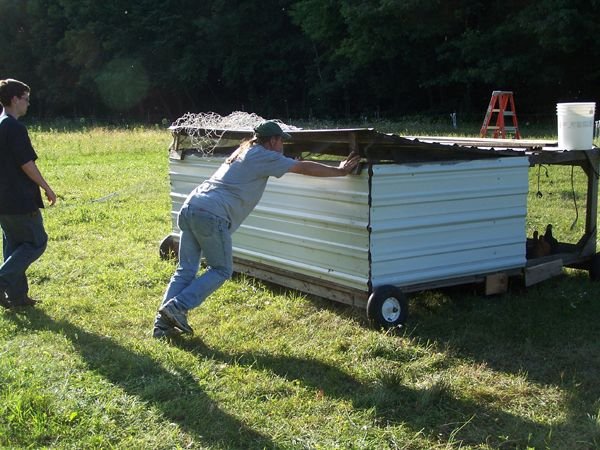
Empty the coop is easily moved by one person. Full, it’s a lot harder. To steer use the 2” x 6” x 10’ as a lever. Place an end well under either the front or the back, in the center, and lift and turn in the desired direction. When not in use, this was stored on the roof.
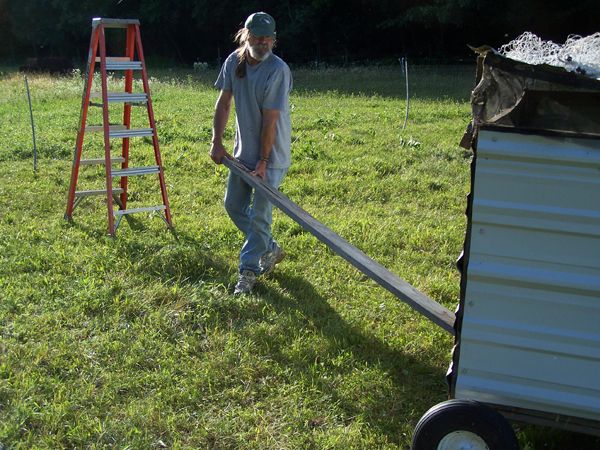
For turns with more room, the coop can be slowly maneuvered by one person pushing the back corner while another retards the diagonal front corner.
We almost always moved the coop with the birds still in, as it was easier than with birds running around helping. And when the entire pen moved, it contained them for the move.
To store the coop in the winter:
The frame was obviously not built to withstand snow loads. We tipped the front, with the screen ramps up, against the barn wall so the solid back was on the ground and the roof against the wall. This worked well for snow, but when ice came, it took out the ramp doors. We removed the doors before storing the second year.
Details of Building:
The side frames are 1” x 3” x 8’. The hardware cloth is stapled to the inside. The roofing is screwed to the outside. There’s a vertical support midway on the sides.
Bracing is as follows:
Corner braces of ½” CDX plywood triangles
Placed:
The 4 outside corners of each ramp, the 4 inner corners of the back wall, upper and lower corner of the side wall vertical support, the 2 corners on the front side walls on the outside.
We used hemlock throughout due to its better strength and better weathering ability.
Problems with design:
• It was not as easy to move as we hoped
• It needed a better turning system
• It was not as easy to get into to get birds as we had planned
• The hardware cloth floor held some of the manure
• There wasn’t enough feeder space, even though it was 96”
• The wheel design failed
• The join at the roof’s hinge leaked in heavy weather
So when this prototype started to fail also, we started back to the designing board. I will do a post on that later. Next up is the Pasture Pen.
.jpg)

THAT is a great set-up! Love that it's on wheels too so you can move it like a chicken tractor. GREAT design.
This post has been featured in the @offgrid-online Weekly Review curation: offgrid-online Weekly Review - Issue#2. Thank you for sharing you knowledge and experience :)
Now that is cool... made me think of a chicken circus... lol...
Some days, not far off, as in 3 ring..... :))
this is a great post! i'll point it out to ini as i think he'll find great interest. we followed one of justin rhode's designs last year, but with pvc to make a mobile chicken tractor (more lightweight with the pvc), but the birds aren't totally happy with it. we may look further into this one! thanks! and congrats on your @ocd!!!
Might wait until I get the next ones written, because things changed at the end.....
We did not use anything very lightweight due to our issues with wind out here (Salatin pen). Also, 75 - 80 birds weigh a lot and it must support them (pasture coop).