Permaculture - Zones and sectors, practical use and example (lesson 18)
During this lesson, I will try to prepare an overview plan of the distribution of individual elements on the plot using the "zone and sector" principles to make it easier for you to understand them. However, remember that this is only a demonstrative plan created in a few hours, so it will be very imperfect. Real plans are made for weeks or even months. This quick example should, however, be enough to describe the theoretical knowledge in more detail.
Step 1
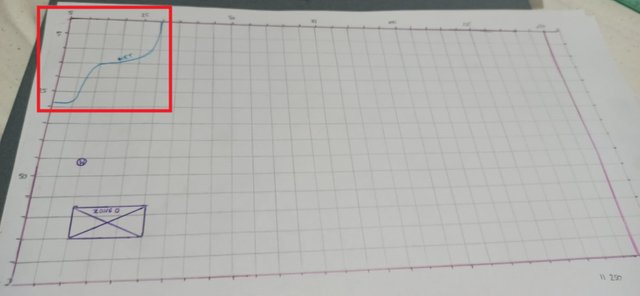
We have a plot of land slightly larger than 1.1 ha (11 250 m2). Each square is 5 meters by 5 meters (25 m2) in size. There is already a house on the plot (ZONE 0) and a well (a circle with the letter "W").
We start with a thorough examination of the plot and determining what specific zones are located on it. We note that the land in the northwest corner is slightly lower than the rest of the plot. In heavy rains, the water flows in that direction. So we mark a sector that is characterized by a special wetland.
Step 2
2)The second sector we will select will refer to the visuals. The neighbor opposite built cowsheds and barns right on the border with our plot. They are ugly and unattractive, so the land next to them will be characterized by an ugly landscape. Of course, the farther from the border, the less attention we pay to what is there. The sector will start right next to the neighbor's barns, and end 50 meters away.
Step 3
3)The third sector relates to security. It's a narrow strip on the side of the road that we call the "crime sector". By planting attractive fruit trees or good-looking vegetables in this space, we risk that someone will jump over the fence and steal our food.
Step 4
4)The next sector takes into account the greatest insolation during the day. We mark it as "sunny". The sun's rays can be a blessing to allow for vigorous vegetable growth, but they also threaten us by increasing the risk of fires on dry days. So I added "fire" to the description.
Step 5
5)In the corner opposite the house, furthest from our place of residence, you often encounter wild animals. This is a place frequented by deer, and there are also lots of birds. Let's call it the "wild animals sector". It is more intense in the place closest to the plot boundary and gradually decreases the closer to the house building.
Step 6
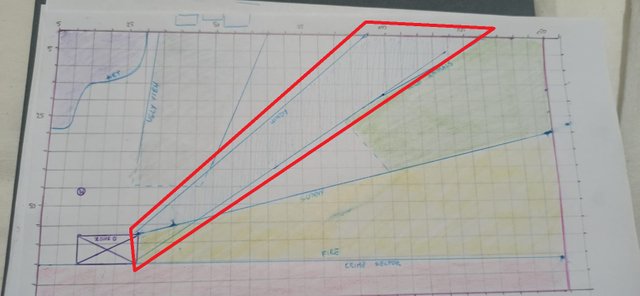
6)The next sector is marked as "windy" and it is the most common direction of winds blowing from the north to the south. After checking the area several times, it seems that these are all sectors worth mentioning. There may be many more of them - mark anything on your plans that you think might be useful. Better to have too many sectors than not to include something.
Step 7
7)We move on to marking the zones that were mentioned two lessons ago. The first zone will refer to the space 10-15 meters from the house in a straight line.
Step 8
8)The range of the second zone depends on the convenience of approaching individual places. I set the borders of the zone about 20 meters from the end of zone one. The borders don't have to be straight - look at an example. In the wet sector, where the ground slopes steeply, the second zone is moved a little closer to the house, skipping difficult terrain. Instead, I put it a little further just next to the east.
Step 9
9)The third zone was also arranged quite unevenly. In the north of the plot, where the ground is irregular, it extends only five meters from the second zone, while on flat terrain with excellent access from the road in the east - up to 30 meters.
Step 10
10)When designing the borders of the fourth and fifth zones, we included the distribution of the wildlife sector. Knowing that the fifth zone is a zone where we will not build or plant anything (left to nature), we have moved its borders so that it takes into account the location of wild animals. Instead, we've moved the edges of zone four farther east to a place closer to the road where there isn't much wildlife anyway.
While exploring the area, we noticed that at one point the land was rising slightly upwards. So we mark an additional sector, lofty calling it "hill", even though the elevation may be 1-2 meters, no more. This is an example to show that we should always be ready to introduce editing. Discovering additional factors that may affect the placement of individual elements should not be a problem.
Step 11
The next step will be to arrange the individual elements of the garden using all the tips I have included in the previous two lessons. Photos will be bigger so you can see well what I am writing about.
The fifth zone remains intact. In the fourth zone, however, we will place pastures, hives, bamboo grown for wood, firewood, trees, and medicinal shrubs.
We consider the placement of each element, trying to take into account as many factors as possible. Pastures, marked in yellow, are located right on the southern border of the plot. They are unattractive enough for people passing by - when there are no animals on them, it's just ordinary fields. In addition, the space at risk of fires should be occupied by grass rather than trees - this allows us to quickly notice the threat and easily extinguish the fire. If we had planted trees there, the fire would have been a much greater hazard.
Place the hives on a slight hill (blue). Bees, starting their flight a little higher, will not disturb us as much. The location of the hives is also as far away from the place where people and animals are, which is less burdensome for us and the bees themselves, which are stressed by the presence of other creatures. A slight hill is also better insolated - bees do not like shade.
The wet space will be perfect for growing bamboo (red), which likes moisture. The rest of the space in the zone is filled with trees and shrubs, from which we will obtain once or twice per year firewood, leaves, syrup, or bark used for medicinal purposes. Remember to plant wind-pollinated plants (dark green) in the zone with strong winds, those that are pollinated by insects closer to the bees, and in the sector with unfavorable views, you can plant vigorously growing plants - tall and/or with wide, dense tree crowns (light green).
Step 12
In the third sector we will put fields with grain, soybeans, and other beans, rainwater tanks, and fruit trees (orchard).
Cereals and beans (red), as less attractive and not suitable for spontaneous robbery, are placed in the sector right next to the road, in the south of the lot. An additional advantage is a fact that they prevent the spread of fire (they burn quickly, the flames are not high) and it is good to have them in the driest zone.
Fruit trees, as in the case of medicinal trees in the previous zone, are divided into wind-pollinated ones (dark green), located in the strong winds sector, and others (light green), closer to the hives.
Water tanks (blue) are placed in the sector where water collects quickly during any rainfall.
Step 13
The closer to the house, the more buildings, so the second sector is quite full.
Although our whole plot has some form of fencing, the second and the first sectors are additionally surrounded on three sides by a tall hedge (I will write about hedges and the best plants to create them in the next lessons). The hedge is to protect against cold winds and cut off the most practical part of the garden from the less aesthetic one, with fields and pastures. There will be wickets or passages leading to other sectors and the streets. The hedge is marked with a bright green color.
Near the house, on the eastern side, we have vegetables (dark green). Although the vegetables in the "crime sector" should not be located, we do not have to worry about it, because the hanging hedge made of thorny plants effectively protects us against theft.
The orange color is a pond with fish, which reflects the sun's rays from the water surface and additionally heats greenhouses marked in red. Greenhouses block the view of your neighbor's ugly buildings, reducing the negative impact of the ugly view sector. There are also henhouses (gray) adjacent to it, which makes it easier to maintain high temperatures on cold days in them. As in hen houses, apart from hens, we also have ducks and geese, they also benefit from the pond around.
The barns, which are located close to the water tanks (we can use rainwater for watering animals) and the composter (yellow), to which we can easily transport their feces, are marked in purple. A composter close to rainwater tanks allows us to quickly produce liquid manure.
In the zone, there is also a workshop (black), which is close to the barns and allows for quick shearing of our sheep, and easy transport of wool for further work. Next to it, there is also a worm farm marked in brown, used to enrich compost and soil in the garden and to feed fish.
The whole thing is enriched with fruit bushes, which would require too much work to be practical to leave them in the sector with fruit trees, further from the house.
Step 14
Zone one is described last. There are herbs here (purple), placed next to the kitchen, against two walls of the house - one for sunny positions and the other, partially darkened, so that different types of herbs with different requirements can be planted here.
I marked with red color the place where new plants will be planted and seeds for our garden will be obtained. This is an area that requires constant care, so it's good to have it close.
A space with decorative flowers, marked in blue, is in front of the building. Flowers, apart from their aesthetic value, can also have a practical function. It depends on us whether we decide to plant edible flowers, or whether we choose more pleasant, intense aromas or functions that attract birds, butterflies, or other useful creatures to the garden.
The entire space around, marked in yellow, is a recreational space with benches, maybe a swimming pool, or a nice attic. Instead of a lawn, however, we should allow the space to be overgrown with a meadow. I will write about it in the next lessons.
Ready work
Like mentioned at the beginning, it is just an example prepared in a few hours so do not consider it as the real plan. To make it well, you need to spend at least a few weeks projecting the garden. It's worth it though because the time saved in a long term is tremendous.
I hope you enjoyed this lesson and it helped you to understand and summarize the knowledge gained until now.
All my lessons are shared totally for free with a CC-0 license (which means you can copy my text and share it wherever you want to, without the need to mark me as an author). I hope it will bring you joy.
Previous lessons can be read here:
Fertilizers
2 - types of manure and when to use it
3 - Compost. Basics
4 - advanced composting
Soil and minerals
10 - Boron, Molybdenum, Copper, Magnesium
11 - Zinc, Calcium, Iron and other elements
12 - soil components: sand and clay
14 - soil components: calcium, microorganisms, minerals
15 - soil components, part four: water and air
Space
16 - Zone analysis
17 - Sectors in Permaculture
Thank you for reading,
@papi.mati


.jpeg)
.jpeg)
.jpeg)
.jpeg)

.jpeg)
.jpeg)
.jpeg)
.jpeg)
.jpeg)
.jpeg)
.jpeg)
.jpeg)
.jpeg)
I was wondering if you were familiar with growing microgreens and whether it would be feasible for people to grow them in countries under economic constraints. I had mentioned microgreens and growing plants from kitchen scraps to a member from Venezuela but I don't really know enough about South American countries.
The advantages that I can see with growing sprouts or microgreens include:
Fast turn around
Most greens can be harvested between 8-12 days
Maximizes Growing Area
Growing microgreens should be considered as growing them on an assembly line. Once the plants reach a certain stage of growth, they are moved to a different area. For the first days, the grow trays need to be compressed. This means they can be stacked. Then they need to be sprouted in a dark zone and the final days need to be in sunlight.
The disadvantages that I can see include:
Labour Intensive
Most crops that are planted in the ground require less attention. Once the plants are in the ground, occasional "maintenance" needs to be done, but usually, it isn't necessary to monitor your crops on a daily basis. Growing greens require watering on a daily basis. If the crop that you are growing takes ten days to mature, you need to check and handle ten trays twice a day.
More Watering
Normal cropping practices can expect that at least some precipitation will occur naturally. Growing microgreens means daily watering. Can people collect enough water and store it in cisterns or do they need to buy it?
Monetary Requirements
Growing microgreens require shelves, trays, growth mediums, and more seeds. One aspect of growing microgreens is that it is possible to scale up an operation quite easily. This allows a person to grow more than their particular requirements. If the society is amenable to eating greens, this could provide an income flow to pay for the added costs. While it is less effective, a paper towel can be used for the growth medium.
Here is a video to review the process:
Do you think that this could be a series that you could do in addition to your Permaculture series?
That sounds like a good idea for one of the future lessons. After the chapter about land design, I can focus on the food producing in the apartment, including microgreens and kitchen scraps.
Thanks!
Are there any "weeds" that would be easy to harvest the seeds for this purpose? I am asking for the person in Venezuela.
Are you asking about plants from the wild? I don't know much about tropical climates and I have never been to Venezuela to see what grows there, so I can only recommend that amazing website to get inspired by the things which could be harvested and grown at home
http://tropical.theferns.info/
Speaking about regular greens, a lot will grow. The simplest and most accessible will be beans to make bean sprouts. I will try to prepare 10-15 examples of the "weeds" to grow at home as sprouts