S19-Wk6: Amplifier circuit design

As teachers at the Electronics Academy, we are delighted to present the final lesson of our workshop.
But before we proceed, we would be grateful if you would watch our appreciation video below:
Lesson 6 could be one of the easiest for the students who completed all the previous lessons.
Over the past few weeks, each student has had the opportunity to acquire valuable knowledge, learning both theoretical concepts and practical skills. They have challenged their minds and developed new understanding. Now, we look forward to seeing this knowledge reflected in their work during this final lesson.
In this lesson, we want you to apply the knowledge acquired in Lesson 4, where you worked with transistors and their data sheets, to build an amplifier.
Please note that you will be using various tools, including a multimeter, soldering iron, tweezers, and other necessary components to manufacture the amplifier.
Next, we will present four diagrams of varying complexity. The goal is for you to choose one of these amplifiers, build it, and demonstrate its functionality through images and videos. You can also use this project at home.
If you were to purchase this device in the market, it might be quite expensive, but now you have the opportunity to build it yourself! Isn't that exciting?
Diagram 1
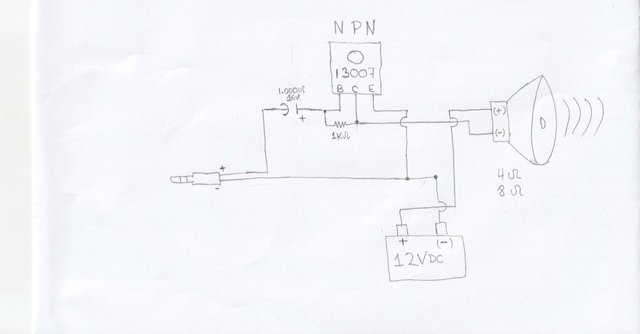
To make the amplifier in the diagram you will need:
Transistor 13003, 13007, 13009 or one of their replacements.
3, 4, 8, 8, or 16 ohm horn (or speaker) 🔊
Audio plug
1 k resistor
1000 UF 16v capacitor
12 vdc power supply
Soldering iron
Tin.
Diagram 2
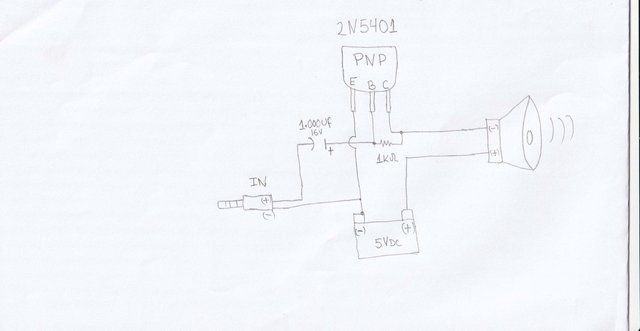
To make the amplifier in the diagram you will need:
2N5401 transistor or any of its replacements.
3, 4, 8, or 16 ohm horn.
Audio plug
1k resistor
1000 UF 16v capacitor
5 or 9 vdc source
Soldering iron
Tin.
Diagrama 3
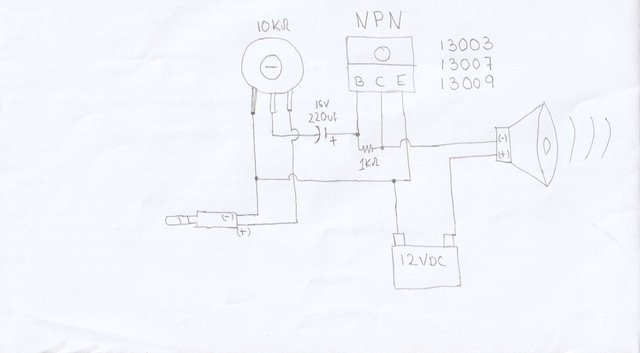
To make the amplifier in the diagram you will need:
Transistor 13003, 13007, 13009 or one of their replacements.
3, 4, 8, or 16 ohm horn.
10k potentiometer or any other you can find.
Audio plug
1k resistor
1000 UF 16v capacitor
12 vdc power supply
Soldering iron
Tin.
Diagrama 4
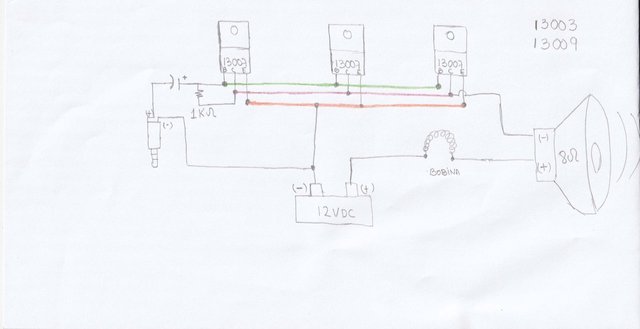
To make the amplifier in the diagram you will need:
3 Transistor either 13003, 13007, 13009 or any of their replacements.
3, 4, 8, 8, or 16 ohm horn.
Heatsink
Copper wires
Audio plug
1 k resistor
Air or ferrite core coil
1000 UF 16v capacitor
12 vdc source
Soldering iron
Tin.
Task 1: Choose one of the diagrams above and build the amplifier presenting the step by step, tutorial style.
Task 2: Carefully touch the transistor and explain: why do you think this phenomenon occurs?
Present it in the best possible way, be creative, ingenious.
Task 3: Show a video of your favorite song playing on the amplifier you just built, as we would like to celebrate the success of your assignment with music.
Task 4: As you reflect on the past 6 weeks of classes, how proud are you of what you've been able to create and accomplish using the knowledge and skills you've gained?
To help you appreciate how easy these circuit can be made and how it works, watch the video below:
Instructions :
- Please kindly read all the instructions we have on our post entitled: Reminders For Students in Electronics Academy. We would be working with those instructions STRICTLY

The participation schedule is between Monday, August 12th, at 00:00 UTC to Sunday, - August 18th, 2024 at 23:59 UTC.
DO NOT wait till the last minutes to submit and create unnecessary arguments about time zone, you have the whole week to do your tasks., use it
Feel free to post in any language hence it can be translated on google translator
Please make sure to include our tag #electronicss19w6 among your first four tags for easy search.
Post the link of your assignment in the comment section of this lesson.
Avoid unnecessary long and irrelevant introductory
All our instructions are supper important and all participating students are advised to read and understand those rules/regulations.
Note to community curators:
Please NO community curator should use the SC account to vote any assignment in the "Electronic Academy" when such post is not verified yet by any of the professors.
Note to students:
Additional efforts will be taken into account , so try to be creative , original and show your interest in learning .
This lesson is more of practical because we are heading to somewhere. If you have completed all the tasks, please kindly wait for the professor's comments and continue studying to be prepared for the sixth week.
Goodluck
The Electronic Eagles Team
Ha sido un verdadero privilegio haber participado en esta idea innovadora de Steemit, el programa educativo por medio de clases, ha sido un éxito, lo siento así y lo confirmo.
Cada participante se considera un alumno, así haya realizado una sola lección, y es así porque con el solo hecho de tener la voluntad de participar y de aprender algo nuevo, se ha ganado el respeto de todos nosotros como profesores de un área que no es fácil trabajar.
Espero que ese conocimiento que han adquirido sirva para aplicarlo en su vida diaria, estoy seguro que muchos ya no tendrán temor de destapar algún artefacto, diagnósticar fallas y repararlas.
Sabemos que falta mucho por aprender y por esa razón nos seguiremos postulando, para que esté conocimiento se siga expandiendo.
Éxito para todos, espero ver tutoriales de estos alumnos muy pronto.
Dear Students:
Our last week electronic teaching assignment has started. Congratulations to all the students who participated in the teaching assignment.
I am giving some advice to the students. Completing the electronic assignment every student has learned about electronic components and electronics circuits. Through this education, you will dare to open your home electrical or electronic equipment if it is damaged. Then by applying the knowledge gained from our assignment you will be able to fix the equipment. You need mental strength and courage only then you will succeed.
For example, an electric rice cooker does not turn on suddenly. You dare to open the rice cooker step by step. Then you measure the input voltage first with a multimeter. Then you check the fuse or auto circuit. Looks like you've got a rice cooker problem. I mentioned the rice cooker as an example. You can troubleshoot all electrical and electronics equipment.
I thank our team leader @ubongudopot of our eagle team for working hard for the students. Then @rmm31 is very knowledgeable as an electronic teacher. I feel privileged to participate with them.
I will feel blessed to be a professor in the Electronic Eagle team if you benefit through us. There is a large area of electronics including power electronics and digital electronics. If possible and opportunity we will try to give you more electronic knowledge. Good luck to everyone.
Congratulations, your comment has been successfully curated by Team 7 via @𝐢𝐫𝐚𝐰𝐚𝐧𝐝𝐞𝐝𝐲
Wow...
Thank you to the electronic team for
all the wonderful lectures.
Building the amplifier is really a
wonderful way to end the season. It's more like a souvenir for all our
hard work.
I can't wait to get started.
But from my perception it seems it's
not going to be really as easy as the previous tasks so I'll like to know are
we open to ask questions when we encounter difficult? Cause I'll really
like to build a functional amplifier.
Thank you once again professors.
Sure, you are free to ask questions, however, all what you need is on the diagram.
Hola vamos avanzando un poco mas en el aprendizaje en esta oportunidad un circuito mas completo. Me disculpan si me equivoco revisando los diagramas observé que en el #3 en el símbolo de capacitor dice 220 μF, pero en la lista de materiales dice capacitor de 1000 μF 16 V, solo quiero aclarar mi duda muchas gracias ya estoy ubicando los componentes para mi participación.
Saludos
Use 1000 μF by 16 V capacitor.
Waiting for your entry soon!!
Gracias por su pronta respuesta.
Saludos
https://steemit.com/hive-188837/@manuelhooks/amplifier-circuit-design
https://steemit.com/hive-188837/@udyliciouz/s19-wk6-amplifier-circuit-design
Mi participación:
https://steemit.com/hive-188837/@naka05/s19-wk6-diseno-de-circuitos-amplificadores