[Crafty Content] How to make a "Day and Night" painting |🌞|Como hacer un cuadro "Dia y Noche" | TUTORIAL 🎨 [ENG-ESP]
.jpeg)

Hello, dear family ❤️
This new day I bring you another new and fun step by step where I will show you how to make a beautiful painting with a yin and yang film of the day and night, which is undoubtedly a perfect image to decorate our favorite walls giving that creative and personal touch, and the best of all is that it is made of super cheap materials and very easy to get. So, I invite you to continue enjoying this fun journey, perfect for developing everyone's creativity, especially our children.
Hola familia ❤️
Este nuevo día les traigo otro nuevo y divertido paso a paso donde les mostrare como realizar un lindo cuadro con un pelicular yin y yang del día y la noche, que sin duda es una perfecta imagen para decorar nuestras paredes favoritas dando ese toque creativo y personal, y lo mejor de todo es que esta hecho de materiales súper económicos y muy fáciles de conseguir. Así que, los invito a seguir disfrutando de este divertido trayecto, perfecto para el desarrollo de la creatividad de todos, especialmente de nuestros niños.
What are they waiting for?
Thanks to this technique we can create our own painting day and night, in addition, a beautiful work done at home is a creative and very inexpensive way to give a touch of joy to our environment. Before we start, let's not forget to wash our hands.
¿Qué están esperando?
Gracias a esta técnica podemos crear nuestro propio cuadro de día y noche, además, una hermosa obra hecha en casa es una manera creativa y muy económica de darle un toque de alegría a nuestro entorno. Antes de comenzar no olvidemos lavarnos nuestras manos.

[Materials | Materiales]
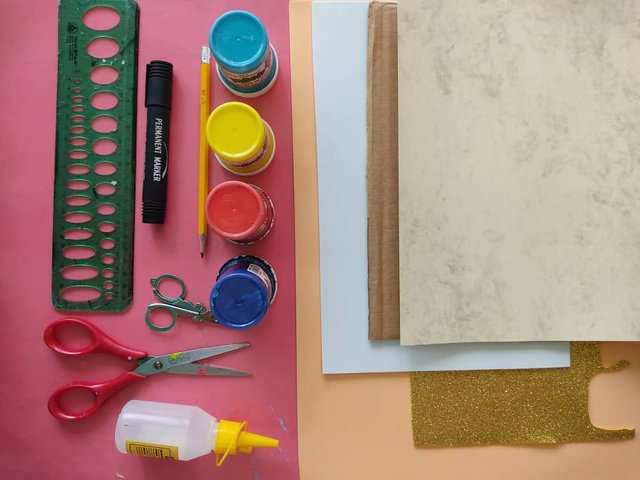
To make this cute work we will need:
- Molds.
- Foamy or eva foam.
- Vegetable paper or tracing.
- Cardboard sheet.
- Rule.
- Pencil.
- Bookmark.
- Scissors.
- Cutter.
- Brush or brush.
- Paintings.
- Liquid silicone or glue.
Para realizar esta linda obra necesitaremos:
- Moldes.
- Foamy o goma eva.
- Papel vegetal o calco.
- Lamina de cartón.
- Regla.
- Lápiz.
- Marcador.
- Tijera.
- Cúter.
- Pincel o brocha.
- Pinturas.
- Silicón liquido o pegamento.
Procedimiento (paso a paso)
Process (step by step)

First, we draw a circle of approximately 15cm in diameter, and in the center, we draw a curve that will divide it in two, then on one of the two sides we make the sun in a very original way, and on the other, we make the beautiful moon with clouds and stars to simulate the night.

Primero, dibujamos un círculo de aproximadamente 15cm de diámetro, y en el centro dibujamos una curva que lo dividirá en dos, luego en uno de los dos lados elaboramos al sol de una manera muy original y en el otro hacemos a la hermosa luna con nubes y estrellas para simular la noche.

Once the desired drawing is ready, we start cutting, separating only the sun, the moon, and the clouds.

Una vez que esté listo el dibujo deseado, comenzamos a recortar separando tan solo el sol, la luna, y las nubes.

Next, we make the 15cm diameter circle on a white foamy sheet.

Seguidamente, elaboramos el círculo de 15cm de diámetro sobre una lámina de foamy de color blanco.
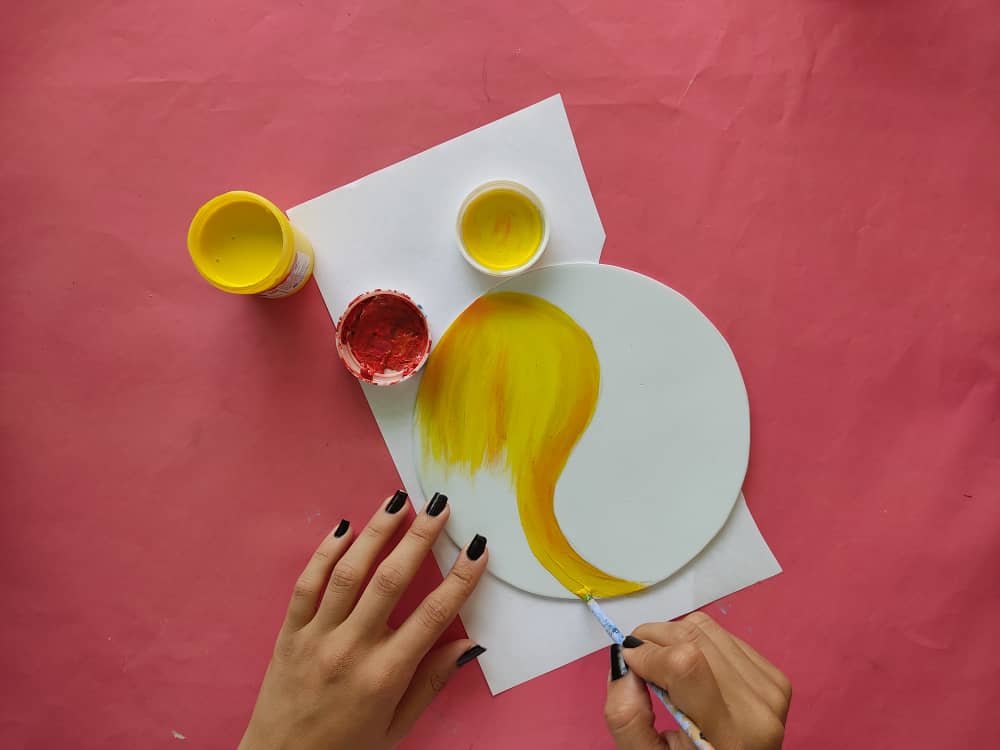
Now, we paint this circle in the shape of a yin-yang but this time with yellow and blue colors, which will represent the day and night.

Ahora, pintamos este círculo en forma de ying yang pero esta vez con colores amarillo y azul, que representarán el día y a la noche.

Following this, we made a beautiful black design using a very fine and delicate brush.

Seguido de esto, elaboramos un hermoso diseño de color negro utilizando un pincel muy fino y delicado.

Now, we begin to paint the sun combining beautiful colors such as yellow and orange in the way that we like the most.

Ahora, comenzamos a pintar el sol combinando hermosos colores como lo son el amarillo y el naranja de la manera que más nos guste.

Then we mark the edges and define his face in black with the fine tip brush.

Luego, marcamos los bordes y definimos su cara en negro con el pincel de punta fina.

Now, we paint the moon in this case we paint it in light blue and navy blue colors.

Ahora, pintamos la luna en este caso la pintamos de colores azul claro y azul marino.

Next, we define its details and face using the fine brush and black paint.

Seguidamente, definimos sus detalles y cara utilizando el pincel fino y pintura negra.

Afterward, we make some small stars in frosted golden foamy, to decorate the night part of our beautiful painting.
.jpeg)
Después, elaboramos unas pequeñas estrellas en foamy dorado escarchado, para decorar la parte nocturna de nuestro hermoso cuadro.

Once all the pieces are ready, we begin to put together this beautiful circle by day and night by gluing the sun on the yellow part and the moon plus the clouds on the blue part, not forgetting the stars.

Una vez listas todas las piezas, comenzamos a armar este hermoso círculo de día y noche pegando el sol en la parte amarilla y la luna más las nubes en la parte azul, sin olvidar las estrellas.

Then, we make a cardboard base measuring 24cm by 18cm and paint it blue. And when it is completely dry we mark its edges with the black marker and the ruler so that it looks like an elegant frame.

Luego, fabricamos una base de cartulina de 24cm por 18cm y la pintamos de color azul. Y cuando esté totalmente seca marcamos sus bordes con el marcador negro y la regla para que luzca como un elegante marco.

To finish, we glue the circle in the central part of our base using cold silicone, and finally, we glue our cute box to a thick cardboard base so that it is more firm.

Para terminar, pegamos el círculo en la parte central de nuestra base utilizando silicón frío, y finalmente, pegamos nuestro lindo cuadro a una base de cartón gruesa de manera que esté tenga mayor firmeza.

Thanks for joining and I hope you enjoyed it. ❤️
Gracias por acompañarme y espero que lo hayan disfrutado.❤️
.jpeg)
.jpeg)
.jpeg)
.jpeg)
.jpeg)
.jpeg)
.jpeg)

Congratulations, your post has been upvoted by @dsc-r2cornell, which is the curating account for @R2cornell's Discord Community.
Very much dear
Thanks for promoting Steem by sharing you post on twitter
( If you no longer want to receive notifications and upvotes from us, reply to this comment with the word
STOP)Esta genial ese trabajo amiga!
Lindo como siempre!
#onepercent
#venezuela
#affable