SIZ Tutorials | How to Create a System Restore Point in Windows 7 by @hidayat96
Hello Steemians. Hello friends of Steem Infinity Zone.
Meet me again @hidayat96, on this occasion I will try to discuss how to Create a System Restore Point in Windows 7.
Our computers do not always run smoothly. There are times when there are problems that are difficult for us to solve. This problem sometimes occurs after we install software, install drivers or change some settings on our Windows computer.
However, in order to restore it to its original state, System Restore requires a Restore Point. In this Restore Point, all information about Windows registration and settings will be stored, so that when an error occurs we can easily return to that point.
Below you can all listen to a tutorial on how to create a system restore point in Windows 7.
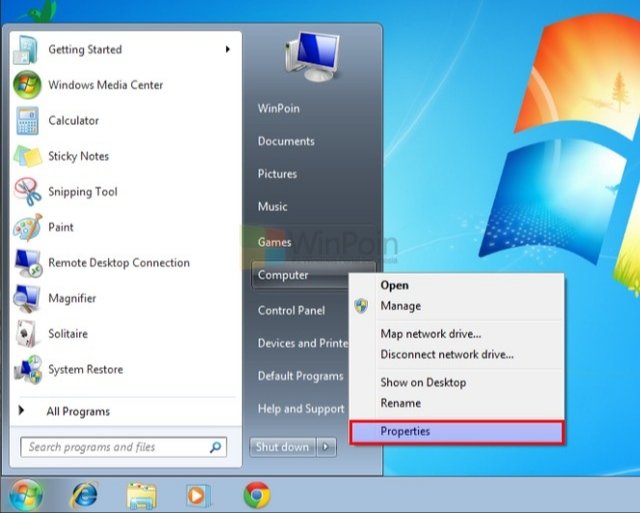
1. Open Start Menu -> Right Click My Computer -> Properties
2. Select System Protection

3. Click Create

4. Enter a description of the Restore Point that you want to create, then click Create.

5. System Restore Point has been successfully created

This System Restore Point will later be useful for restoring the condition of your computer system to the point where you created the Restore Point.
Tips for creating Restore Points
Although Windows automatically creates restore points within a certain period, it's a good idea to create your own restore points manually when:

Every time will install software that changes the system.
Every time you install software that is "less reliable" and you still doubt the quality.
Every time you run software that changes the system, for example, such as registry cleaner, system tweak optimizer and so on.
That way if a problem occurs in your Windows, then you can restore it easily. How to restore Windows using System Restore you can read here.

That's how I made this tutorial. Although the tutorial is short, I hope that my post can be useful for all of you. I thank you all for taking the time to read my post.
In the end let me say Thank you. 😊
About me


nice
very informative information
Thank you bro @qadeerasghar 👍
Good post dear friend keep it up bro
Thank you very much bro @faran-nabeel 😊