SIZ Approved Course || IOT And Home Automation || Lecture 1 || 20% pay out to siz-official
Greetings SIZ From @Ammar79

The title of this Lecture is Introduction to Microcontrollers
Lecture Outlines
- Basics of Electronics
- hardware information
- software installation
- attach Microcontroller with PC
- Write Hello word program on Microcontroller

because we have to work physically on a microcontroller that's why video lecture is necessary for Clear understandings. I published A Video for this lecture on youtube, There I have taught everything.
Although I described everything in the video some important things need to be described here
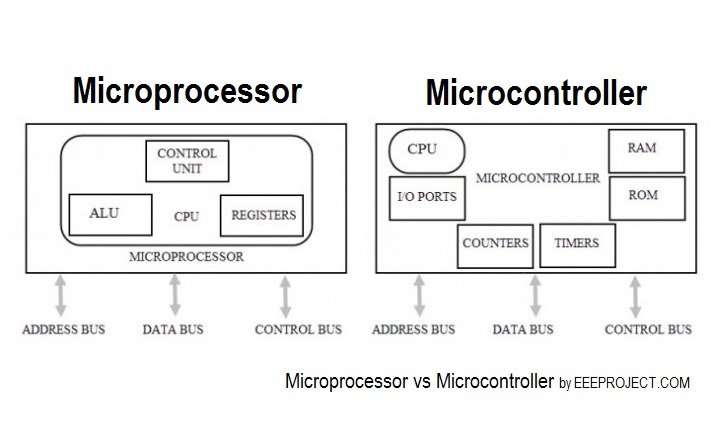
Defference between microcontroller and micro processor
in the first segment of our video, I described basic information of microcontroller and the difference between microcontroller and microprocessor with a diagram here I am again sharing it
Arduino IDE Installation
In the next section, I described to installation method of Arduino ID. First, we need to download arduino IDE
from this link
Download Arduino IDE
after that, we just need to extract the downloaded zip file. to run the IDE just go to the extracted folder and double click on arduino.exe.
Board installation
After Running IDE we need to install the Board on Arduino IDE for this go to file and select preferences or press ctrl+ comma key

A new Dialouge box will be appear. Go to Aditional boards Manager URLs

replace Url with this
https://dl.espressif.com/dl/package_esp32_index.json,http://arduino.esp8266.com/stable/package_esp8266com_index.json
Now you can download Board from the internet and install it to your IDE for this got to "Tools" in the menu bar then click on "board" then click"board manager.."

After that Boar Manager Will be open go to the Search option and type "esp32"

here you can see ESP32 in the search results. just click on install to install it (I have already installed it that's why install button is not highlighted )
Now you are ready to Go to program your microcontroller just connect Microcontroller with USB and Upload your first code in microcontroller I describe Each and every step in my video
I hope Every one Understand the first lecture I am waiting for your Feedback in comment Section
Good one Post dear friend you make a very good post thanks for sharing a good information with us your information is very helpful for beginners. My best wishes for you.
Regards,
Faran Nabeel
Thank for appreciation.... at the end of this course ,We will going to make a home Automation project
Thank you very much for sharing your quality content in detail on the SIZ Community. -We gave you support to this post from the siz official account. Congratulations ! Keep producing content in the SIZ Community . :)
You can delegate your SP to @siz-official and take benefit of our Delegation Rewards Offer of receiving up to 200% Curation Rewards
You can check our Steem Investment Plan and Receive 5% Profit Monthly
Thank you @siz-official i will be continue my efforts in spreading IT. Knowledge.