Crypto Academy / Season 3 / Week 5 - Homework Post for Professor [@yousafharoonkhan] : Death Cross & Golden Cross, How To Use Binance P2P Trade
This is my homework post for Steemit Crypto Academy Season 3 Week 5 for Professor @yousafharoonkhan’s lesson Death Cross & Golden Cross, How To Use Binance P2P Trade.
Note : I performed this task on Microsoft Windows 10, Google Chrome browser.

Question 1
Define Death Cross and Golden Cross in your own words. And what is the significance of DC and GC in trade? And what effect do these two have on the market? (in your own words.)
Golden Cross and Death Cross are conditions when two Moving Average lines (one long term and one short term intersect on the chart. This is a signal that in the near future there will be a change in the direction of asset price movements in the market. Both are statistical analyzes that can be used by traders to determine their next steps.
1.a. Golden Cross
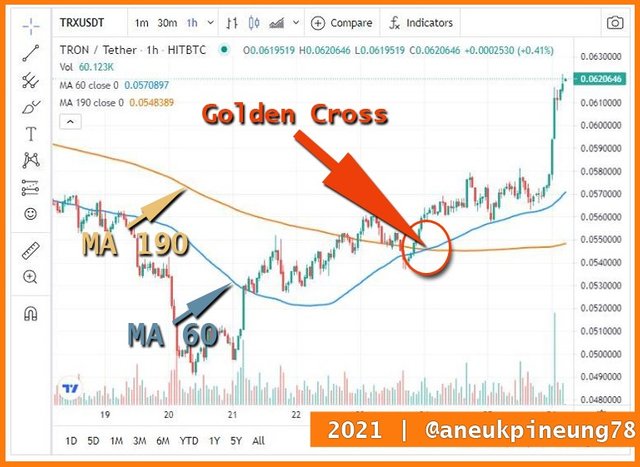
Golden Cross occurs when the short term moving average line which is below the long term moving average line crosses the long term moving average line. So, to put it simply, these are stages to identifying the Golden Cross:
- It starts when the market shows a downtrend where the short term moving average line is below the long term moving average line,
- Followed by a change in the trend to an uptrend,
- The short term moving average crosses the long term moving average line and then the short term moving average stays above the long term moving average line.
The Golden Cross is a first signal that the market will experience a bullish trend, due to an increase in the market confidence in the asset in the market, which indicates a massive buying of the asset.
There are three things to consider when identifying a Golden Cross:
- Golden Cross accompanied by high trading volume will strengthen the bullish signal;
- The larger the timeframe chart, the stronger and longer the Golden Cross signal effect appears. In other words, the signal that emerges from a combination of the MA 50 and MA 200 is considered better than the combination of the MA 5 and MA 15 in fast-paced trading in one or two day periods.
- In short-term trading, the Golden Cross signal on the Moving Average can be combined with other indicators such as the Oscillator to get a more precise picture of when the uptrend is overbought.
Below is the example picture of a Golden Cross. It is the TRXUSDT price chart with MA 60 MA acts as the short term MA, and MA 190 as long term MA.
1.b. Death Cross
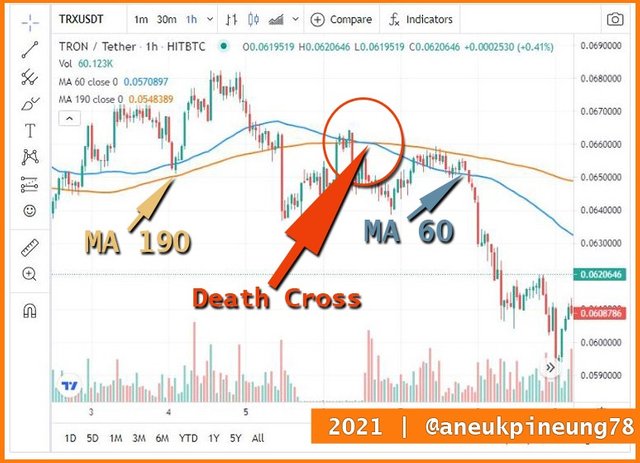
The Death Cross is the opposite of the Golden Cross. If the Golden Cross is a positive signal of the asset price movements in the market, then the Death Cross is the opposite signal. The Death Cross indicates that a bearish trend will occur because it indicates that there is a massive release of assets in the market. In other words, it is the first signal of a bearish market.
Death Cross occurs when the long-term moving average line crosses the short-term moving average line from below. So, to put it simply, the stages for identifying the Death Cross are:
- It starts when the market shows an uptrend where the long term moving average line is below the short term moving average line,
- Followed by a change in the trend to a downtrend,
- The long term moving average crosses the short term moving average line and then the long term moving average stays above the short term moving average line.
Below is the example picture of a Death Cross shown on the TRXUSDT price chart with MA 60 MA acts as the short term MA, and MA 190 as long term MA.

Question 2
Explain the points given below.
- How many days moving average is taken to see Death cross and Golden cross in market for better result and why?
- How to see death cross and golden cross on the chart.
- Explain Death cross and Golden cross on the chart.
2.a. How many days moving average is taken to see Death cross and Golden cross in market for better result and why?
People can use any combination of short term and long term moving averages they want and there is no one specific formula that is claimed to be the best, but the most popular Moving Average combination used is 50 MA for short term and 200 MA for long term. Another popular combination is 5 MA and 15 MA. The combination of 50 MA and 200 MA provides a more reliable signal to the direction of the trend, in the case of long time trading (more than two days), while the 5 MA and 15 MA combination is said to be a good combination for an intraday trading.
2.b. How to see Death Cross and Golden Cross on the chart
To see both crosses on the chart, we need to set up for two MAs on the chart, the short term MA and the long term MA. Once the MA lines cross each other, then we have the cross, whether it is the Death Cross or the Golden Cross.
2.c. Explain Death Cross and Golden Cross on the chart
For this task I will use the BTTUSDT price chart on a 1 hour timeframe, with MA 5 as the short term Moving Average and MA 15 as the long term Moving Average.
2.c.1. Death Cross
The following picture shows the Death Cross experienced by the BTTUSDT pair as seen on the chart on coiningecko.com.
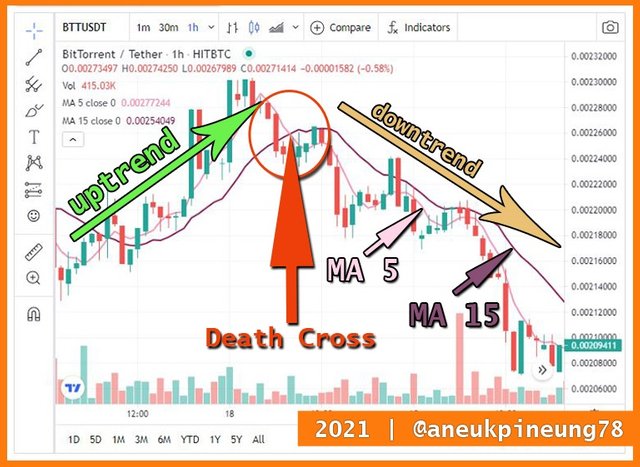
The above chart tells us that before the intersection of the two MA lines, the long term MA 15 line was below the short term MA 5 line when the market was bullish. Then the long term MA 15 line crossed the short term MA 5 line from below, and continued to be above the short term MA 5 line as the market became bearish. After the intersection, the long term MA 15 continues to be above the short term MA 5 in a bearish market.
2.c.2. Golden Cross
The following picture shows the Golden Cross .
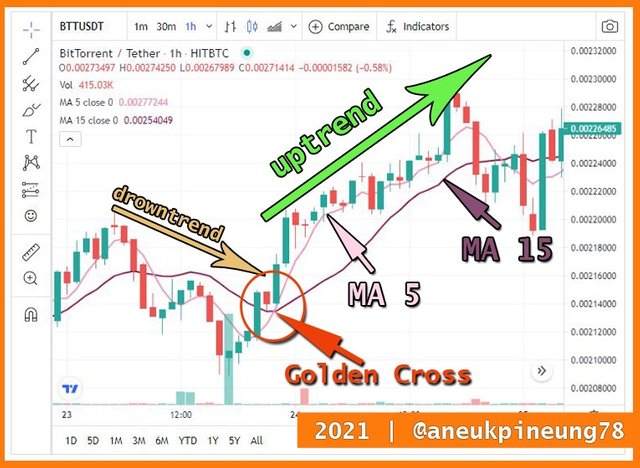
We can tell by the chart that it was a bearish market when the short term MA 5 line was below the long term MA 15 line. When the short term MA 5 line crossed the long term MA 15 form below, it is called the Golden Cross as the first signal of the bullish market. After the intersection, the short term MA 5 continued to be above the long term MA 15 and the market became bullish.
Question 3
- What is Binance P2P and how to use it?
- How to transfer cryptocurrency to p2p wallet?
- How to sell cryptocurrency in local currency via?
3.a. What is Binance P2P and how to use it?
3.a.1. What is Binance P2P
Binance P2P is a peer-to-peer (P2P stands for peer-to-peer) trading platform provided by Binance. The characteristics and advantages of Binance P2P are as follows:
- it allows users to buy and sell digital currencies using fiat (local currency),
- it offers consumers the freedom to choose their preferred trading partners (counterparties),
- it gives users the freedom to determine mutually agreed payment methods in the trades they carry out,
- it allows users to transact at their preferred price,
- low transaction fees, takers are not charged anything while makers are only charged a very small fee.
Peer-to-peer trading is prone to fraud if either party is not careful enough. In this case, Binance is present as an intermediary by offering a security system that protects the parties and prevents them from experiencing losses. Binance's security system is:
- Identity Verification. Identity verification is the most important thing needed to be able to enjoy services on Binance, including P2P trading (Binance P2P). In identity verification, prospective users are asked to prove their identity, including by submitting an identity card number and a clear photo that shows their face and identity card. The goal is to ensure that users trade on Binance under their real identities.
- Escrow Service. This is a method of protection by locking the traded crypto assets. Binance locks up traded assets to ensure no fraud occurs. For example, the buyer does not pay after getting the crypto he bought. Or it could be, the seller doesn't send the crypto after receiving the payment. So, the assets being traded are locked by Binance, and will be released to the buyer after payment is made by the buyer and received by the seller.
- Customer Support. Customer service can be leveraged by users to resolve issues that may arise between users in their trading. In addition, with this method, a user can also report a user who he thinks is cheating so that other users avoid becoming victims.
3.a.2. How To Use Binance P2P
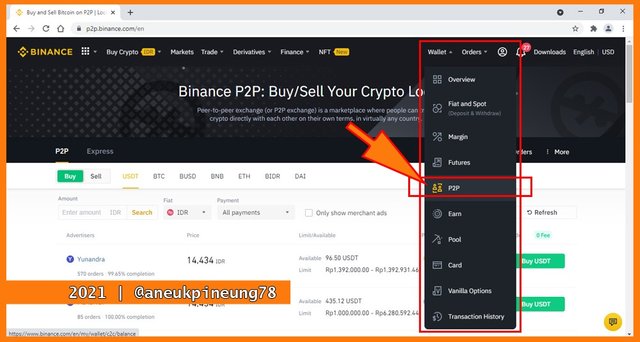
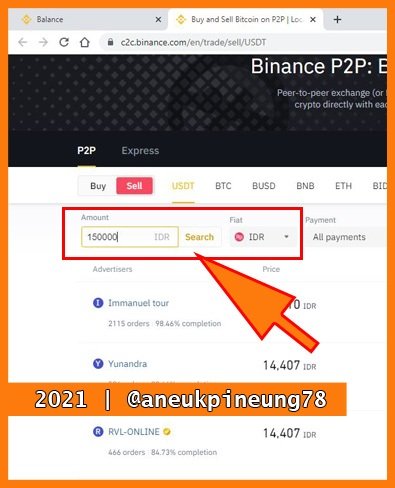
To make a purchase or a sale using the P2P method on Binance, users can do it on its PTP page at https://p2p.binance.com/en. Here is a screenshot of the Binance P2P page.
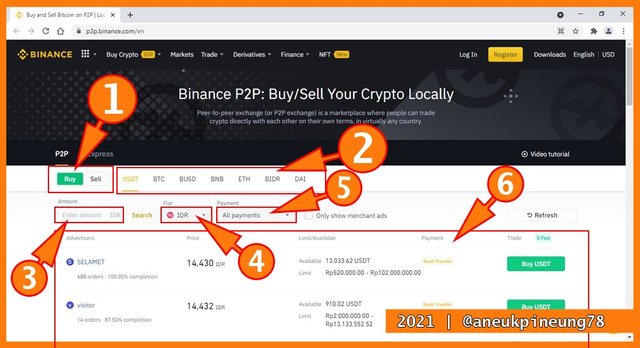
In the image above I have given some numeric markings. The explanations for the markings are:
- Number (1) : This button is used to determine whether a user wants to buy or sell crypto assets.
- Number (2) : This is a selection of crypto assets that can be directly selected for trading.
- Number (3) : This is a message box to fill in the amount of fiat that will be used.
- Number (4) : Box to fill in the type of fiat to be used.
- Number (5) : Dropdown list to select the desired payment method.
- Number (6) : A box that will show the search results after all parameters ( numbers 1 to 5) are filled in and executed by pressing the [Enter] key on the PC keyboard or relevant key on another operating system. (Note: I did this task by using Microsoft Windows 10 PC)
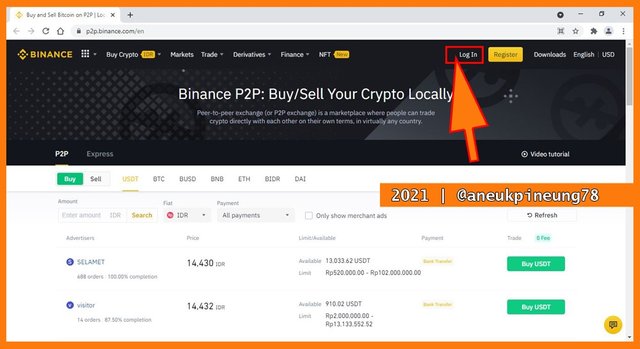
Binance P2P trading is only possible if the user has logged into their Binance account. I will log in by pressing the [Log In] button at the top right of the Binance P2P webpage. See the following picture.
Filled in my credentials.
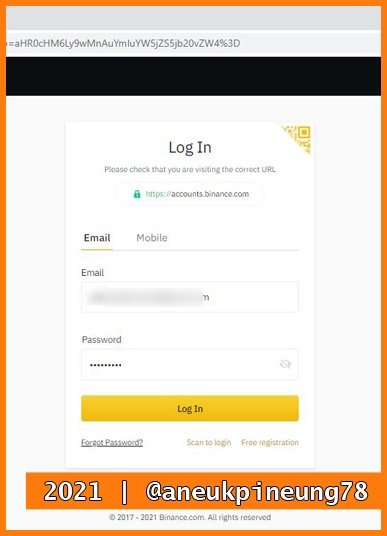
I was successfully logged in. Now I can proceed whether I wanted to buy or to sell, or maybe both.
Users can also perform the Binance P2P trade via their wallets. To go to the P2P feature in the wallet, users can hover their pointer to the [Wallet] button on the upper right menu bar. It will generate a dropdown list. From the list, users can choose P2P option.
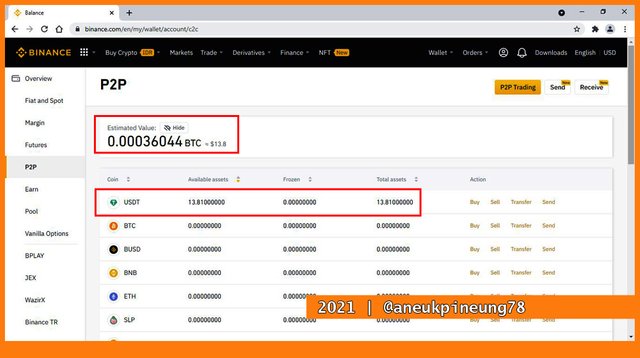
The image below shows us the P2P feature in the wallet.
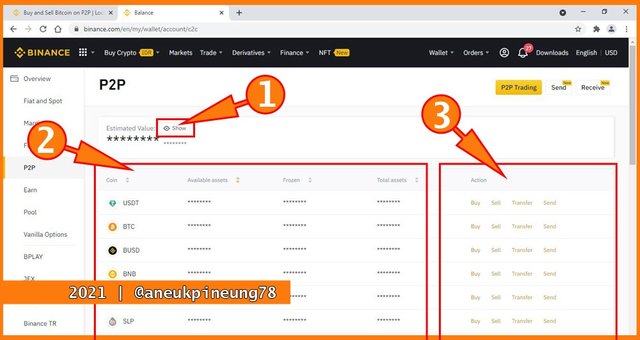
As shown in the image above, on this page, all figures related to financial balance are disguised with asterisks. To remove the asterisks and show the actual nominal figure, the user can click on the [Show] button as indicated by number (1) in the image above.
The marked number (2) is a column that shows list of the the assets. These assets are separated into three categories: available assets, frozen, and total assets.
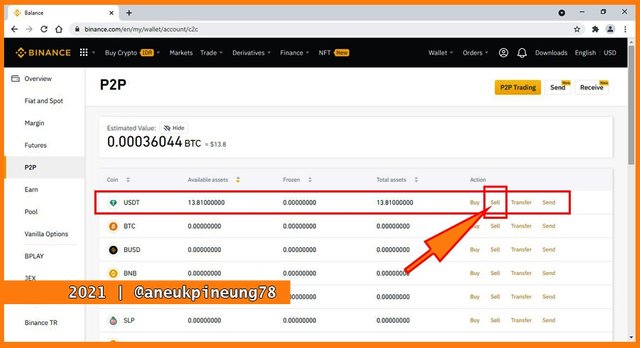
While number (3) is the Action section, where the user can decide what to do with a particular asset: buy, sell, transfer, or send. The difference between transfer and send is:
- Transfer is sending inter-wallet assets owned by one account, for example User1 sending assets from his Fiat and Spot wallet to his P2P wallet, and vise versa.
- Send is sending assets from one account to another account.
3.b. How to transfer cryptocurrency to P2P wallet?
I have 13.81 USDT in my Binance Fiat and Spot wallet.
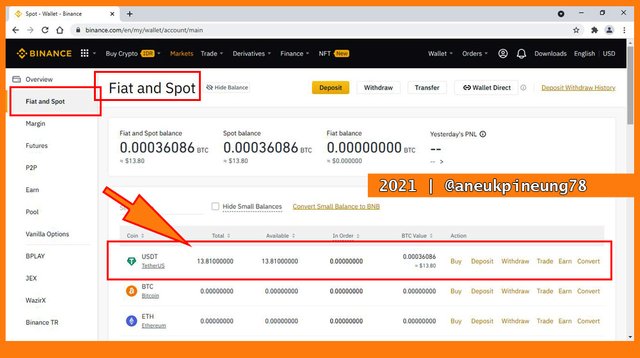
Here was how I transferred it to my Binance P2P wallet.
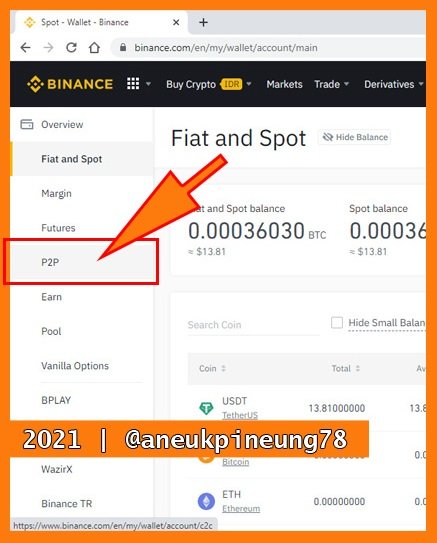
- First I clicked the P2P button on the left panel to move to my P2P wallet. The transfer will be performed there.
- When my P2P wallet was opened, I clicked the [Show] button to show the nominal balances of my assets.

- Clearly, I had nothing in my P2P wallet at that time.

- I clicked the [Transfer] button on the Action area.
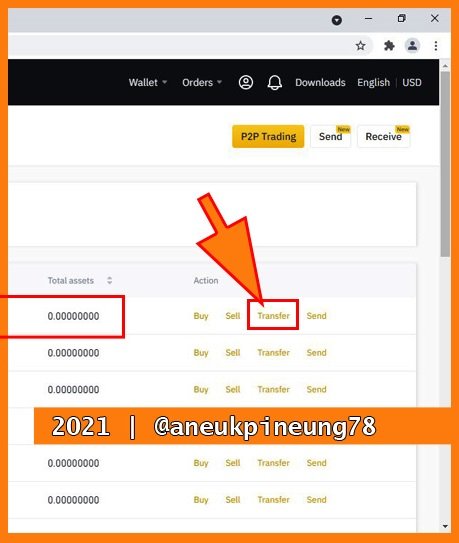
- The transfer pop-up box appeared where I needed to fill in the necessary credentials. When I was done, I clicked the yellowish [Confirm] button.

- Only took a few seconds and the transfer was successful.
3.c. How To Sell Cryptocurrency In Local Currency Via P2P
Now that I had some asset in my Binance P2P wallet, I could make a sale. For this task, I was doing it as a market taker. Here were the steps I took to do it.
- I clicked the [Sell] button on the USDT line.
- A new browser tab open, the Binance P2P platform.
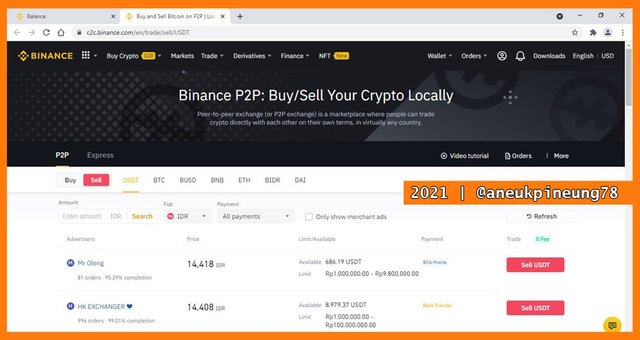
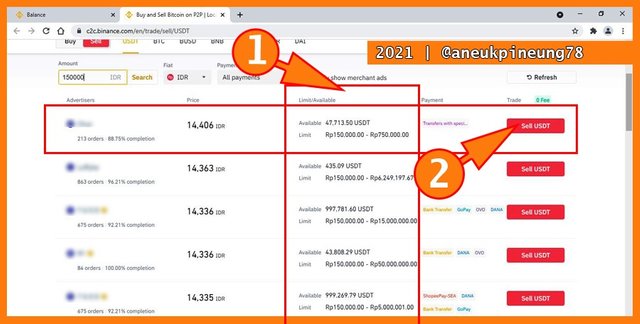
- As I scrolled down the page I can see list of market makers with their offer. The highest offer is put on the top of the list. The list shows the name of the market maker, the price they offer to buy, the limit they offer to buy, and the payment method they preferred. I can make my sale by observing their criteria. The top one on the list put the highest price but the minimum limit they will buy was IDR1,000,000.- while my USDT did not reach that amount in IDR with the current price rate. So it did not fit my need.

- I made use of the search box. So since my asset was worth above IDR150,000.- and below IDR200.000.-, I did a search by typing the number 150,000 in the [Amount] box and making sure that IDR was selected in the [Fiat] box.
- I hit [Enter] on my PC kerboard, and the result came as seen in the picture below. The search results were arranged in a descending pattern which placed the advertiser (market maker) with the highest purchase price on top. In the picture, the column I marked with number (1) is the column that showed the purchase limit of each advertiser. I chose to sell my asset to the top market maker on the list, so, I clicked on the [Sell USDT] button.
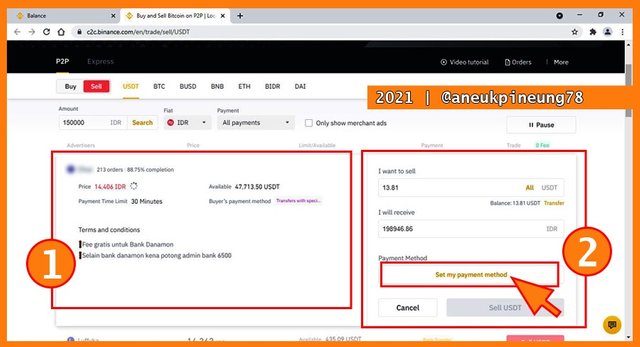
- On the next page, I saw a brief information about the market maker on the left pane (marked number (1), while on the right pane (marked number (2)) was where I needed to set up for my payment method. And I clicked on the [Set my payment method] button.
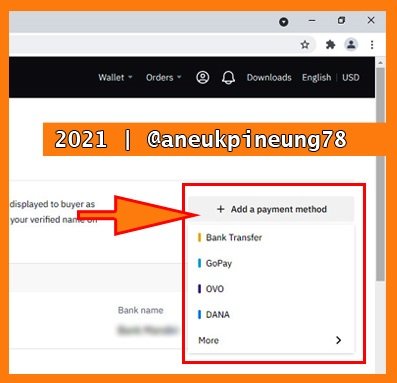
- I was taken to a page where there is a list of my accounts, where at that time I only had one bank account that I had registered with Binance, as shown in the section I marked with number (1). If I wanted to add a payment method, I could click on the [+ Add a payment method] button as I have marked with number (2).
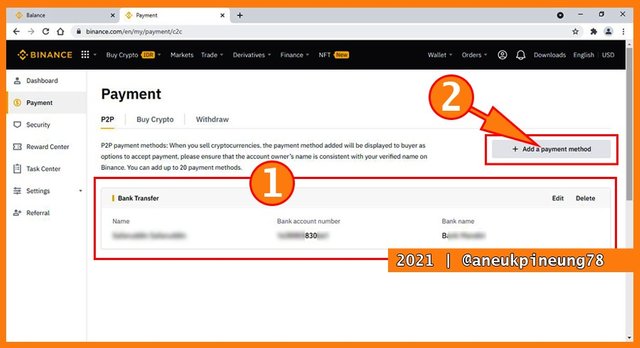
- The [+ Add a payment method] button is a dropdown list button that will open a list of options when clicked.
- Setelah selesai memilih metode pembayaran, saya mengklik tombol merah [Sell USDT].
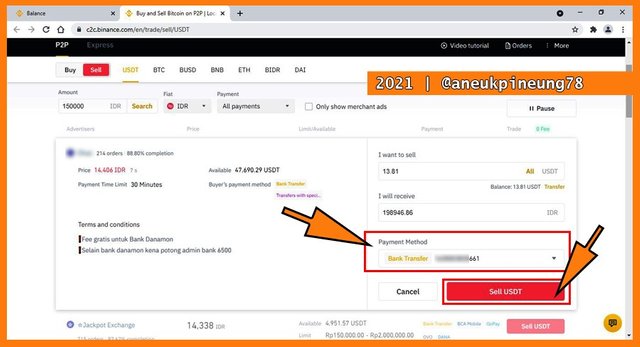
- My offer data is shown on the left side of the page that appears later (I marked it with number (1)), there you can see when the order was made, the order number, amount, price, quantity, and the payment method. While marked number (2) shows the countdown time before the transaction expires. This payment time was set by the market maker. And marked numner (3) shows a chat box that market maker and market taker (n this case was me) can use to communicate further about their trade.

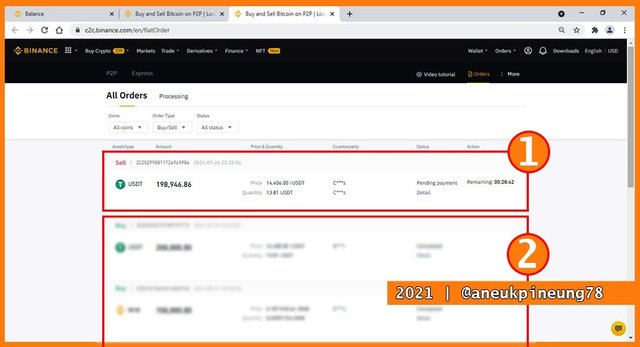
- Next, while waiting for my counterparty take action, I went to see the order list I have made. So I clicked the [Order] button on the upper right horizontal menu which generated a dropdown list. From the dropdown menu, I chose [P2P Order].

- On the next page, the [All Orders] tab was chosen. This page showed me all the P2P orders I have ever made on Binance. The newest one was put on top. The marked number (1) in below picture shows us the sell order I just made. And the marked number (2) shows us the previous orders I made.
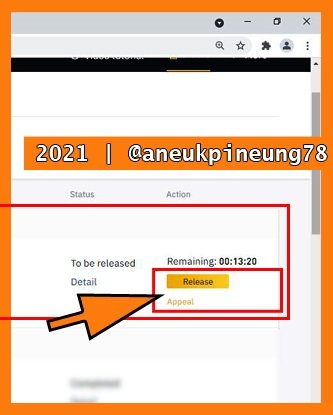
- Some minutes later, a [Release] and [Appeal] button showed up on my sell order note of USDT. That indicates the buyer has made a claim that he has paid for this transaction.
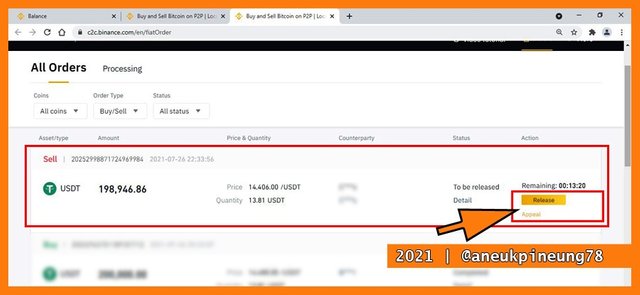
- Then I did a check on my bank account. After about 10 minutes later, it turned out that no funds had come in, I decided to appeal by clicking the [Appeal] button.
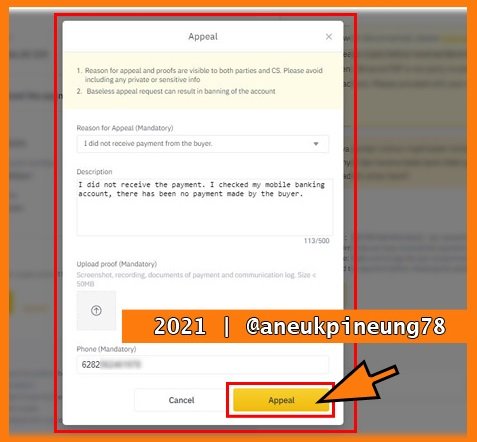
- A pop-up box appeared, I clicked the [Appeal] button to proceed.

- In the next pop-up box, I state the reason for my appeal and write a description, then execute by pressing the [Appeal] button.
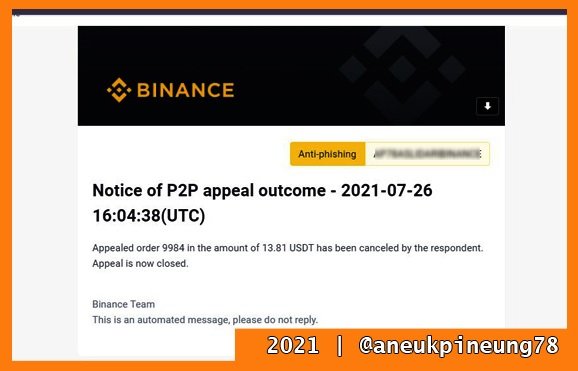
- A few minutes later, an email came in to the email address I registered on my Binance account. The email informed that the appeal has been closed.
- When I got back to Binance, I saw the notification that the trade has been cancelled.
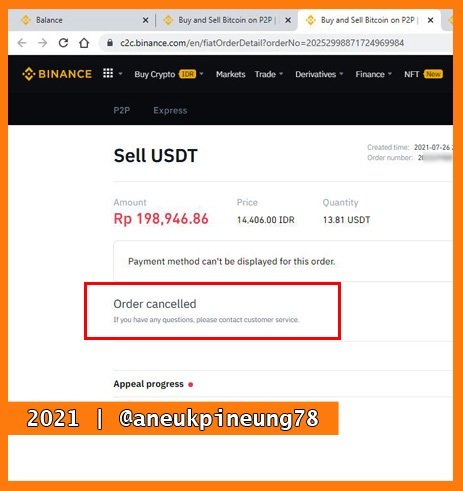
- It could be that the market maker made an unintentional mistake so the system charged me to release the asset in the trade. I had to file an appeal in self-defense, otherwise I could be considered fraudulent if I didn't release my assets, and Binance could blacklist my account. If only the market maker was successful in making the payment, I would have pressed the [Release] button, and we would be able to complete our trade.
So, basically, P2P trading on Binance is something very easy to do.
Question 4
What are the things to keep in mind during P2P trade and describe its four advantages and disadvantages.
4.a. The Things To Keep In Mind During P2P Trade
The thing that must always be remembered in the P2P transaction is to always be careful, because even though the intermediary (in this case Binance) has made prevention efforts, but losses can still arise if the user is too careless. For example, a seller who rushed released the assets he sold before actually checking that he had received the correct payment. So, caution is a very important thing.
4.b. The Advantages of P2P Trade
There are at least 4 advantages of peer-to-peer trade as can be read in this article. They are:
- Low Fees. On Binance P2P trade, takers pay no fee, they are not charged with any fees. While maker should pay a very small amount of fee once the transaction is completed.
- Availabe Globally. Since blockchain technology is now rising, it is available around the world. Binance itself is currently accessible in more than 180 countries. It is the opportunity to make trade with the cryptocurrency community around the globe.
- Multiple Payment Method is Supported. On Binance P2P, users are allowed to choose more than one payment methods. It should help users in doing transaction.
- Secure. Binance provide the escrow service to protect both parties, the makers and the takers.
- Freedom to to determine the transaction price. Market makers can put their preferred price and market taker can choose from available market price.
4.c. The Disadvantages of P2P Trade
- Slower than traditional trading. This is because it requires the involvement of both parties. One of the parties may be late in responding for some reason. This is not the case in traditional asset trading.
- Low Liquidity. P2P trading has much lower liquidity than the CEX (Centralized Exchange) does.
Thanks
Thanks Professor @yousafharoonkhan for the lesson titled Death Cross & Golden Cross, How To Use Binance P2P Trade.
Pictures Sourcing
- The editorial picture was created by me.
- All another pictures were screenshoots and were edited with Photoshop CS 3.
Sources and Reading Suggestion
- https://www.investopedia.com/terms/d/deathcross.asp;
- https://www.investopedia.com/ask/answers/121114/what-difference-between-golden-cross-and-death-cross-pattern.asp
- https://blockchainmedia.id/debat-death-cross-harga-bitcoin-diskon-besar-lagi/;
- https://www.coindesk.com/bitcoin-death-cross-bear-market;
- https://academy.binance.com/en/articles/golden-cross-and-death-cross-explained;
- https://www.investopedia.com/terms/g/goldencross.asp;


Respected first thank you very much for taking interest in SteemitCryptoAcademy
Season 3 | intermediate course class week 5
thank you very much for taking interest in this class
Thanks, Prof. I did learn something.
Shared to twitter : https://twitter.com/aneukpineung78a/status/1420978475410755590.
Awesome 👍
Thanks, @shahidchoudary.
Congratulations! Your post has been selected as a daily Steemit truffle! It is listed on rank 24 of all contributions awarded today. You can find the TOP DAILY TRUFFLE PICKS HERE.
I upvoted your contribution because to my mind your post is at least 6 SBD worth and should receive 26 votes. It's now up to the lovely Steemit community to make this come true.
I am
TrufflePig, an Artificial Intelligence Bot that helps minnows and content curators using Machine Learning. If you are curious how I select content, you can find an explanation here!Have a nice day and sincerely yours,

TrufflePig