BitTorrent Speed Wallet- Steemit Crypto Academy- S5W3- Homework Post for @sapwood
This is my homework post for Steemit Crypto Academy Season 5 Week 3 of Professor @sapwood’s class BitTorrent Speed Wallet.

Task 1 – Torrenting, BitTorrent Operation and Its Rewards
1.1. Torrenting
Torrenting is a peer-to-peer (P2P) file sharing process using torrent technology. Peer-to-peer connectivity in torrent technology allows multiple users to connect and share digital content (files), it frees downloaders from relying on a single source to download the files (content).
In the traditional process of downloading files, the downloader relies on a single source (single file provider). For example, in the process of downloading a file from Google Drive, the downloader depends entirely on Google Drive's servers, so if an interruption occurs on the server while the download has not been completed, then it can interfere with the download process and can even fail the download completely. It is different with the process of downloading files with torrent technology, where many people can share files with each other, for example if there are 50 computers sharing (seeding) a file and if 10 computers experience interference (or end the seeding process for some reason), the downloader still can continue downloading files from 40 other computers that are still seeding.
Torrenting is done via an application called Torrent Client. There are various torrent clients available to use, the most popular are Bit-Torrent and uTorrent, besides qBittorrent, Vuze, Deluge, and so on.

Before a file (or folder and files) is available for download via a torrent client, a torrent file (.torrent) needs to be created for it, and this task is performed by the torrent client after the uploader confirms the files (or folders and files) to be uploaded / shared. A torrent file (.torrent) is like a “container” containing the textual information needed to download a file. The information contained in it includes: the size of the file (and or folder), name of the file (or folder and files), URL tracking address, comments, and so on. This information will be part of the useful information for people who want to download the file in the future when the file is available for download.
1.2. Seeding
Seeding is the activity of sharing files via torrent technology. The person (computer) that does the seeding is called a seeder. A seeder can be someone who creates a torrent file and uploads (seeds) it, or someone who has finished downloading a file via torrent client and then automatically seeds the file.

Seeding is positively correlated to the probability of successful download. The more number of seeders a file has, the greater the probability of the successful download of the file. Therefore, it is almost a rule that after downloading a file via a torrent client, the downloader must seed the file for at least the same amount of time as they took to download. That is, people should not come to take advantage without any regards to the interests of others.
There are torrenting communities that require membership, and they tag and rate their members. These tagging (markings) and ratings are closely linked to their history of participation in torrenting activities in the community. Assessment and tagging is usually done by measuring the time spent downloading and the time spent seeding.
1.3. How Torrenting Earns BTT Rewards

BitTorrent, one of the most famous torrent clients, offers BitTorrent Token (BTT) as a reward to people who carry out torrenting activities through it. Actually it's like a "fee" for the computer hard disk space that users “rent out” for torrenting activities (especially seeding). So, while traditionally, people seeded out of self-consciousness, now they are also rewarded for carrying out that activity.

The BTFS installer can be downloaded at https://www.bittorrent.com/token/bittorrent-file-system/.
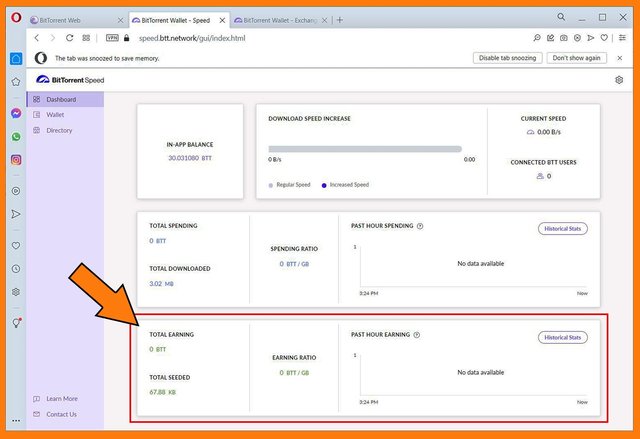
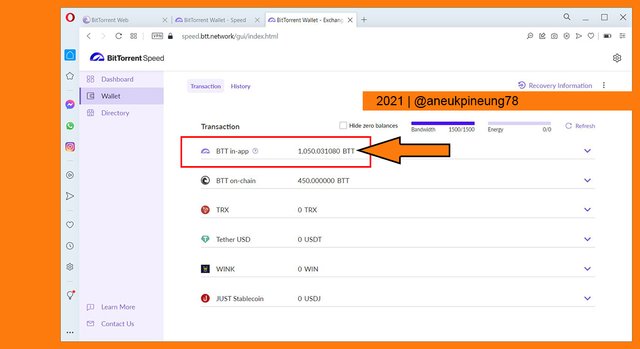
But, how to rent spare hard drive? It’s easy, only by keeping BitTorrent active on the machine (computer). To get detailed info about how much reward is earned, a user needs a BitTorrent Speed wallet. Below is a screenshot image of the BitTorrent Speed dashboard page which records details including: in-app BTT balance, download speed increase, spending, and earning.
1.4. Torrenting Demonstration (Downloading and Automatically Seeding)
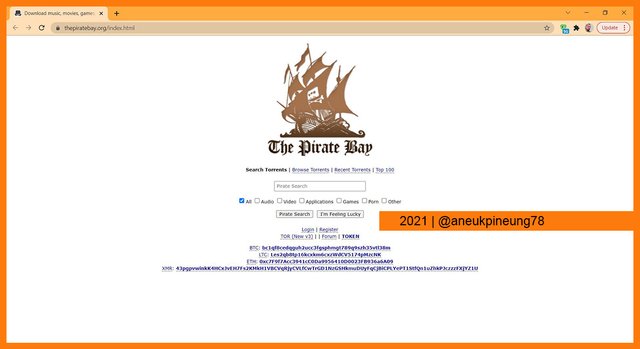
For this ask I used the BitTorrent Classic as the torrent client to download a Ubuntu installer from the famous torrent provider, The Pirate Bay.
- On the The Pirate Bay website I searched for Ubuntu by utilizing the search feature.
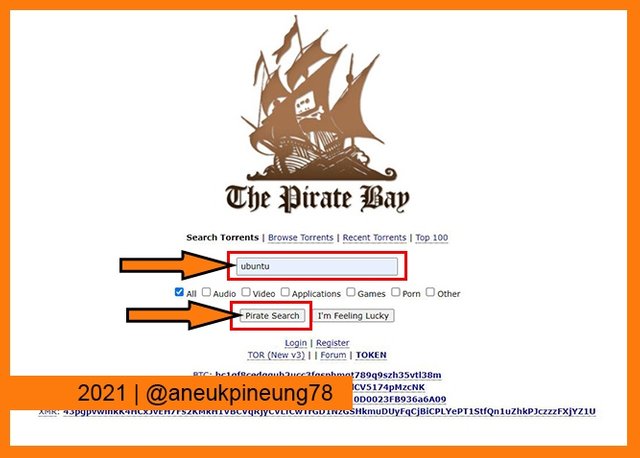
The search feature on the index page of the The Pirate Bay website. - On the results list, I clicked on the relevant one to my search.

The result page. - The next page showed the detail information of the file to be downloaded. The information contained: the file name, the type, the number of files, the size, the date the torrent file uploaded, the uploader, the number of seeders and leechers (at the time), and link(s) to the torrent file. There are two links for the file of my choice, one for the .exe torrent file and the other is the link for .iso torrent file. I chose the .iso file.
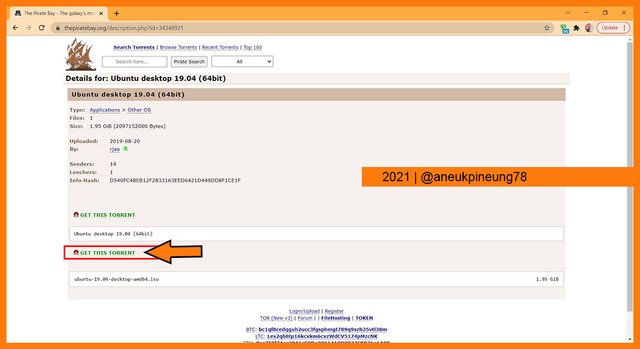
The file detail and link(s) to proceed. - Clicking on the link popped up a dialogue box, asking access to activate BitTorrent Classic since it has been installed on my machine. I gave access by clicking the [Open BitTorrent] button.

Open BitTorrent permission. - BitTorrent Classic opened along with the Add New Torrent dialog box. On the dialogue box, users can: 1) set the folder the file to save in to, 2) change the file name to the one they desire (if they want to), 3) select which file(s) to download if there were more than one file. I left everything as it was and proceeded by clicking the [OK] button.

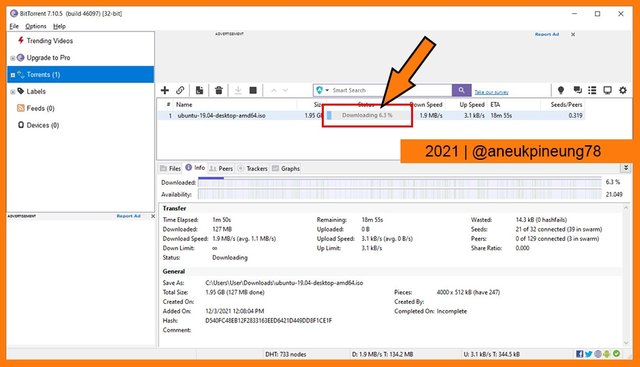
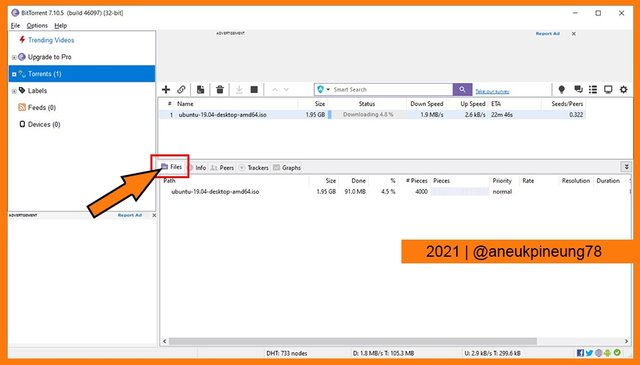
The Add New Torrent dialog pop-up box. - The downloading process was then started immediately. There are five useful information tabs for each file that being torrented in BitTorrent Classic application. Click a file on the list (in this case it was only one file), and the relevant info can be gathered via five tabs on the lower panel.
- The picture below shows the first tab [Files], which contained information such as the file size, the downloaded size, the downloaded percentage, and another relevant info.
The [File] tabs. - The second tab was [Info]. It contains comprehensive information about files and their status in torrenting activities.

The [Info]tab. - The third tab is [Peer], which shows information about currently available peers on the torrent file. Peers are computer that is currently torrenting the file. They can be a leecher (downloader) or a seeder. It contains information on the IP address, the client each of them uses, download and / or upload speed, and so on.

The [Peer]tab. - The next tab is [Tracker]. Tracker is a server whose job is to help the communication and data exchange between peers. It also provides information about connected peers. Trackers in the P2P world are divided into 2 types: 1) public/open trackers, and 2) private/closed trackers.

The [Tracker] tab. - The last tab is [Graph] which -as name implies- shows the torrenting status in the form of graph.

The [Graph] tab.
- The picture below shows the first tab [Files], which contained information such as the file size, the downloaded size, the downloaded percentage, and another relevant info.
- When the file downloading process was completed, the BitTorrent automatically seeded it.

Automatically seeding the downloaded file.

Task 2 – BitTorrent Speed Wallet
In this study, I installed BitTorrent Speed Wallet through the BitTorrent Web application.
2.1. Downloading BitTorrent Web
- To download BitTorrent Web I opened the download page. I clicked the [Free Download] button.
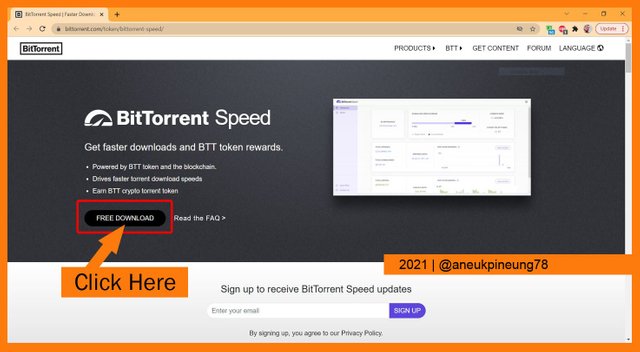
The screenshot image of BitTorrent Speed Wallet download page. - The page displayed the instruction on how to proceed with the download.

The instruction. - The download manager I use opened up a dialog box. I hit [Start Download] button.

The download manager dialog box.
2.2. Installing BitTorrent Web
- I located the downloaded installer and double-clicked on it.

The installer. - A dialog box popped-up. I hit [Yes] button.

Confirmation to install. - A welcome message dialog box appeared. This message also contained some related information. I clicked [Next].

The welcome message in a dialogbox. - Then appeared a warning message dialog box about online scams. I proceeded by clicking the [Next] button.
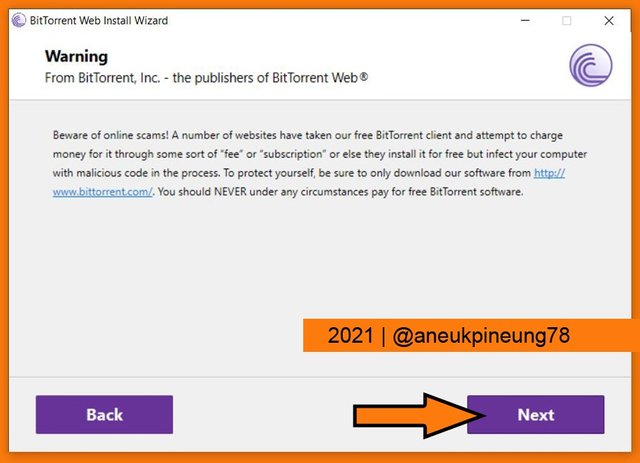
The warning message dialog box. - It then showed the License Agreement dialog box. I hit [Next] to proceed with installation.

License Agreement dialog box. - The BitTorrent Web installation was started.
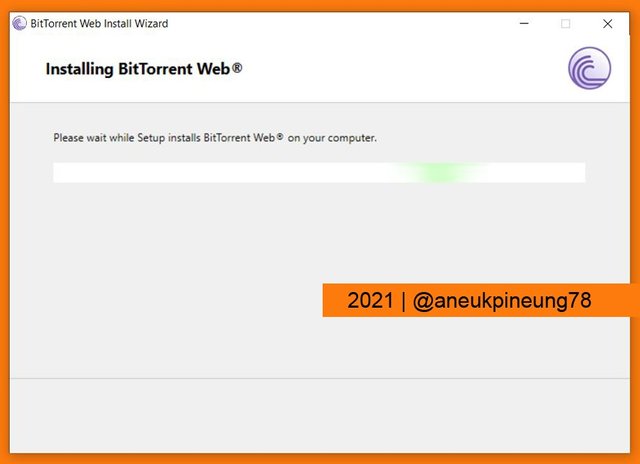
The installer started the installation process. - The BitTorrent Web installation process took not much time to complete. I clicked the [Next] button.
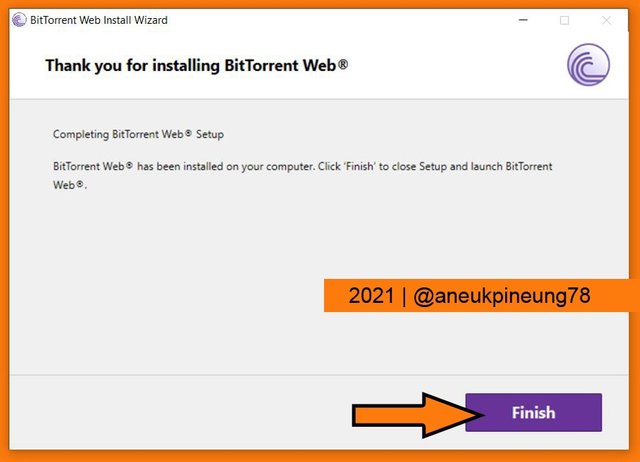
The BitTorrent Web installation was completed. - The BitTorrent Web opened in the default browser (mine was Opera browser). The first time use interface contained the question if it was my first time using it. I clicked [Yes].

The BitTorrent Web first time use interface. - Some short introduction opened the BitTorrent Web. I skip the introduction part in this study. Below is the screenshot image of BitTorrent Web interface.
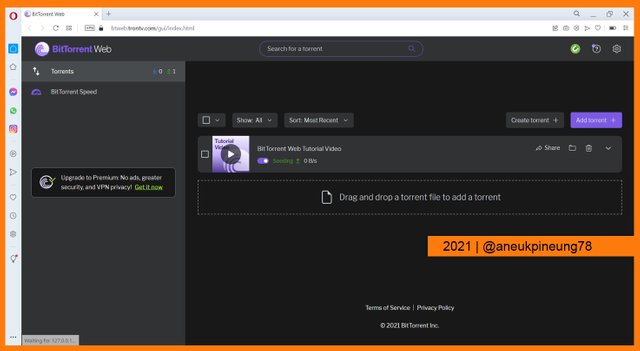
BitTorrent Web interface.
2.3. Installing BitTorrent Speed Wallet
- To begin installing BitTorrent Speed Wallet through BitTorrent Web, I clicked the [BitTorrent Speed] button on the left pane of BitTorrent Web interface.

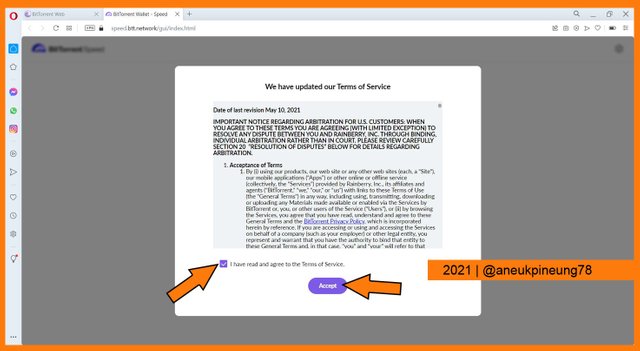
The [BitTorrent Speed] button. - The Terms of Service dialog box popped-up. I ticked the radio box that as my declaration that I have read and agree to it, and hit the [Accept] button.
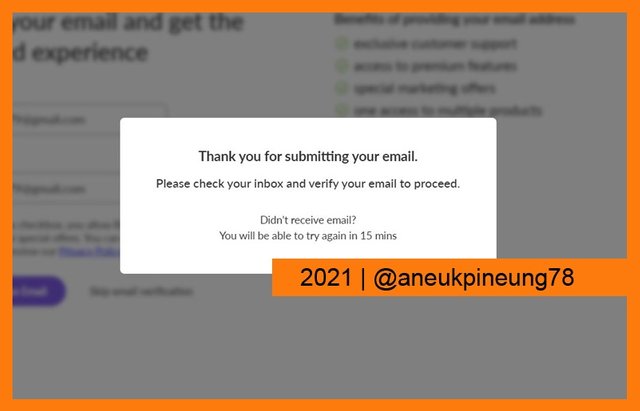
The Terms of Service dialog box. - On the next page I filled in my email address and hit the [Send Verification Email] button.

Registering email to BitTorrent Speed Wallet. - A dialog box popped-up, asking me to check my email.
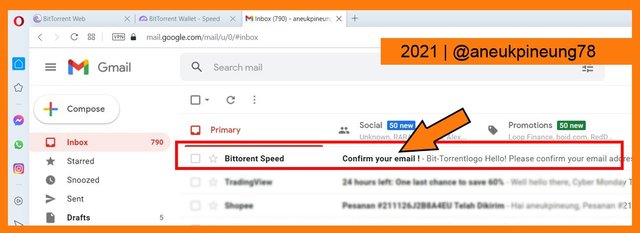
Needed to check verification email. - An email from BitTorrent Speed was there in my Inbox. I clicked on it.
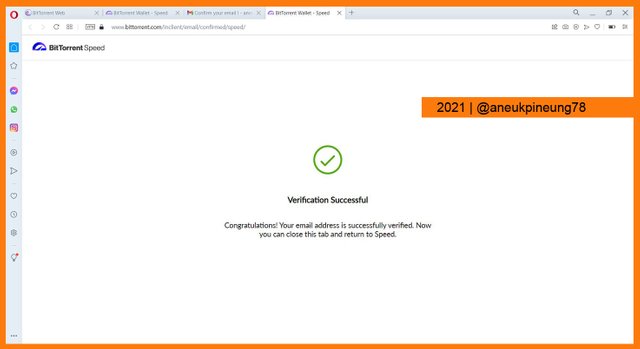
The email. - The email contained the confirmation button. I clicked on it to confirm my email address.

The confirmation button in the email to verify the email address I registered earlier. - Email address verification was successful.
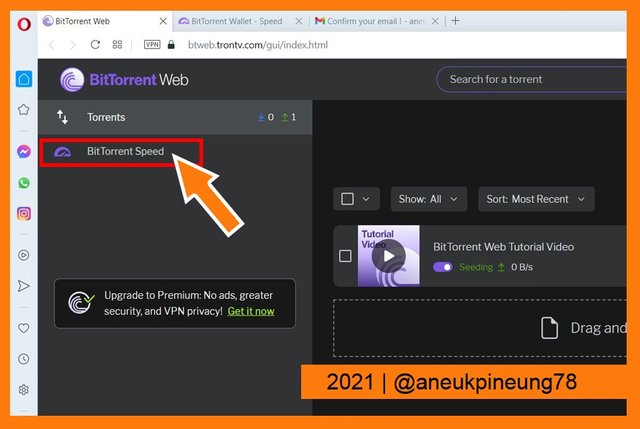
The email address has been verified. - I went back to the BitTorrent Web application window and hit the [BitTorrent Speed] button.
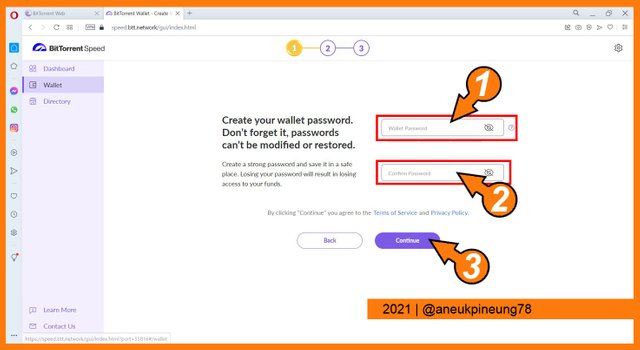
The [BitTorrent Speed] button on the BitTorrent Web. - After some introduction which I skip in this study, the create wallet password page was displayed. I typed the password inside the box marked (1) and retyped it in the box marked (2) as shown in the picture below. Lastly, I clicked the [Continue] button (marked number (3)).
Creating password for the BitTorrent Speed Wallet. - The next step was to store the 12 words recovery phrase. This recovery phrase will be useful in case I lose access to the wallet. I wrote down the 12 words in the same order provided to a safe place. When I was done, I clicked the [Continue] button.

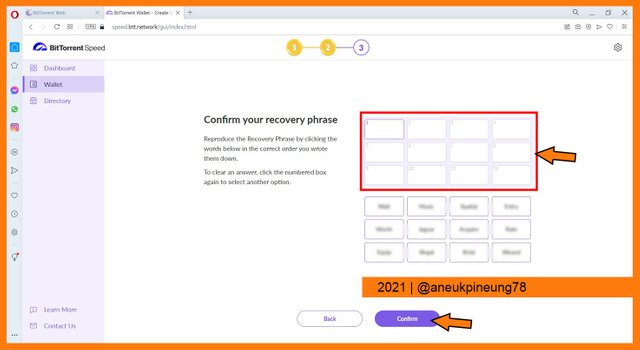
The recovery phrase. - Then I was asked to arrange the recovery phrase in the order provided earlier. When I was done, I clicked the [Continue] button.
Confirming the recovery phrase. - The BitTorrent Speed Wallet creation was completed. Below is the screenshot image of the BitTorrent Speed Wallet interface.

The Transaction page is the default page of the BitTorrent Speed Wallet interface.
2.4. Restoring BitTorrent Speed Wallet in TronLink Wallet
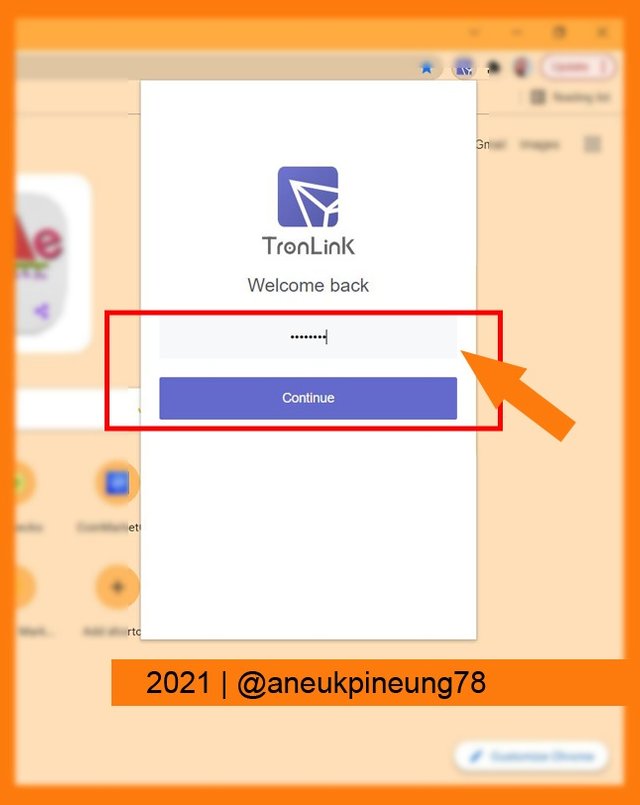
- I activated TronLink wallet extension on Google Chrome. Filled in the extension password and clicked [Continue] button.
Activating TronLink wallet on Google Chrome web browser. - I clicked on the TronLink wallet name.

Clicking the TronLink wallet name. - On the sliding panel that followed, I hit the [Create] button.

The [Create] button. - It needed me to set a new account name.

- I set the account name and clicked the [Continue] button.

New account name creation. - There were three ways to import an account. I chose to provide the Private Key.

The three possible ways to adding an account to TronLink wallet. - I wrote down the BitTorrent Speed Wallet Private Key and hit the [Continue] button.

- The BitTorrent Speed Wallet was successfully imported to the TronLink Wallet.

Wallet importing was a success. - I clicked on the newly created BitTorrent Speed Wallet, it showed the assets I had in it as shown in the screenshot image below.
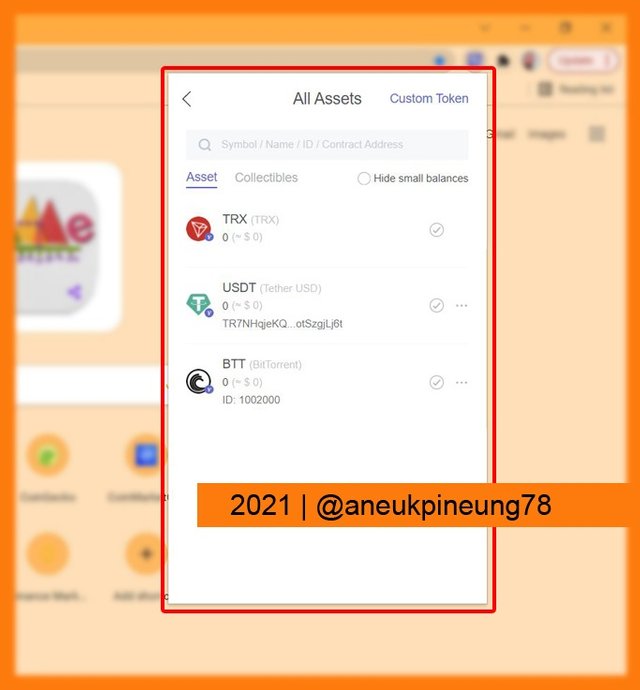
The Asset page of the BitTorrent Speed Wallet displayed in the TronLink wallet.
2.5. Securing BitTorrent Speed Wallet Private Keys
- On BitTorrent Speed Wallet I clicked the [Recovery Information] button.
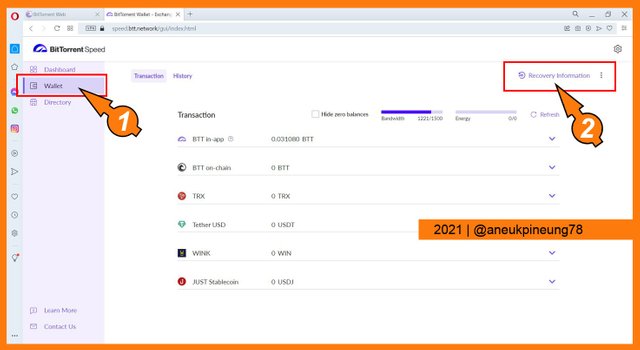
The BitTorrent Speed Wallet Recovery Information button (marked number (2)). - I was asked to enter the BitTorrent Speed Wallet password, so I did.

Entering the BitTorrent Speed Wallet password . - A dialog box containing a warning message popped-up. I ticked the confirmation button (marked number (1)) and hit the [REVEAL] button.
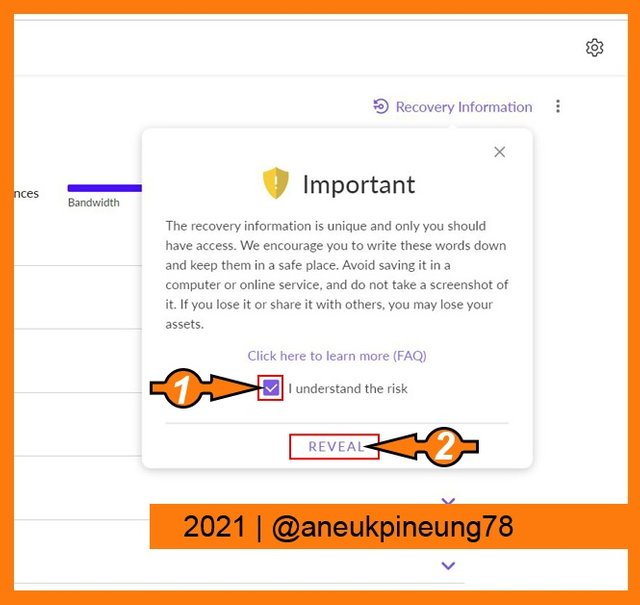
Understanding the risk. - A pop-up box containing Recovery Phrase and Private Key appeared. I copied them both and pasted to a securely saved document.
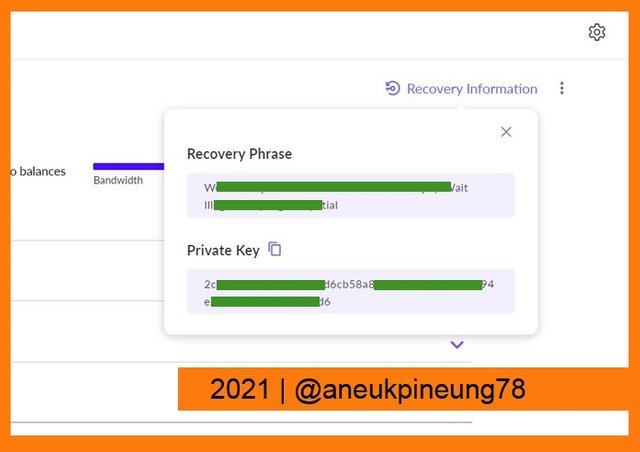
Recovery Phrase and Private Key.
Task 3 – Tansferring BitTorrent (BTT)
3.1. Transfering BTT from an Exchange (UPbit) to BitTorrent Speed Wallet
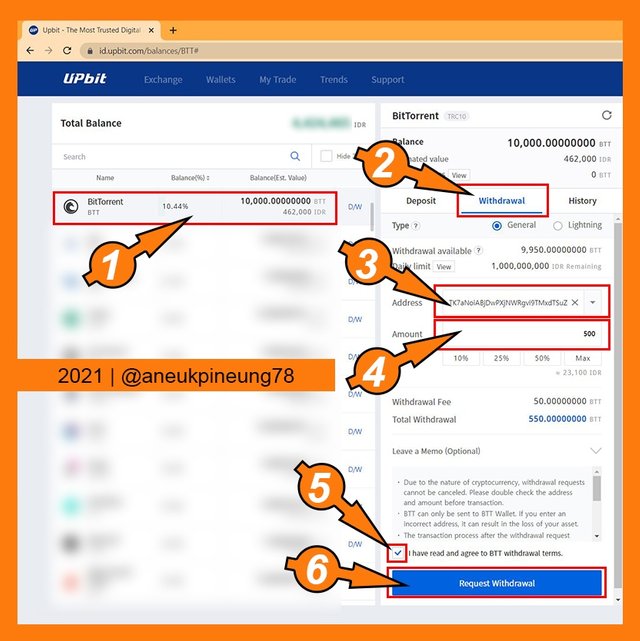
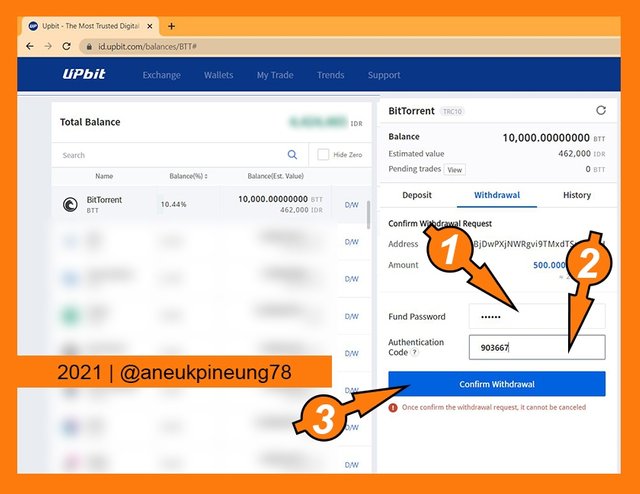
- I logged in to my UPbit account. In the wallet I chose the BitTorrent Token (BTT) (marked (1) on the screenshot image below). On the coin operation panel I clicked the Withdrawal button (marked (2)). On marker (3) was where I typed in my BitTorrent Speed Wallet public address. I typed “500” in the amount of BTT to send to my BitTorrent Speed Wallet as shown by the marker (4). The agreement declaration tick box (marker (5))must be activated to proceed. Lastly I clicked the [Request Withdrawal] box.
Requesting BTT withdrawal on UPbit. - On the confirmation box that followed, I needed to provide the Fund Password (marker (1) on the screenshot image below) and the Authentication Code (from Google Authenticator, marker (2)). And when I was done, I hit the [Confirm Withdrawal] button (marker (3)).
Confirming BTT Withdrawal in Upbit. - The BTT sending from UPbit to BitTorrent Speed Wallet was successful in a short time. It only took under 2 minutes time. The transaction detail can be viewed on TronScan at https://tronscan.org/#/transaction/3b95b7e2a1e35b6c1d2324f58ecff53457c5fba7bd975d3462649efa987f6563.

The withdrawal was a success. - I opened the BitTorrent Speed Wallet and see that there was 500 on-chain BTT in it.
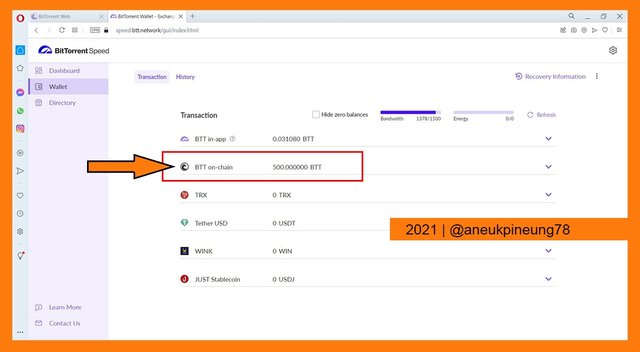
The BTT transferred from UPbit was booked as on-chain BTT.
3.2. Transferring On-Chain BTT to In-App BTT & Vice Versa
3.2.1. Transferring On-Chain BTT to In-App BTT
- I clicked somewhere on the BTT on-chain line.

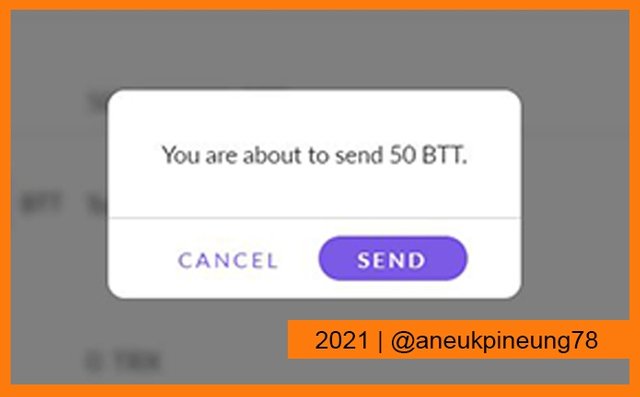
Clicking somewhere on the BTT on-chain. - On the appearing panel I entered “50” in the BTT amount to send to in-app BTT (marker (1) on the below picture). And I clicked the [Send] button (marker (2)).

Sending 50 BTT from on-chain to in-app. - A confirmation box popped-up, I hit the bluish [Send] button.
Confirmation box. - The next pop-up box informed that the request has been successfully made and was pending. I hit the [Done] button.
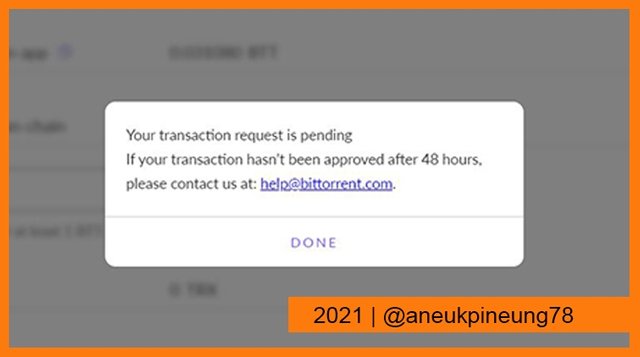
Request was successfully made. - Some times later, the transferring was succesful. There was 50 BTT short in on-chain and a 50 BTT increase in the in-app.

The 50 BTT was sent to in-app.
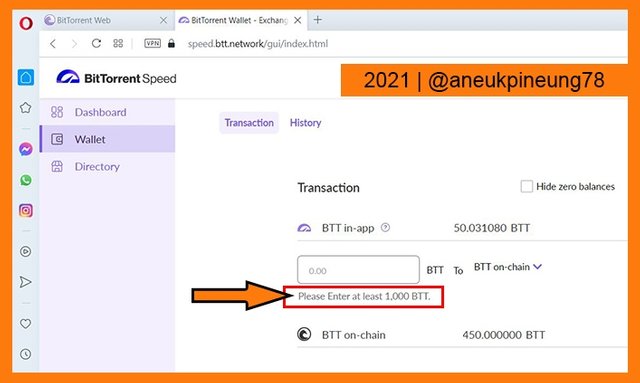
3.2.2. Transferring In-App BTT to On-Chain BTT
The minimal amount of 1,000 BTT is required in transferring in-app BTT to on-chain BTT. So I logged back in to my UPbit account and sent another 1,000 BTT to BitTorrent Speed Wallet, and then sent 1,000 on-chain BTT to in-app.
- I had +1,050 in-app BTT. I wanted to send 1,000 to on-chain. I clicked somewhere along the in-app line. On the appearing panel I filled in 1,000. And then I clicked the [Send] button.
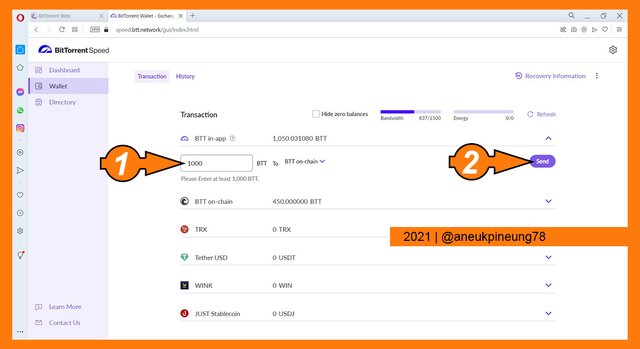
1,000 in-app BTT to send to on-chain. - Confirmation box popped-up, I clicked the [Send] button.

Confirmation pop-up box. - The request was successfully made and was pending.
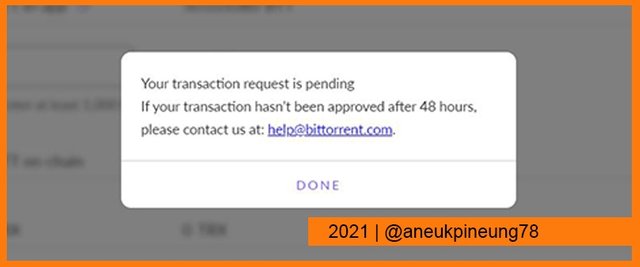
Successful request. - Some times later, the transaction failed. A total of 1,000 BTT returned to the in-app.
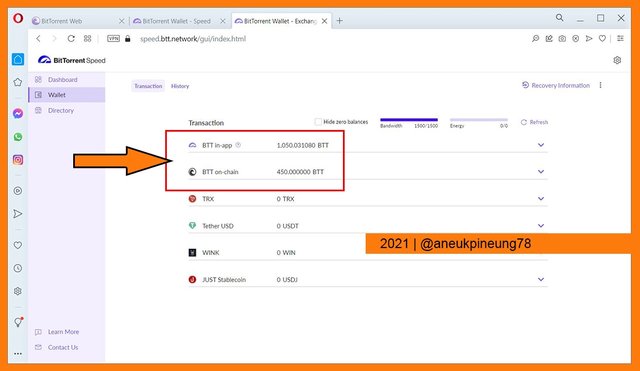
The transaction was a failure. - I did not really know what was the problem or what did I miss. So I repeated the same transaction and it failed too. For the third time experiment, I changed the delivery amount to 1,020 BTT. Details of transaction history can be seen in the following image.

The transaction history detail.
Later on when I checked the third transaction, I found out that it had been canceled too.

And the 1,000 BTT was back to in-app. I don’t understand what the problem is for I think I have taken all necessary steps needed.
Task 4 – Creating and/or Adding Torrent and Seeding It
4.1. Creating New Torrent and Seeding It
- In BitTorrent Web I clicked the [Create Torrent] button.
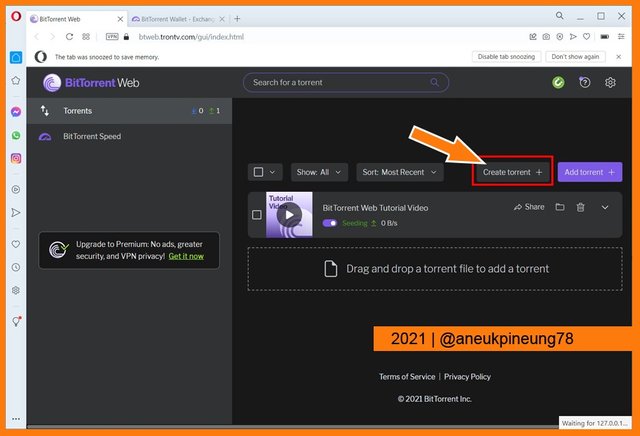
The [Create Torrent] button. - Next step was to browse for the file(s) to convert to torrent file(s). Marked (1) on the picture below shows the folder path of the file(s) I wanted to use. While marked by number (2) is the file(s) contained in the folder. When I found the desired file(s), I clicked the [Select] button (marked number (3)).

Browsing for file(s). - The next pop-up box shows the detailed information of the file(s) to be converted. Marked number (1) on the picture below is the section than contains the information on the folder name, folder path, number of files in the folder, and the folder size. Marked number (2) shows the path to the folder to use for storing the created torrent file(s), it is changeable. Marked number (3) is a tick box, it is optional whether the user want to seed the torrent file(s) once created or not, I ticked it. Marked number (4) is the button to hit to proceed once all is set.

The Create Torrent dialog box. - The creation of the torrent file was a success and it was seeded right away.
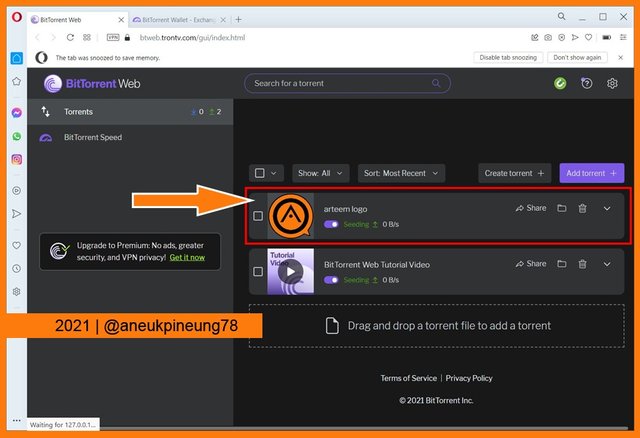
The torrent file was created and seeded.
4.2. Adding Torrent and Seeding It
There are three ways users can add torrent file(s) to BitTorrent Web and seed them: 1) By dragging and dropping the files, 2) by browsing for the torrent files on their computers, and 3) by pasting the magnet link(s) or torrent link(s). In this study, I did the browsing one.
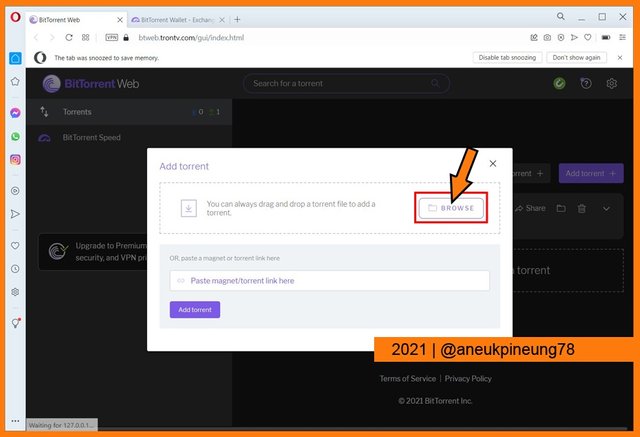
- I clicked the [Add Torrent] button.

The [Add Torrent] button. - On the popped-up box I hit the [Browse] button.
The [Browse] button. - The next pop-up box shows several “latest files” users can immediately choose. To browse for different file(s), users can click the [Show all files...] button. I clicked the button.

The “immediate files list” and the button to browse further. - I found two torrent files to add to BitTorrent Web, as seen on the screenshot image below (marked number (1)). I chose the two files and clicked the [Open] button.

Browsing for and opening torrent files. - The BitTorrent Web then popped the information box of the torrent files to add to its seeding list. I clicked the [Add] button to proceed.
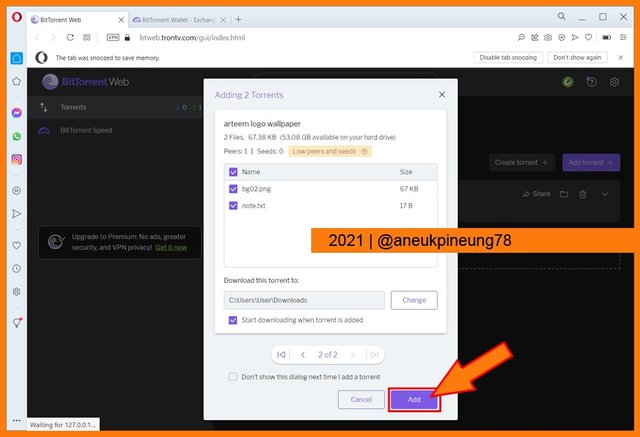
The files detail and the execution button. - The files was immediately added to BitTorrent Web application.
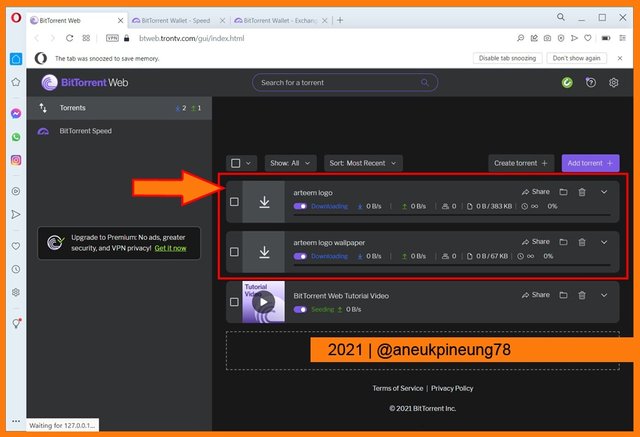
The files was added. - Clicking on the tiny arrow-down button brought up the detailed information of the torrent files.

The torrent file information.
Thanks
Thanks, Professor @sapwood for the lesson titled BitTorrent Speed Wallet.
Pictures Sourcing
- The editorial picture was created by me.
- Unless otherwise stated, all another pictures were screenshoots and were edited with Photoshop CS 3.
Sources and Reading Suggestion
- https://www.cloudwards.net/what-is-torrenting/;
- https://www.comparitech.com/blog/vpn-privacy/is-torrenting-safe-illegal-will-you-be-caught/;
- https://www.techslang.com/torrenting-what-is-it-and-how-does-it-work/;
- https://idcloudhost.com/apa-itu-torrent-pengertian-fungsi-fitur-fitur-dan-cara-download-dengan-torrent/;
- https://semutsujud.blogspot.com/2018/03/apa-torrenting-itu-apa-yang-harus-anda.html;
- http://vpnoverview.com/id/privasi/pengunduhan/apa-itu-torrenting/;
- https://winpoin.com/apa-itu-torrent-mengenal-lebih-dalam-tentang-torrent/;
- https://en.wikipedia.org/wiki/BitTorrent;


shared to Twitter: https://twitter.com/aneukpineung78a/status/1467129221717782529
Semoga sukses dan tambah maju dengan mengikuti Steemit CryptoAcademy.
terimakasih