Godot engine: How to prepare your game for Steam and GOG

Hey.
We’re Monolith of Minds.
We’ve spent the last five years building our first video game, Resolutiion, with the Godot engine. In just a few weeks, it will be released on the two big PC gaming stores: Steam and Good Old Games.
Building Resolutiion was hard.
Releasing it should be easy, right?
Well, we wanted to support good platform integration, achievements, stats, connect with friends, and everything else these big guys had to offer. And when getting our game ready for one store, why not make it work for the other as well?
This tutorial fuses the integration of both platforms into a single workflow. However, if you only care for one, you can skip the other’s respective parts. The initial steps are:
- Register as a partner on Steam and GOG to download their SDKs
- Download the Godot source code and the Steam- and GOG module sources; recompile the engine and export templates
- Add the code to your game that initializes client and user logins, and call the platform functions
Expect many more lists like this, as we dive deep into the bones of our favorite game engine and store platforms.
01 Register as Partner
Let’s start by joining the club.
Steam
Steam’s Software Development Kit (SDK) has plenty of useful features, e.g. you can register achievements from within your game or get input from your controllers. To get access to it, you need to enter the Steam partner program. Go there now and follow through.
Upon completion, you will probably end up at the dashboard. Here, in the panel on the right-hand side, you can download the current version of the SDK zip archive, which includes header files and binaries for Windows, Linux, and macOS (and also tools to upload your game to Steam) — everything you need to build that new engine.
GOG
To get the GOG SDK you will have to get in touch with their business team and register as a GOG partner. Having done so, the SDK needs to be downloaded for each platform separately.
For now, GOG only supports Windows and macOS. We are eager to get our hands on the soon-to-be Linux integration. Godspeed.
02 Recompiling Godot and the export templates
With the bureaucracy out of the way, we’re ready to do some magic and compile the hell out of all these sources.
Note: vanilla Godot doesn’t know how to call the SDK functions (within the C++ libraries) natively from GDScript. We need to add two more modules to the build so that Godot can make the calls. Let’s download them:
- Download the Godot source code from Github
- Download the Godot Steam module sources from gramps
- Download the Godot GOG module sources from pixelriot
The module for the Steam integration was developed by gramps — high-five to him for the amazing job. Following in his footsteps Richi/pixelriot (that’s us!) developed the GOG module.
Filetree
While each module offers its own build instructions, here we’re merging both into a single project. That means we first need to put various puzzle pieces in the right places:
- Unpack the Godot sources; the
modulesfolder is where everything else goes - Unpack the Godot Steam module
- Place the
godotsteamfolder into themodulesfolder - Unpack the Steam SDK and copy the folders
sdk/public/andsdk/redistributable_bin/toGodot/modules/godotsteam/sdk/ - Unpack the Godot GOG module and place the
godotgogfolder into themodulesfolder - Unpack all GOG SDKs
- From one of them copy the
Includefolder toGodot/modules/godotgog/sdk; it doesn't matter which one you take - Copy the
Librariesfolders from all SDKs to theGodot/modules/godotgog/sdk-folder
In case those copy/paste steps were hard to follow, this is how your file-tree should look like for the Steam module:
godotsteam/sdk/public/*
godotsteam/sdk/redistributable_bin/*
godotsteam/SCsub
godotsteam/config.py
godotsteam/godotsteam.cpp
godotsteam/godotsteam.h
godotsteam/register_types.cpp
godotsteam/register_types.h
And this is how everything GOG should be:
godotgog/sdk/Include/galaxy/*
godotgog/sdk/Libraries/*
godotgog/config.py
godotgog/godotgog.cpp
godotgog/godotgog.h
godotgog/register_types.cpp
godotgog/register_types.h
godotgog/SCsub
The OS specific shared libraries (DLL/SO/DyLib) are within the godotsteam/sdk/redistributable_bin folder and the godotgog/sdk/Libraries folder, respectively.
Compilation
Now we have to recompile the engine. This process is well documented and we will not get into the details here. The main point is, that Godot uses the SCons build system, which you have to install and set up before you can move on.
When SCons is working properly, the next steps should be as simple as follows:
- Open a terminal and
cdto your Godot source folder - Type
scons platform=windows tools=yesto build the editor for Windows;scons platform=x11 tools=yesfor Linux, andscons platform=osx tools=yesfor MacOS
Compiling such a large engine will take some time, but if no errors occur, you will end up with a new, shiny binary in the Godot/bin folder. Executing it will unfortunately, return an error: dynamic libraries (DLL/SO/DyLib) are missing. We can fix that easily:
- Go to
godotsteam/sdk/redistributable_binand copysteam_api64.dllnext to your Godot binary; .so on Linux and .dylib on macOS - Do the same from
godotgog/sdk/Librariesand copy the respective library to your Godot binary - As a final puzzle piece, to access the Steam API we also need to add a text file named “steam_appid.txt” into the executables folder, which contains only your Steam app ID. If you don’t know your app’s ID, just visit your Steam dashboard — the ID is the number right next to the name of your game.
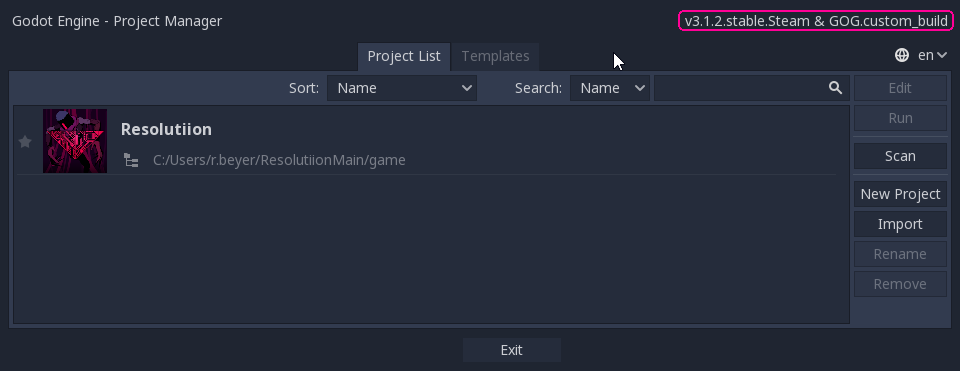
Now executing the binary will bring up our familiar Godot editor. You can add a cool new suffix like ".Steam & GOG" in the version.py file.
If everything went well, you should have two new entries in your Global scope:
- Steam
- GOG


Templates
But wait, there’s more: we also need additional export templates that you will later use to compile your game into an executable. However, since we obviously don't want the Steam functions in the GOG version and vice versa, we have to disable one of the modules for each template.
- Do
scons platform=windows target=release module_godotgog_enabled=no extra_suffix=steamto build a release-export template for the Steam version (change your OS variable, accordingly) - And
scons platform=windows target=release_debug module_godotsteam_enabled=no extra_suffix=gogfor the GOG version. - Do the same with
target=releaseif you need debug templates as well.
macOS users take note: when building the Godot editor or the export templates, you need to package them according to this Steam forum post and the official documentation.
From here on, you should have a set of engine and template files for as many operating systems as you compiled them for. All things in place, our folder with the editor and all the export templates should look something like this:
godot.windows.debug.64.gog.exe Windows GOG debug template
godot.windows.opt.64.gog.exe Windows GOG release template
godot.windows.debug.64.steam.exe Windows Steam debug template
godot.windows.opt.64.steam.exe Windows Steam release template
godot.windows.tools.64.exe Godot editor for your OS
godot.x11.debug.64.gog.exe Linux GOG debug template
godot.x11.opt.64.gog.exe Linux GOG release template
godot.x11.debug.64.steam.exe Linux Steam debug template
godot.x11.opt.64.steam.exe Linux Steam release template
osx_templates.zip MacOS templates (release and debug)
Galaxy64.dll GOG library (.so on Linux, .dylib on MacOS)
steam_api64.dll Steam library (.so on Linux, .dylib on MacOS)
steam_appid.txt Steam app id
This is the time where we need to point out that compiling software is crazy and things can go wrong. It takes a while to understand all options and the whole build process, so never hesitate and check back with the official Godot docs.
03 Adding platform integration code
Now that the proper functionality is available from Godot’s GDScript, we want to add some code to our game, initialize the platform APIs, and call some backend methods.
Both SDKs offer a gazillion functions and callbacks you can use to register achievements, get controller info and input, toggle overlays, set up multiplayer sessions, matchmaking, and more. For this tutorial, though, we’ll focus only on some simple achievements.
Usually, when you have a platform-specific implementation, you’ll want to export a single binary for every build. In our example the export settings would look like this:

Since you probably don’t want to call your Steam API from a GOG build, and vice versa, we need a way for our game to know which backend it should speak to. A simple solution is Godot’s feature tags: adding steam or gog to the custom field in your export settings will differentiate each platform, and we can refer to that tag in the code easily.
Continuing, we need an entry point where our game can initialize the SDK APIs and access function calls and callbacks. To do so, we will create a singleton called Integration with the following script:
integration.gd
extends Node
"""
depending on the feature tag, *steam* or *gog*, a different integration implementation will be set.
"""
var integration_scenario = null

func _ready():
    if OS.has_feature("steam") and ClassDB.class_exists("Steam"):
        integration_scenario.script = load("res://integration_STEAM.gd").new()

    elif OS.has_feature("gog") and ClassDB.class_exists("GOG"):
        integration_scenario.script = load("res:///integration_GOG.gd").new()

    integration_scenario.init_integration_scenario()
This singleton will either load the integration_STEAM.gd or integration_GOG.gd script, and instantly initialize the respective platform API by calling init_integration_scenario().
Here are the two integration scripts to be added:
integration_STEAM.gd
extends Node
"""
Steam Integration
"""
const STEAM_APP_ID = ADD_YOUR_STEAM_APP ID HERE

func init_integration_scenario():
    set_process(false)

    #check if Steam is running
    if not Steam.isSteamRunning():
     if not Steam.restartAppIfNecessary(STEAM_APP_ID):
        push_warning("Please start Steam and restart the game.")

    if Steam.steamInit():
     print("Steam initialized.")
    else:
     print("Steam cannot be initialized.")
     return

    #init Steam controller
    Steam.inputInit()

    #connect signals
    Steam.connect("user_achievement_stored", self, "_on_user_achievement_stored", [])

    #run callbacks
    set_process(true)

func _process(delta) -> void:
    Steam.run_callbacks()

#ACHIEVEMENTS
func set_achievement(achievement_id : String):
    if Steam.setAchievement(achievement_id):
     print("Achievement achieved: " + achievement_id)
     Steam.storeStats()

#CALLBACKS
func _on_user_achievement_stored(game_ID, ach_group, ach_name, cur_progress, max_progress):
    global.debug_output("Achievement stored on Server: " + str(ach_name), 2)
integration_GOG.gd
extends Node
"""
GOG Integration
"""
const CLIENT_ID = "your client id"
const CLIENT_SECRET = "your client secret"

func init_integration_scenario():
    set_process(false)

    #connect signals
    GOG.connect("auth_success", self, "onAuthSuccess")

    #run callbacks
    set_process(true)

    #initialize GOG Galaxy
    if GOG.init(CLIENT_ID, CLIENT_SECRET) == OK:
     yield(get_tree(),"idle_frame")
     GOG.sign_in()
     yield(GOG, "auth_success")
     print("is signed in: ", str(GOG.signed_in()))
     print("is logged on: ", str(GOG.is_logged_on()))

func _process(delta: float) -> void:
    GOG.process_data()

#ACHIEVEMENTS
func set_achievement(achievement_id : String):
    print("Achievement achieved: " + achievement_id)
    GOG.set_achievement(achievement_id)

#CALLBACKS
func onAuthSuccess():
    print("authentication successfull!")
Now we can register those sweet achievements: whenever your player slays that nasty dragon, feel free to call
Integration.integration_scenario.set_achievement("YOUR_NEW_ACHIVEMENT_ID"). The Steam or Good Old Games backend will respond prominently by shouting out “Hail the new King!”, or whatever you have come up with.
Testing and Export
After you have added some API functionality, you sure want to test if everything works as expected. Running your game from the Godot editor should work fine and you will be able to call the API functions as long as the Steam or GOG client is running. However, since Godot’s feature tags are only available on exported projects, you have to change to code a bit and load the integration_scenario directly.
Exporting all the builds, you can upload them to their respective platform. Both Steam and GOG offer great upload tools to ease the process. Don’t forget to add the respective dynamic libraries (DLL/SO/DyLib) to your executables, or your game will not start. They should be placed in the same folder as your game.
Usually you should have something like this:
Windows
- MyGame.exe
- MyGame.pck
- Galaxy64.dll (or steam_api64.dll respectively)
Linux
- MyGame.x86_64
- MyGame.pck
- Galaxy64.so (or steam_api64.so respectively)
MacOS
Open or unpack the MyGame.zip file and place the shared library in MyGame.app/Contents/MacOS/ next to the executable.
And that’s it: your game is now part of the big, chaotic family called Steam, or Good Old Games, or both.
Credits
All software presented, Godot, the Steam module and the GOG module, are open source projects, developed by individuals in their free time. If you use them, give the parties involved a donation, some love, a coffee, or at least a well-formatted bug-report.
A dedicated software team brings a wide range of skills, knowledge, and points of view to the table, making sure that the end product is not only useful but also new. Go Wombat knows how important it is to have a development team with a lot of different skills. Their experience making unique software and mobile apps shows how powerful it is to work together