My Very Lazy - No Dig, No Till, No Weeding - Garden Bed Prep Method
I am practicing a REALLY lazy way of prepping new garden beds that doesn't require any digging, tilling or weeding!
Let's get right to it... no beating around the bush.
Here is my recipe!
- Make a pile of compost on top of your grass
- Wait one year
- Peel it back and reveal your brand new, fertile garden bed ready for planting!
Sound easy? Well it really is. Ok, I'll show you how it works with SIX different examples (limited only by my imagination)!
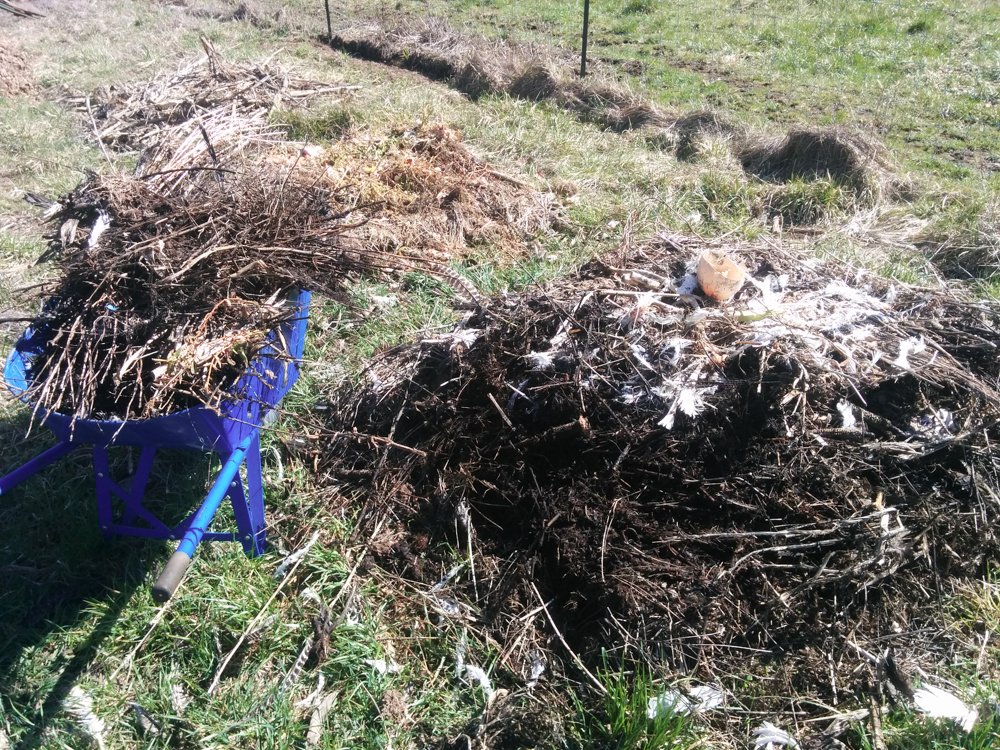
The picture below is a clue as to how it works. These compost piles have been sitting through the winter.

First I want to show you why I am practicing no-dig, no-till garden bed prep. Last year this is how I started prepping our flint corn beds.
- First we had to wait for the soil to dry enough.
- Then it took a lot of labor broadforking the beds.
- Then I had to wait for the soil to dry out more.
- Then it was a LOT of weeding and shaking out soil from the sod using garden forks.
- Finally the beds were raked and smoothed over.
This took several days of work for two people. Don't get me wrong, I love the labor because my body feels good afterward, but when you just want to plant it takes a lot of your time to prep a new bed. Also, it was really worth it because we had just moved in and wanted MORE bed space to plant ASAP. But really, it gets old and with a little planning ahead, next season you will never have to till, fork or dig to prep new beds again!
Example #1: Turf Compost
Remember all that grass you saw in the last photo? Well I took it all, along with all the soil that was clinging to its roots (after some was shook off) and piled it into one big pile that was 4 feet wide and 4 feet tall. That pile also ended up with some kitchen scraps and garden weeds, etc... but mostly it was turf and soil.
This is what it looked like after 1 year:

As you can see it shrunk a lot from 4 feet!
I didn't turn it at all during that time. This is the slow, cold composting method. Thanks to @bobydimitrov for sharing the Slow and lazy compost method - this is essentially what I did!
Although in this case I wouldn't call call the result compost because there is a lot of soil in here that clung to the grass. So I would call the result a soil that is very enriched with compost!
So now that it has been a year I start removing the "compost" and see what is revealed below!!

The grass where I had piled this material is now completely gone. Even the growing grass and roots below the surface have been composted. What we are left with is some really beautiful, enriched soil.
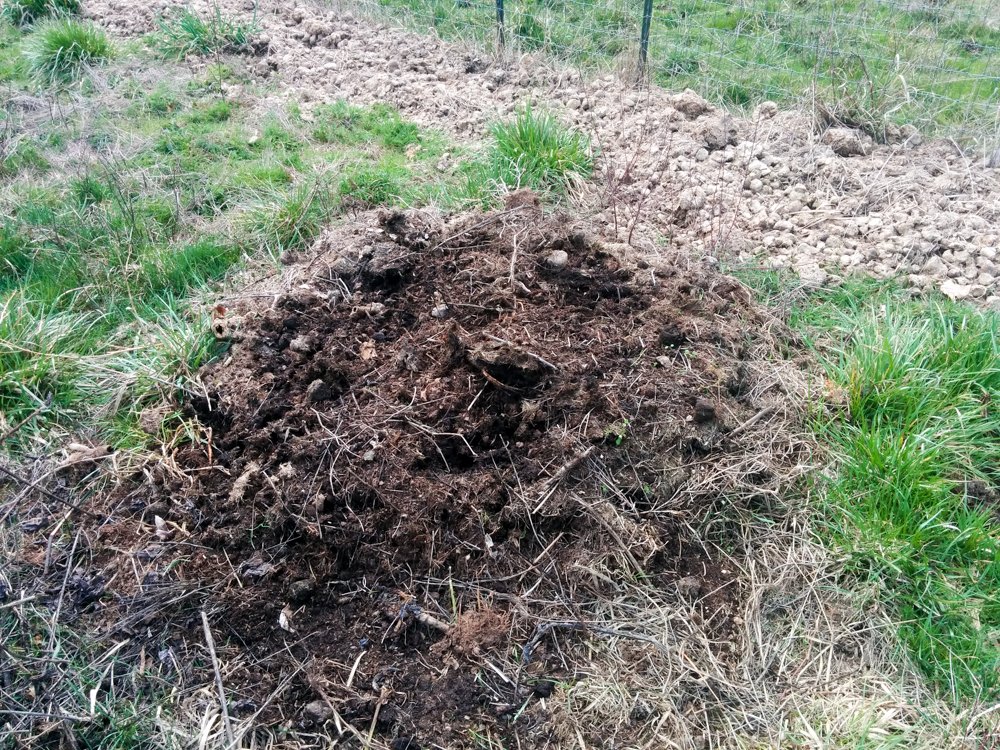
What did I do with all the material I pulled off? I created another pile on another piece of grass close by where I want to have another garden bed next year (or later this year if I am in a hurry).
Here is my new pile!!
And since I took this picture a few weeks ago I have already been piling other stuff on top of it.

My new garden bed!!
Here is the new garden bed! It is so beautiful! All I had to do was take a garden fork and remove the pile piece by piece and make a new pile, essentially turning my slow compost and let it keep working its magic for the next garden bed. I left some of the compost on top of the new bed for extra nutrients and raked it flat.
It was so easy! No forking, no digging, no weeding. And it is immediately ready for planting.

Example #2: Manure + Grass Clippings + Kitchen Scraps
Here is another pile I made last year that was 3 feet by 3 feet and round in shape.

This pile was made by alternating layers of horse manure and grass clippings.
But a majority of the pile was manure and grass. Once it was built up it cooked fast! and then we just kept adding kitchen scraps and weeds to it.

After a year later the pile is totally shrunk down and mostly decomposed!
Since it is a lazy, slow compost method it is not 100% compost, there is still some un broken stuff since I didn't turn this compost pile. But that is totally OK, I am going to add those unbroken pieces into the next compost pile for the next Lazy no till garden bed prep for next year, or later this year!
I start digging in to see what it looks like inside the compost... just what I expected, a lot of rich compost!!

And after removing the top part of the compost pile...
Here is my new garden bed!!!
I left some of the compost on the garden bed for fertility. Again, it is totally ready to plant!

Example #3 - Manure + Corn Stalks
In this photo you can see 4 big square piles. As you can see I am starting a lot of lazy no till garden beds!
Going from left to right, #2 and #4 are new piles that I am starting that are alternating layers of corn stalks from last year's corn patch and horse manure. I started both of these piles mid-winter when I realized I want to have some more beds for squash this summer. Technically these are not compost piles because they are not tall enough to compost. So I will call them mulch piles for now.
This is a great experiment to see in 6 months if these mulch piles will be enough to kill the grass beneath them and compost the grass and grass roots so that I can plant into them. The resulting beds will probably not be as nice as the beds that were composted for 1 whole year, but I think they will be nice enough for planting squash.
This is an ongoing lazy process so you will have to wait a month and a half for me to uncover the mulch and see if it is good for planting.

Example #4 - Big 'ol Manure Pile
In early January, at the same time as planting the piles I just showed you I made yet another pile.
This time I used only manure. Here is the filed of horse manure I had to work with! I moved it into the garden by the wheelbarrow full. This part is really the only part of this process that is not lazy. But forking and wheelbarrowing manure sure beats broadforking sod.

I scooped up all the manure I could find.
This time I made a pile roughly 5 feet by 12 feet by 1 1/2 - 2 feet tall. I figured this would be thick enough to keep the grass from growing through. So far it has been. I will uncover it around June and see what it looks like! You'll have to wait and see with me.

I had lucky timing and was able to move this manure before it got really snowy and really wet this winter. But Ideally all this work would be done in the fall before winter so there is more time to compost.
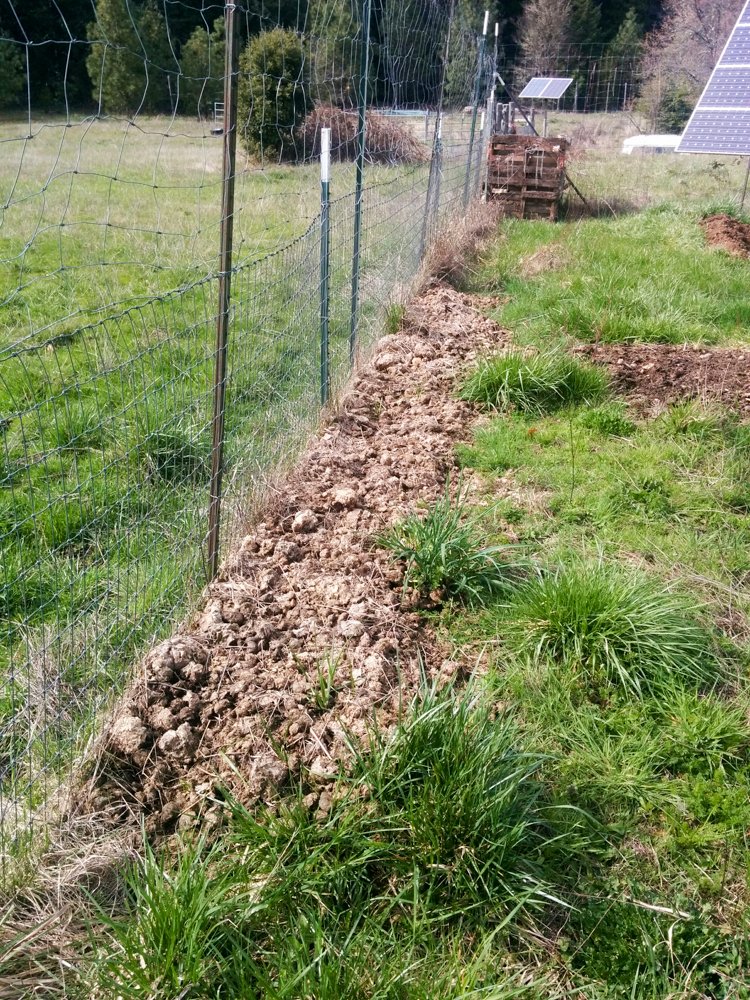
Example #5 - Shallow manure rows along fences
So here is another method I am trying. I took some of the amazing horse manure and piled it along fences about 1 foot wide at the narrowest and 1 foot tall or slightly less.
I want to have vertical space for growing beans and squash up the fences so I picked some fence edge where the sod is the squishiest and least thick. Using my intuition I think these would be fastest to decompose.

I am really pushing the edge of how little manure I can use to prep a bed in as little time as possible.
This might be pushing the edge too far and I might end up with grass roots that are not fully decomposed. But I am willing to try it out and see - and you can learn from my results later this season when they are revealed.

Basically I am observing from nature that one single nice pile of horse poop can decompose a tiny circle of grass given enough time.
But sometimes grass grows through the poop instead of the poop decomposing the grass. I want to find the sweet spot of just enough poop to decompose the grass. Turns out that so far grass has only grown through the poop in a few spots, so I piled more poop on top of those places, the rest are looking good so far.
Example #6 - Raised bed of compost
Here is a raised bed I made using two pallets and a fence corner. It is filled with compost and I planted Burdock in it.
I'll share more on that in another post later.
After one season this raised bed will surely compost and kill the grass and roots beneath it and next year there will be a brand new, super rich, 3 foot by 3 foot bed for planting anything we want!

Conclusion
I hope this inspires you to try making some lazy no till garden beds!
Benefits
- No sheet mulching
- No digging
- No tilling
- No wedding
- No mixing in compost
The only negative to this method is that it is fairly slow - it takes a whole season to do the magic. But the negative is actually a positive because we can enjoy our gardening knowing that the compost and mulch piles are working for us all season long!
Two mulch piles, a brand new no till garden bed and a new slow compost pile with compost/soil on top.

Same piles, with yet another new pile I started with weeds and other materials from the garden.

![]()
Website | @homesteaderscoop | Discord Community

#naturalmedicine | Introducing @naturalmedicine | Discord Community

#tribesteemup | @tribesteemup | The 8 Pillars of TribeSteemUp
This reminds me of the ruth stout method of gardening. She also practiced no till, no dig, no weeding. Simple piles of mulch or straw and seeds tossed right in there.
We are planning our future gardens with a no till method as well! I'll keep following along on how yours grows!
Very cool! I've never read Ruth Stout, but of course I have heard of her famous method. It is nice that this no till method can be forgiving with almost any material :) Good luck with your upcoming garden plans!
Yes thanks, best of luck to you in yours as well!
Not sure if she has books out but I know there is a good documentary on her. Perhaps it's on YouTube?
I tried a similar method. Piled the bed with hay and covered it with a polyethylene for a year. Just today I removed the polyethylene. The hay is not completely rotten, but the ground under it is just great, with fat worms.
I just saw your post. The soil looks great! Nicely done!
Thanks. I added a couple of photos to the post (I forgot them when I wrote). And I have another secret recipe :) I'll write about it a little later :)
The manure and old corn stalks is similar to how I prepped my area this year. Hoping the fall leaves and dead stalks aids as a mulch, shade, and nutrition layer to foster good root growth on my plants.
The grass sod example, I will be very surprised if that works well without extra soft compost and fertility added to the soil.
Interesting experiments going on.
Sounds like you are onto a very good mulch with the leaves and stalks!
Yeah the grass sod should be very good! Alan Chadwick calls this turf loam. His method is alternating sod soil touching soil, grass touching grass. (I wasn't as precise when I made mine) With our heavy clay soil I can hardly call this result loam. But it is very enriched soil from all of the composted organic matter of grass, roots and weeds.
I am very confident I can plant directly into this bed any type of vegetable. Disclaimer--- the soil under the grass was healthy to begin with, but now its even better.
Interesting method of gardening! Will have to attempt this myself
Yes, digging, tilling and weeding are a ton of work! I have raised beds to which I just covered over the grass with paper and cardboard first then my covering of soil, leaves, clippings, food scraps, etc.,, but I still deal with the quack grass that seems to make itself everywhere and sprouts up in the middle of the beds, so irritating!
Oh yeah quack grass would take extra effort to manage!! In past sheet mulching attempts with bermuda grass I found that it is important to make many layers of cardboard, interlacing overlaps at least 6-12". If you just make one layer and only overlap an inch or two or don't overlap the bermuda grass is bound to get through. I like at least 3 layers of cardboard or half inch thick layer of cardboard minimum at least in those situations and edges overlapping at least a foot apart to be extra sure.
You've been visited by @riverflows from Homesteaders Co-op.
Seriously re-steemy-compostable! Amazing. Can you just come over my place please and do my beds? This is a fabulous post - so informative! Needs bookmarking on my end!
A community marketplace of ethical, handmade and sustainable products available for STEEM, SBD (and USD): https://homesteaderscoop.com
follow: @homesteaderscoop
Thanks @riverflows! LOL I would love to if the air fare is paid... or maybe you could just come pick me up in the dingy :P
Gardening and farming aren’t for lazy dudes, as lazy as the title might sound, I saw hard and smart work underneath! Thanks for that comprehensive tutorial @sagecrub! You’re fantastic and hardworking!
Posted using Partiko iOS
LOL good point! It's like Fukuoka's "no work" philosphy doesn't really mean no work, and if you're in not to do work you're bound to be disappointed!
I really love these beds you have created, the less digging we do the better, I really look forward to seeing how the plants grow on the different beds, what a great experiment and well done xx
Thank you @trucklife-family! I will have to post an update later in the season :)
The CooperFelix-Multiservices Team appreciates the content of this post by giving it a 100% upvote. We invite users to participate in the Project by offering a small donation on Fundition.
Wellness Is Green
The image is owned by the author and the use, reproduction or quotation without authorization is forbidden
Great experiments! I've got three beds at the back that are working well, and one I want to improve. I'm thinking a layer of compost this year and left until next year will do the trick. At the front, I have been wondering how to tackle the "lawn" and convert it to beds. I've just seen a post about straw bales and I'm wondering if this would give me both an instant set up and be preparing for the long-term future as the bales break down over time.