[Gardening]: Transplanting a coffee seedling and a dwarf oregano | STEP BY STEP
Hello garden friends!
Today, as I tell you in my last work session that you can see HERE, I will continue to transplant several seedlings that I wanted to have for some time in my urban garden. One of the plants that I will work today is a coffee plant, if a coffee plant, and I know many will say that it is something strange, then, the coffee plant needs certain conditions that are only provided by a mountain climate, such as that of the "Coffee Plantation 4D" that I visited a few months ago (from there I got this seedling). But knowing a little about those ideal conditions to grow coffee in the countryside, I can emulate them on my terrace and have a coffee plant that in this case will help me decorate my garden, because we all know that the maximum that can be produced is an equivalent of approximately 250gr of coffee already roasted per plant, this under ideal conditions.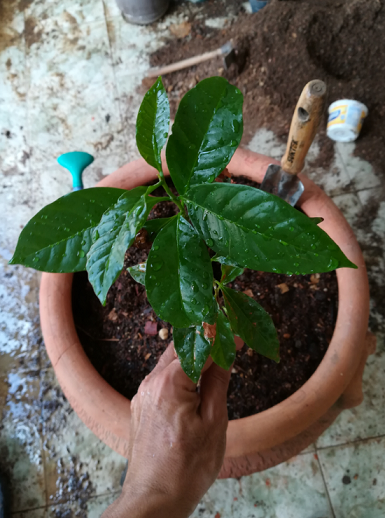
This coffee plant is variety Colombia 27, which is a variety that can be cultivated at full solar exposure, low altitudes and what I like most is that it is resistant to rust.
Coffee Roya is a fungus that makes our coffee plants sick, producing an orange powder on the leaf surface producing defoliation, weakening and a later death of the plant. This disease has caused considerable economic losses to many peasant families that are engaged in coffee growing. Currently, coffee varieties have been developed that resist this disease, in addition to being early and highly productive.
The first thing I will look for this plant is a deep pot, over 50cm, looking in the nurseries I got this clay pot that is about 90cm deep and it seemed ideal for my coffee plant. Also take advantage of the visit to the nursery to obtain mountain land which will mix with other materials such as gravel to obtain a substrate with good drainage, you can see the photos and the preparation of the land in my PREVIOUS publication.
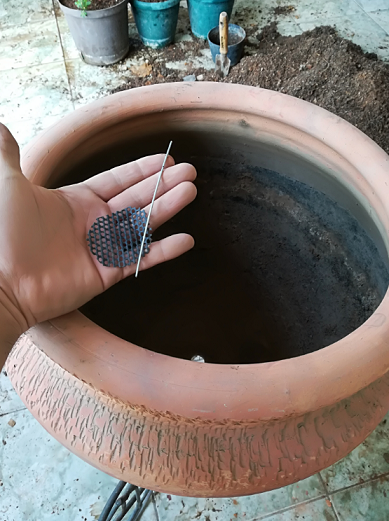
Already with our pot and soil at home, we just have to look for a plastic mesh for our transplant, the diameter of the holes will depend on how fast you want the water to come out of your pot, I usually use it for this type of work the same diameter that I use for bonsai that is 0.5cm per hole. You will also need a piece of wire to fix the mesh to the pot and thick gravel. It is important to mention that you also need the watering can and a broom to clean the earth that spills on the ground ... In my case, there was a lot of dirt on the ground! hehehe
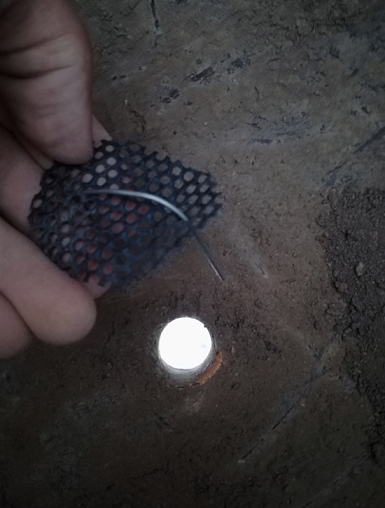
We bend the U-shaped wire and carry the wire mesh assembly to the drainage hole of our pot. Something I do not like about clay pots is that they make holes for drainage very small, for which we must place coarse gravel so that the water drains well.
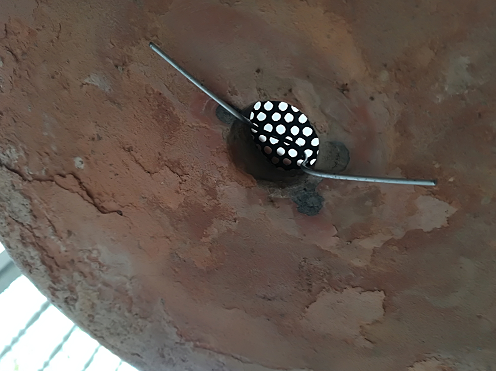
This is the view of the pot from below, so we must bend the wire to fix our mesh in the pot, this technique I apply as I mentioned before, in my bonsai transplants. This type of grip will facilitate the removal of the substrate when replanting our garden plants, as it is easily released. Once we fix the mesh, we place the thick material for drainage.
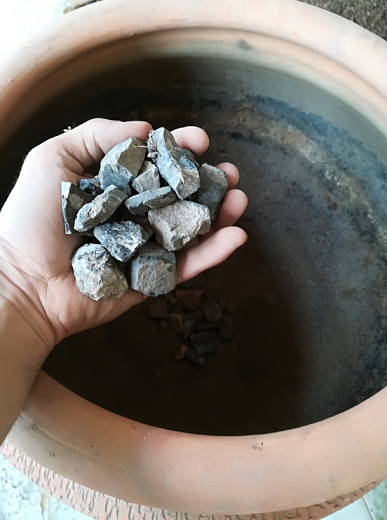
As drainage material use construction rocks, this is used for three reasons, one is to obtain good drainage and an easy exit from the water of the matero. Another reason is that it helps with the circulation of oxygen in the substrate, something that the plant will be grateful for and it will be reflected in its good state of health. And the last one is that these pebbles make the thinnest substrate does not come out through the drain at the time of watering.
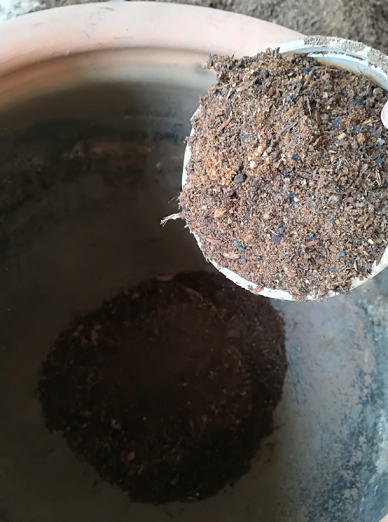
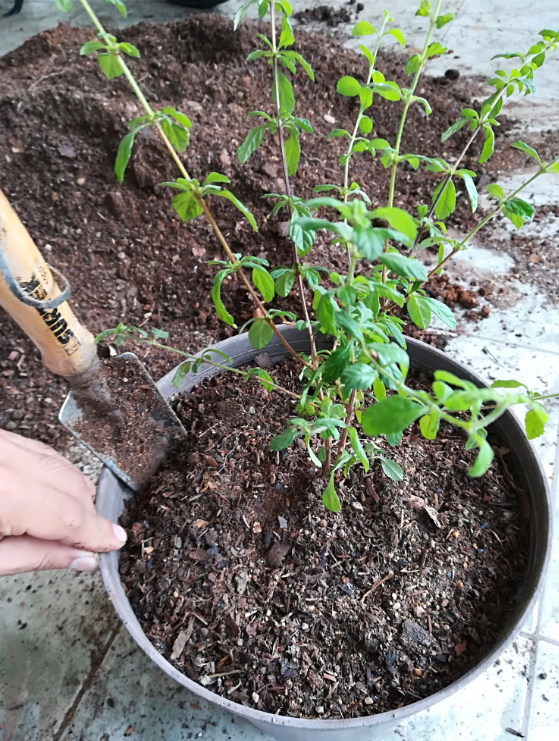
I am ready to add the prepared substrate to the pot, if you do not know how our substrate was prepared HERE I tell you how, I will try to place the substrate evenly trying not to leave air spaces between layers, for this we can give small taps to the matero, that will give that vibration effect, so that our substrate is well distributed.

Once we have filled the matero with the substrate, we proceed to water, so we wet all the material, completely eliminating the chances of finding air chambers. At this time I take advantage of inoculating the fungus Trichoderma harzianum in the substrate to disinfect the substrate.
Trichoderma harzianum is an entomopathogenic fungus that acts as a soil disinfectant, fungicide and seed treatment. This colonizes the roots of our plant, eliminates malignant fungi and helps inducing resistance and growth to our plants. This fungus comes in a wettable powder that is diluted in water and applied in irrigation or by aspercion to our plants.
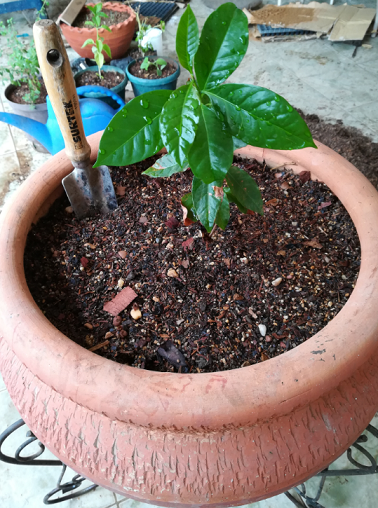
After the irrigation and the application of the Trichoderma we can say that the most awaited moment arrived, the sowing of our plant! We try at this time not to touch the rootlets of the plant to not cause stress and we remove it from the growing place to place it in its new matero, we water again and place a semi-shade until our plant reacts to the transplant showing new sprouting. This is more or less 15 days.
As subsequent care, apply fertilizer approximately one and a half months after the transplant. This is why it is very important to take note of the day of our work and keep records of each activity that is done in the garden, to know when the next activity will correspond. Coffee plants need a certain degree of shade to grow in optimal conditions, which is why I will place it in a shady place in my urban garden, trying to receive only the sun in the morning or in the afternoon.
Using the same steps for the transplant of the coffee plant, we change the oregano plant to a larger container. This variety of oregano I like very much as a condiment of the meals, because it gives that touch of Mediterranean food that personally fascinates me. That's why I bought it in the nursery when I saw it!
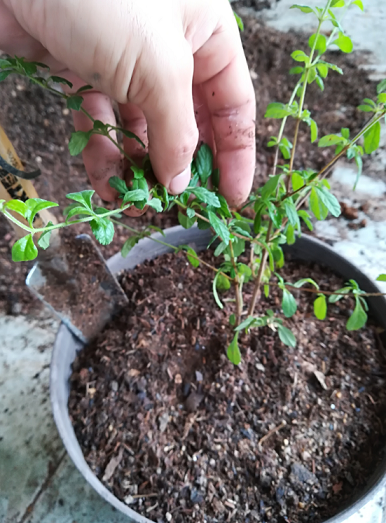
This oregano seedling is known in my country as a Dwarf Oregano and is widely used in all the houses in my city. From this plant the leaves and the finest branches are taken, dehydrated and then ground, so it is applied to the meals and the taste is spectacular. If you add the flavor of the oregano, with tomato paste and paprika the first thing that comes to your mind is PIZZA hehehe.
This oregano is very easy to grow in our garden. You need a pot of about 30cm deep, with a well drained substrate, here if I repeat, WELL DRAINED, because, although the plant likes moisture in the soil and we must water it twice a day, it does not accept stagnations. If the soil becomes waterlogged, we will immediately have roots and death of the plant. He also likes the sun, for being a plant of the Mediterranean we will try to place it in a place where it receives the sun of all day. As for fertilization we must apply high fertilizers in nitrogen (N) because with this we favor the foliar development that is what we will use in the kitchen. If we apply some fungicide or insecticide we will wait about two months to harvest their leaves, giving time to eliminate all the residues. I recommend using biological products and organic fertilizers.
Friends, without saying more than to say goodbye, I hope your comments and your contribution. If you have this type of plants in your garden, do not hesitate to upload a photo with your contribution in the comments, I will be waiting to answer. Without further ado I wish you a happy and blessed day gardeners!

WooHoo!!!
Tpot has arrived to the party. Thank you for being a community member and posting wonderful contents.
Please keep visiting our discord server.
nice..
is it hard to care for the coffee plant? Is it producing? Any type of environment it requires?
Hello @glenlivet! really is not difficult to take care of, it is similar to a garden plant, a selection of what you can handle as an indoor plant, which receives only a little sun in the morning or in the afternoon. The detail is, in that, to achieve the production of coffee cherries in a pot, you must pay close attention to the fertilization, both in the soil and in the leaves and reach a moment before we harvest the productive product and the architecture of the plant. Something important is to take care of the leaves and the horizontal branches, since this depends on the flowering and the formation of fruits. The quality of the grains depends on the height you are in, the higher the better the aroma and taste, greetings!
This post has received a 14.56% upvote from thanks to: @daniellozada.
For more information, click here!!!!
Send minimum 0.010 SBD|STEEM to bid for votes.
You got a 23.39% upvote from @mercurybot courtesy of @daniellozada!
Congratulations! This post has been upvoted from the communal account, @minnowsupport, by dlozada_3 from the Minnow Support Project. It's a witness project run by aggroed, ausbitbank, teamsteem, theprophet0, someguy123, neoxian, followbtcnews, and netuoso. The goal is to help Steemit grow by supporting Minnows. Please find us at the Peace, Abundance, and Liberty Network (PALnet) Discord Channel. It's a completely public and open space to all members of the Steemit community who voluntarily choose to be there.
If you would like to delegate to the Minnow Support Project you can do so by clicking on the following links: 50SP, 100SP, 250SP, 500SP, 1000SP, 5000SP.
Be sure to leave at least 50SP undelegated on your account.