Propagating currants (and other Ribes sp.) with cuttings
OK, there are tons of tutorials and videos on propagating berry bushes by rooting cuttings. However, most are pretty complex, involve lots of steps and equipment and frankly, make the whole process seem a bit intimidating.
I'm not a person that over-complicates things. If there's an easier and simpler way, I'll always prefer that even at the cost of reduced efficiency.
I wanted to share my experience with rooting black, red and white currants (Ribes nigrum & Ribes rubrum, the white being a cultivar / variety of the red currant). It's super simple and I urge everybody to try it!
Simple, no-frills, low maintenance propagation via cuttings
- In late autumn, cut some branches off an established bush or take a bunch from a friend that makes his yearly thinning.
- Cut those branches in pieces, so you have 4-6 buds on each piece. (called "a cutting")
- Stick each cutting in the ground (or a pot) so that 2-3 buds are left above ground.
- Water well and then mulch deep or otherwise make sure the soil does not completely dry until late summer next year.
- You're done! It's that easy!
What remains is to take out the cuttings and plant them out at their permanent place. The best time to do that is autumn, when their leaves fall off at least partially. In our part of the world, that means October-November.
Here's a photo of a rooted cutting I took out of the ground this October. Note the three white underground buds, that will develop as branches, coming out of the base of the plant. Most of the leaves have fallen, except for a few at the top.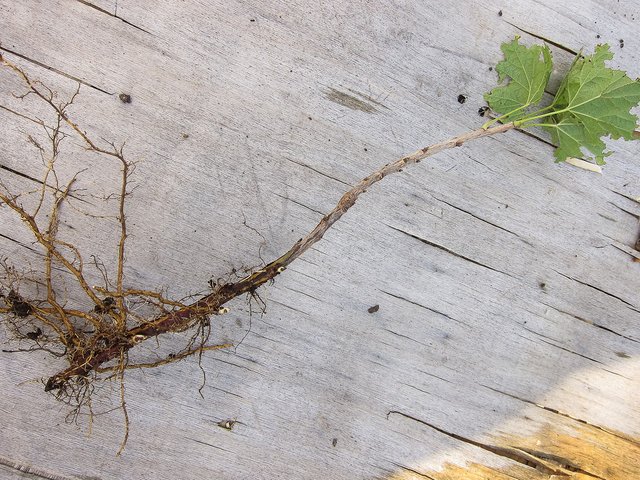
Using this very simple method, I've managed to root about 35 out of 40 cuttings this year. Those 35 are now transplanted in their permanent place and I'll use them mainly for cuttings material and not harvesting. The long term goal is to have a steady supply of rooted plants each year for giving away, sale and planting in the wild!
This autumn, I've put nearly 200 in the ground, which will (hopefully) root and will be ready for transplanting in 2018!
Extra details
In this massive section, dedicated to the avid reader and gardener (cheers to all of you!), I'll give a bit more details on each of the steps. You don't need to know all this below to make successful rooted cuttings, as demonstrated, but it will help you get better results, i.e. more of the cuttings will take root.
1. Obtain the cuttings
Most berry bushes are well receptive of an yearly pruning. In fact, most have to be pruned in order to be productive in the long run. The aim of the pruning is to make a well-ventilated bush, without too crowded or touching branches. Also, you need new growth on the bush to stimulate fruit production - it's more complicated that this and it's species-specific, but that's a topic for another post.
So once you have access to an established, productive bush, say a 4-5 year old, you basically have an unending supply of cuttings for propagation!
The best course of action is to find a friend or neighbor that has the species you'd like to propagate. This way you have higher chances of success, as the plant is already accustomed to the local micro-climate, soil and growing conditions.
If you cannot get some branches in late fall, when it's the usual time to trim the berries, very early spring is also an option. However, make 100% sure the sap is not yet flowing! If you make the cut on the "source" bush and there's a dew drop forming on the branch, either don't cut and leave the project for the autumn, or use horticultural wax on each cut. Otherwise you risk killing the source plant!
After you obtain the cuttings, act quick, so they won't dry out. It's best to put them in the ground 24-48 hours after the initial cut. If you have to postpone the operation, wrap the whole bundle of stems in wet cloth or paper and keep it in a cool, dark place.
2. Prepare the cuttings
Usually, when trimming berry bushes, you end up with stems and branches 50-100 cm long. That's way too much for the purpose of rooting cuttings!
Using pruning shears, cut all the branches into smaller pieces (cuttings). Their actual size is not so much important, as the count of the buds left on each piece.
In theory, you can root a cutting with a single bud above ground. However, most berry bushes' natural shape is a bush, duh! So it helps to have a few buds that will develop into branches early on, near to the base of the plant. You can always prune it to the shape you want in later years, but it's much easier to achieve that shape if you start with a well branched cutting.
When making the cuttings, try to leave 4-6 buds on each one. Depending on the spacing of the buds on the stem, some cuttings may end up 10 cm long, while others - 25-30 or even more. That should not be a problem.
Always try to cut as close to the bud as possible without the risk of damaging the bud in the process. Try to make all cuts at 45 degrees (diagonal cuts in respect of the stem), sloping away from the bud.
Here's an example of an experimental black currant cutting with plenty of buds left on it, about a dozen: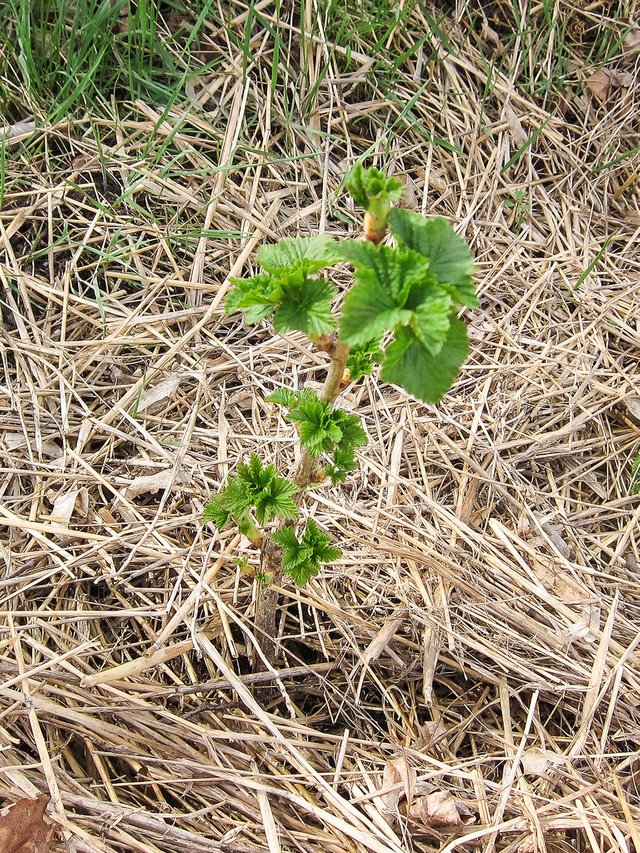
The only problem with this many buds on a cutting is that new baby roots may not be able to feed such a big plant. And my experiment showed exactly this. At the end of the season, the smaller, 2-3 bud cuttings had larger and more vigorous growth, compared to that with the dozen buds, which basically leafed out and stopped (but it rooted, nonetheless!)
3. Plant the cuttings
At this point most tutorials recommend using rooting / growth hormone dips, as well as over-preparing a special bed for rooting with compost, compost tea, double deep digging, adding sand or perlite, etc, etc, etc...
If you'd like to save yourself some labor, time and money, don't do any of those!
Sure, they'll help. But if 35 of my 40 cuttings rooted directly stuck in clay soil, without ANY pampering, no special bed preparation, hormones and the whole shebang, are those 5 extra worth the triple effort?
What I do recommend is using your vegetable beds as "rooting beds". Hear me out.
- Your vegetable beds are going to be watered well anyway and they probably already have nice tilth (nice crumbly soil structure).
- Your cuttings won't put out massive roots that would compete with the vegetables.
- Your cuttings won't grow much in size, so they won't shade out anything.
- You're going to take out the cuttings in the end of the season anyway, just in time for cleaning the garden, so your vegetable beds are going to get an extra light digging for free! How convenient!
- All the care you're going to give your veggies - weeding, foliar feed, mulching, etc - is going to benefit the cuttings as well.
- Your cuttings will feel better if you put them in the shaded side of the bed, a place where not many other plants will thrive.
4. Care for the cuttings
By this point you've probably realized that by a bit a clever positioning, no actual focused care for the cuttings is needed.
However, if you planted the cuttings in a special bed or in a separate pot(s), you'll need to keep the soil moist. Not soaking wet, as that would promote mold and rot, but it should not become bone-dry until late in the summer.
The bed can be mulched with a mulch of your preference and whatever you have available, without the need of extra inputs. Cardboard (lay it out before planting the cuttings, wet it thoroughly and punch though it with the cuttings), straw (lay at least 15 cm of it), woodchips (make sure they're not compacted)...
Now a bit a plant physiology. Each bud has enough stored energy to open come springtime. So usually most if not all cutting will have leaves in the spring (the ones that suffered frost damage or dried out during the winter won't). That might seem optimistic, but spring is too early to get your hopes up. You can pull a cutting up at this time and you'll get a stick with leaves on it, no roots!
After the initial leafing out, the actual rooting will begin. This is the most important time for the cuttings. The roots develop and moisture (but not flooding) is essential.
It usually helps to keep the cuttings in a somewhat shady place, as that will tend to dry out slower and the plants won't loose as much water through the leaves via evaporation. So if you have not placed them in a vegetable bed, it's better to prepare the propagation bed in partial shade.
At some time during the summer, the roots stop growing and start actively feeding the new plant. At this point you'll notice new growth on the cuttings - buds will develop into branches. That is usually a good indicator rooting is successful.
5. Planting out
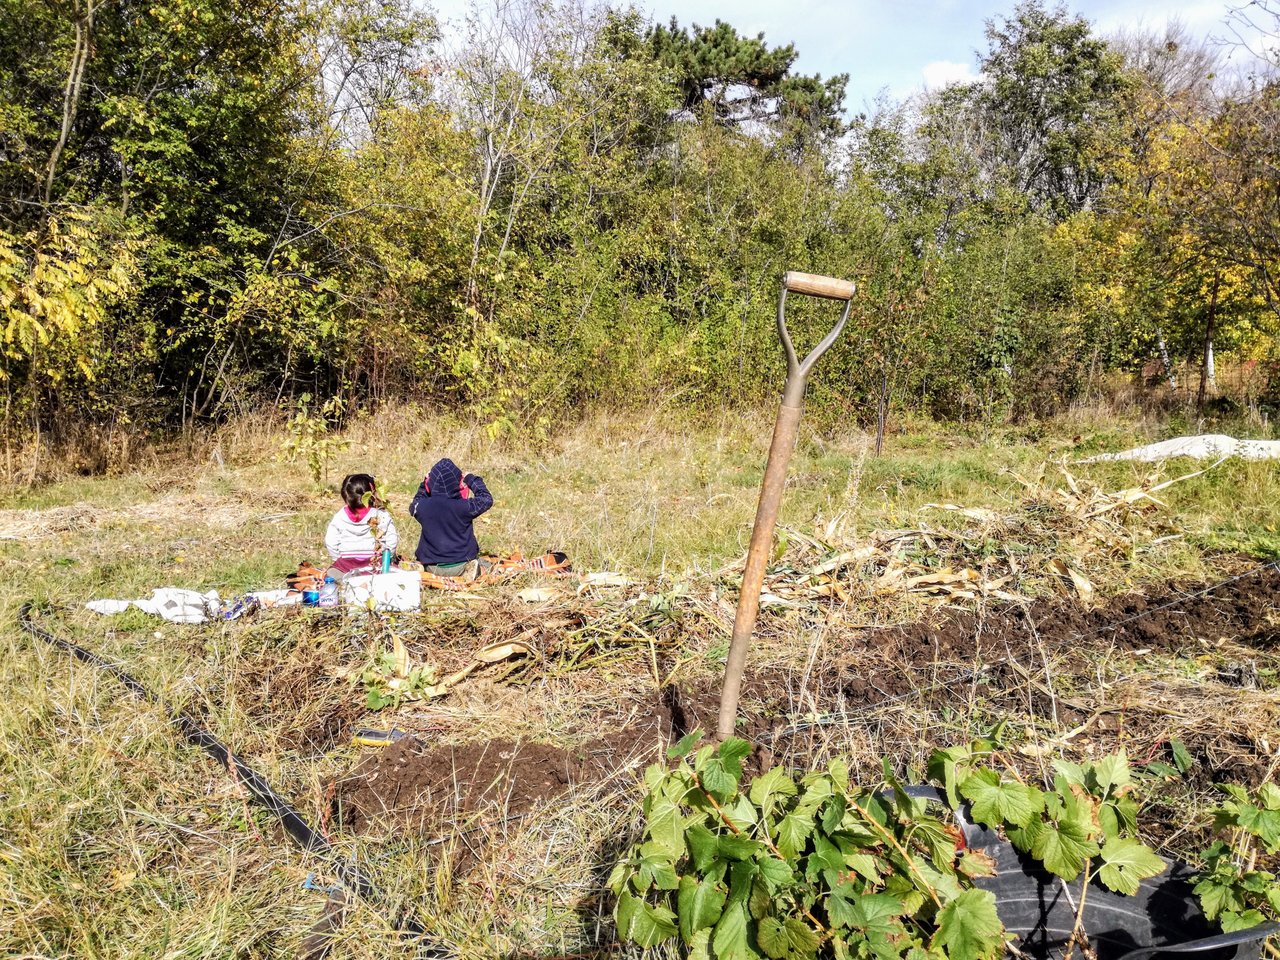
When the leaves of the cuttings start to fall in autumn, it's time to dig them out and plant them in the place you selected for them. As you can see from the this photo, I did not wait long for the leaves to fall :) The bucket of rooted cuttings shows a bunch of them with 75% of their leaves on.
The reason for this is that many perennials, including fruit and nut trees, keep growing and developing even in late autumn and into the winter as well! However, all that is happening underground, so we kinda live with the illusion of nature "hibernating" during the winter.
So it makes sense to plant out the cuttings as soon as autumn starts working her magic. And it actually improves their chances of taking root in the new location and surviving the winter, as well as giving them a headstart for the coming spring.
When planting the rooted cuttings, do not forget to water, even if the soil is wet. Watering helps the soil settle better around the roots, filling gaps and stabilizing the plant.
Is that all?
By all means, NO! That's just a quick skim of the surface! It's one of the things I like about nature and nature studies, as well as permaculture. There's always a nugget of easily understandable and working wisdom, covered with layers upon layers of complexity. It's up to everyone to decide the level of personal involvement in a certain topic.
In any case, propagating edible bushes is one of the great ways to get free planting material for your home garden! Don't even get me started on planting edibles in the wild!
Thank you all for reading! Three cheers for all that reached this point without skipping (much)! :D
This is great! I've been wanting to do this with what I already have growing but the instructions and info I've seen is very tedious. This is much simpler! Following!
If you do try this method, I'll be grateful to know your results! Please keep in touch! Thanks!
Will do! Even though we are now in winter, since our winter is milder I may try this soon.
Whatever you do may seem insignificant to you, but it is most important that you do it.
- Mahatma Gandhi
Great post! Love the abundance of nature
Resteemed and following :)
Thanks, ditto for your brambles post, just read it!
Very informative! I may just have to try it!
Thanks for sharing!
Please do! :) I have a friend that rooted two cuttings in a large pot and now has two currant mini-bushes on his terrace! And that was just the first step.
A few years later, using his own cuttings (!) he created an edible hedge for the parking space behind the condo where he lives. That's dozens and dozens new plants, all starting with just a single cutting! Gotta love nature! :)
That is amazing!
I've never grown currants before, Ill have to look up how to care for them. I love growing food for the family!
Love the idea of an edible hedge! I think more people should plant edibles for ornamentals. :D
Congratulations @bobydimitrov! You have completed some achievement on Steemit and have been rewarded with new badge(s) :
Click on any badge to view your own Board of Honor on SteemitBoard.
For more information about SteemitBoard, click here
If you no longer want to receive notifications, reply to this comment with the word
STOPHave you tried this technique with Haskaps / honeyberries? Blueberries? I am going to try your simple technique above for Eldeberries and currants this fall and am thinking of haskaps as well. I have a small home orchard that I am trying to start on a little half acre plot next to the house. Berries and propagating berries are a significant portion of my plan.