Self made watercooling tower #3
Part 2
In Part 1 of this series I have presented to you my idea of creating an external water cooling tower for my gaming computer based on parts that I already own. I have also given you an overview of the hardware I intend to use, and I also tried to lay out the next steps.
Since that first post I have been busy and now all the steps I have laid out there are completed - so I feel it's time for an update.
Today's agenda:
- List of which CAD models I found where
- List of parts I had to model myself
- Thoughts on water flow direction
- Thoughts on power supply
- What kind of tubing to use
- Next steps
1. Downloaded CAD models
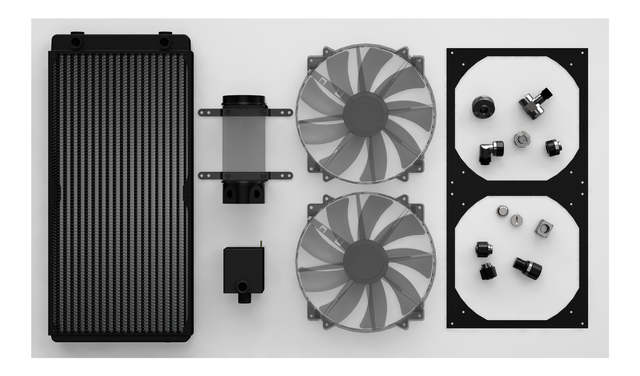
Alphacool Eisbecher (Reservoir):
Alphacool has an entire section of their website dedicated to 3D models ->link<-. The models are pretty accurate as far as I can tell, however they sometimes lack a little love. It would e.g. not hurt if the parts were provided in the form of assemblies instead of just one-block-models, or if the interior structure was modeled more thoroughly. Also they only provide a very limited number of models.Cooler Master MegaFlow 200mm (Fan):
Unfortunately, Cooler Master does not provide models for their parts (yet?), but I got lucky on my favorite 3D community site GrabCAD [->link<-]. The models here are created by any number of people who want to share their work. Usually one has to be careful with blindly trusting dimensions and so on, but I got lucky. Btw thanks to Jang Ji for modeling the fans.Small stuff (Fittings, Filters etc.)
Koolance currently seems to be most cooperative in terms of sharing models of their products (thumbs up!). I was able to find almost everything I needed in terms of fittings and so on there. It's a bit tricky to find. Go to the site of the product you want to use, then click on the "Files" tab.
Not all my fittings are from Koolance, but I figured they are close enough to be used for modeling. I need to keep in mind though not to go overboard and always keep some room for slightly different sizes and forms.
2. Self modeled parts

Very satisfying, yet time intensive work. I ended up modeling the following things myself:
- Phobya Xtreme 400 (Radiator)
- Fan carrier (Connects two fans to the radiator)
- Phobya DC12-400 (Pump)
- Scythe Kaze Master Flat II (Fan-Controller)
- Koolance VLV-BL1X2 (Ball valve)
If you are interested in downloading these models, check out my GradCAD page ->link<-
3. Water flow
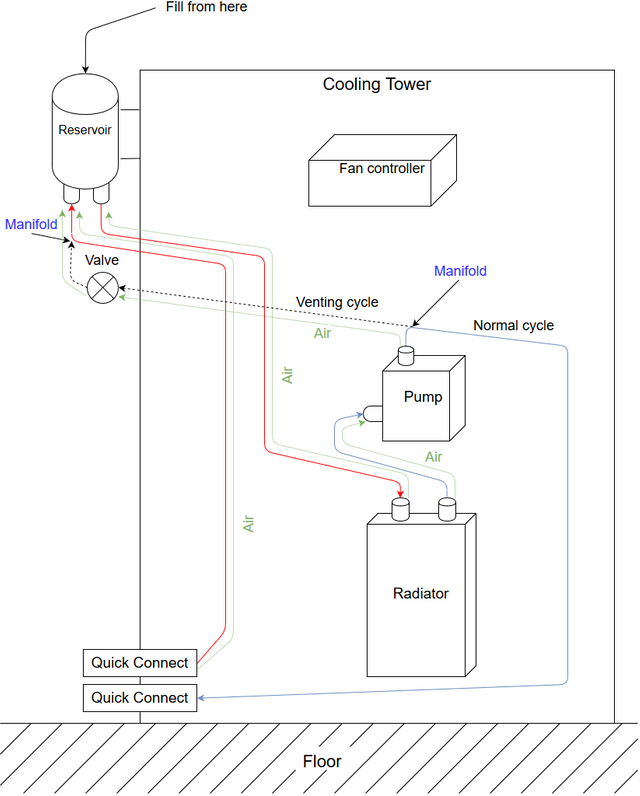
Anyone who has ever tried to build a water cooling system him/herself knows: Venting is a pain. There is almost no way to get all the air out of the system. I have done it twice now and it does get easier with experience, but still it's a mess. To avoid this I have come up with the following concept:

The water connection to the outside world will be realized with quick disconnect couplings, probably something along the lines of this. From there the water will flow upward to the reservoir, which is the highest point of the system. From there the now mostly bubble-free water will flow down into the radiator where it will transfer heat to the surrounding air. After that the pump (second highest point after the reservoir) will force the water out through the other quick connect coupling.
To facilitate the filling and venting process, I plan to add a secondary circulation pathway (dashed line). The filling (venting) process would then follow something like this:
- Turn off the power
- Disconnect the quick connectors
- Open the venting-cycle valve
- Open the reservoir on the top end and fill in as much coolant as desired
- Wait for the bubbles to rise (along the greenish dotted lines)
- Fill in some more liquid to compensate for the air that escaped
- Close the reservoir
- Turn on the power for a few seconds
- Turn the power off again and wait until the rest of the air has made its way up to the reservoir
- Repeat until no more air is in the system.
- Finally close the venting valve.
At this point there will be no more air in the tower. If there is still air in the previously disconnected computer's cooling system, it will now most certainly be pumped out and accumulate in the reservoir where it can easily be replaced with additional coolant after a few minutes of pump operation.
Whenever the tower is powered off, opening the venting-valve will open up a pathway for any left-over air in the system to slowly rise towards the reservoir.
4. Power supply
After spending some time looking into different ways to power the tower I finally concluded that it is not wise to give it an independent power supply. I will instead use either a 4-pin Molex or SATA power connector and an extension cord to provide power from the computer's internal power.
5. Tubing
In my current system I am using flexible plastic tubing. It was a good choice for my first build because it is easy to handle, but there are also a few drawbacks that are now becoming an issue:
Diffusion: Fluid slowly traverses the tubing material and evaporates, thus making frequent coolant refills necessary. Also, this is not really nice for the climate in my office. Of course diffusion is an issue with any material whatsoever, but with hard tubing like PETG or even better glass the diffusion will be a lot slower.
Degradation: After about two years of service, my flexible tubing starts to break down. It has become sticky on touch and is also a lot bendier. This means sharp bends that look fine when first installing the system will start to cut off water flow, and fittings might lose their grip, causing leaking.
Of course, using Borosilicate glass tubing would be the gold standard, but I will go with PETG tubing with an inner diameter of 10mm for now. PETG is a lot easier to bend and cut, and it is also less susceptible to tension-breaking.
6. Next steps
- Model a first digital prototype to see how big it will get and what kinds of parts I will require
- Order all the parts
- Measure the parts to make sure the model fits the real measures
- Finalize the digital model
Stay tuned.
Perfect Design.. BTW i hate CAD. I left engineering because of CAD. :P
Thank you @varun23. Sorry to hear that btw, for me it was the main reason to stay^^