VFX 101 - Digital Images
This is a introductory post for everybody who is interested in Digital Visual Effects. Some of you probably know most of the things I am writing down here, but some do not. This will be kind of the foundation for all my following posts since digital visual effects relay on digital images. I try to keep things simple and will try to simplify as much as possible. The main goal here is to make you understand some basic concepts, and from there you can do a more in depth research.
Almost every movie that gets released these days, is shot on digital camera. Even if they are shot on celluloid film, we need to digitize them first in order to be able to manipulate them on a computer.
But what is a digital image and where does it come from!? How can we manipulate it? What problems can be cause by certain image manipulations?
The Basics section of this post covers just the minimum technical understanding on what a digital image is. From there on we have a closer look on how to work with them. If you want to deepen your knowledge, the internet offers some great resources, but you can also ask me directly in the comment section.
The basics
Digital image definition:
A digital image is a numeric representation (normally binary) of a two-dimensional image. Depending on whether the image-resolution is fixed, it may be of vector or raster type. By itself, the term "digital image" usually refers to raster images or bitmapped images (as opposed to vector images).
Wikipedia
There are basically two different types of digital images that we are used to see:
- Raster based images
- Vector based images
Raster based images (also called bitmap images) are described by a finite set of picture elements, pixels, all of the same size and of which each stores information about it's color and opacity. The resolution/size of the image is dependent on the amount of pixels that describe the length and height of the image. If you try to scale up a raster image you will loose image-quality and sharpness because the new generated pixels only can gather information about their opacity and color based on the average values from surrounding pixels. If you scale a raster image down, you throw away information because you try to represent the same visual information with less pixels. If you save the scaled down version of the picture and try to bring it back to the original size, you will not be able to get the same image quality and sharpness you had in the beginning. This is because information got lost during this operations. In digital visual effects we usually work with raster based images.
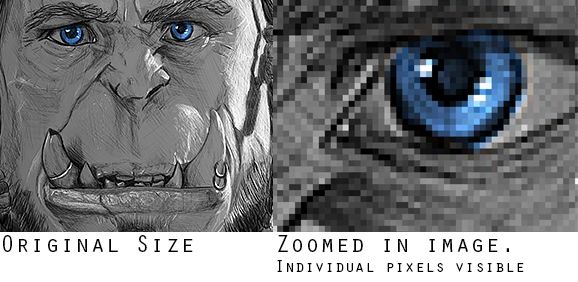
Image by @giorgiomarino
Vector based images are describe with mathematical formulas describing shapes in a 2D space. Since the shapes are based on math and not on pixels, you can scale vector images up and down as much as you want without loosing any image quality.
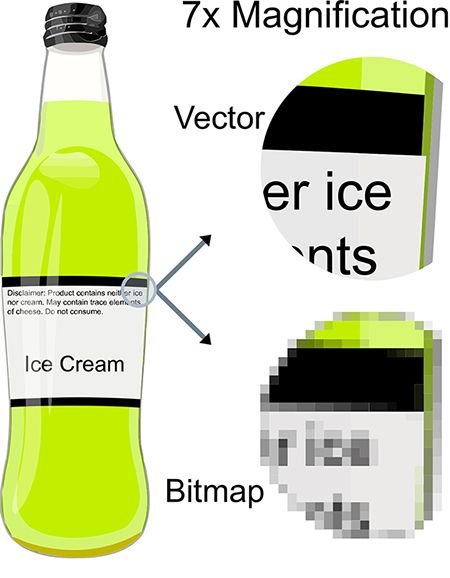
Imag by Darth Stabro - Transferred from en.wikipedia to Commons by Pbroks13.Source
There are ways to convert raster images into a vector images, and you can export vector images as raster images, as soon as you scaled them up to the desired size. I will continue to focus on raster based images since these are the once that we work with the most in visual effects.
Generating a digital image
2D/3D Image Software
There are different sources where digital images are created. The most basic one would be to open any 2D drawing software on your workstation and create a new file, of any size, and save it. Even without drawing anything you stored an image full of pixels with the same color. Usually white is used as a default color for every pixel in a new created canvas.
If you are using a 3D software, every time you render the scene from your 3D view-port, you generate a 2D-image that you can save and store on hard-disk.
Digital Photography
Another common thing is to use an light sensitive image sensor as we have in our digital cameras to take pictures and videos. It does not matter if it is a D-SLR, smartphone or pocket-camera, we capture light information with a sensor and we store it digitally in a raster image format. The max. resolution depends on the sensor resolution.

(Example of a camera chip and how it stores it information)Source
Digital Scan
A printed image or celluloid film can be scanned with a set resolution. The optics in the scanner analyses every inch of the print and translates it into pixel information in the pre-defined resolution raster. This will become the raw file of the digital image. Once this is complete the file can be saved in different formats.
For sure there are other sources like images created by a neural network or combinations of the 3 sources mentioned above. But this should cover the main sources.
Now that we know how to generate digital images we need to clarify the terminology.
Terminology
Resolution
Amount of consecutive vertical and horizontal aligned pixel that define the area of the image. The higher the resolution, the more information/image detail can be stored in an image. Based on the image size the file size increases or decreases.

Channels
The color information alongside with other image based information gets stored in channels. Those can be visible or invisible at first sight. Some of these channels are only visible in the appropriate software environment and can be used to read out additional information or to manipulate other data with it.
Bit-Depth
Is the number of bits that are used to store and describe color information of a single pixel. The higher the bit depth the more color range can be stored in an image. In a 8-bit image you can have a maximum of 256 different colors that can be assigned to a pixel. In a 32-bit image you can assign up to 16777216 different color-values + opacity information in a given image for each single pixel.

Source
File format
A file-format is a container for different types of data, describing what kind and how information is stored in it. In the case of digital images it can be used to compress the image file size, for efficiency, or add additional information into the file that can be read at a later point. Widely used file formats are for example: JPG, GIF,PNG, BMP, EXR.
RGB+A
So, now that we got all the basics covered we can start to look at those digital images a bit closer and explore what can be done with them.
In our digital world images are created by mixing the colors RED, GREEN and BLUE in all possible combinations. Each color saves its mixing values in a channel. So when we talk about RGB-images, it means we talk about images that are composed of a RED + GREEN + BLUE -channel.
The ALPHA channel saves the opacity information of the image. It decides if pixels are visible, semi transparent, or invisible. Images can have an alpha-channel but if not used they appear to be just RGB images, we call these unpremulted-images. As soon as you see an images with any type of transparency, it most likely has an alpha channel and therefore is a RGBA image. Images where transparency is visible are called premulted-image
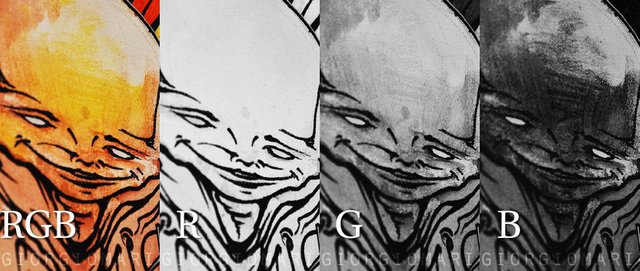
(In the image above you see a RGB-image and all its channels. 100% white means the color is mixed in 100%, absolute black means that these pixels do not contribute any color from that channel)Image by @giorgiomarino
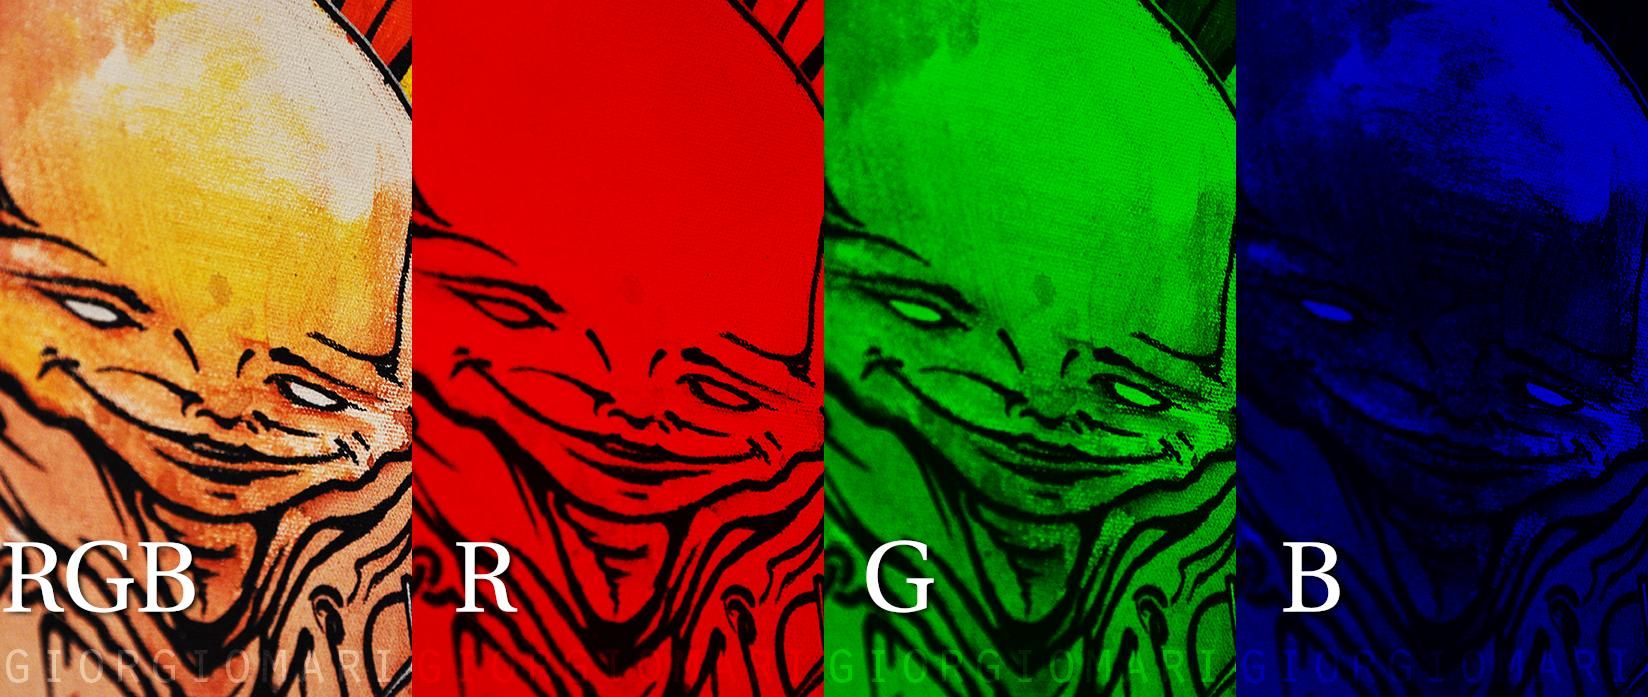 (Here we see the same image with the same channels, only this time we see how each channel looks like ones we assign the color with the dictated amount of color)Image by @giorgiomarino
(Here we see a RGBA image. In the first image the alpha is not used but still available in the image. In the second image we only see the alpha-channel. The 3rd image has the alpha active, so the black area represents the part of the image that would be transparent if we overly it over another image)Image by @giorgiomarino
To clarify the math behind the alpha-channel. The alpha-channel is a black and white image. 1 represents absolute white and means 100% opacity. The 0 represents absolute black and stands for 0% opacity. If we consider 1pixel that stores the RGBA values (1, 1, 1, 0.5) , this means that we have a white pixel and it is 50% transparent.
Other Channels
There are many other channels that can be saved in an image:
distance to camera of any given pixel, called depth-channel. This can be used to emulate DOF (depth of field).
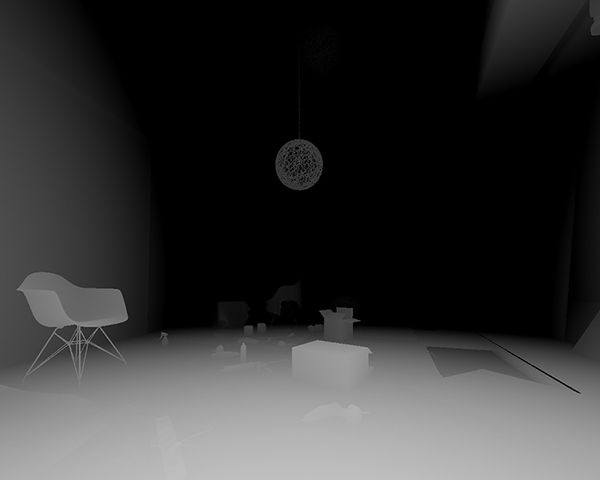
(There are different ways of saving the depth channel. In this case the darker the values get, the further away they are from the camera)Sourcemotion information of each pixel, called motion vectors, that can be used to emulate motion blur, based on the actual movement of the object of interest
IDs, or additional matting channels, that can be used like an alpha, to isolate areas of an image, or used to perform isolated color-corrections or apply isolated image filters.
world position pass, can be generated for 3D objects giving you a channel that describes in its RGB values the position in 3D space of each pixel. The depth channel only tells you the distance to camera, the word position pass can tell you the exact position within the 3D-scene from where the 3D element was rendered from.
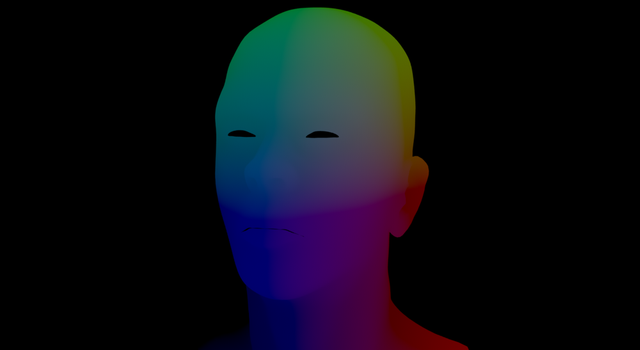
(If you would pick the color of any pixel in this image, you would get back a triplet like (100,50,75). Those are RGB values that represent XYZ coordinates in the 3d-Space from where this image was generated)Source
There are many many more, but this should give you an idea.
Image manipulation
There are different types of image manipulations that can be performed. Some of these alter the image in its appearance, but do not compromise its quality, others need to compromise some of the image quality in order to be performed.
Color corrections
Color corrections are any manipulation that only affects the color values of the pixels inside a given image. Usually mild color corrections do not compromise the image quality, but if pushed to far you start flattening out the color values causing the lost of image details and color variations, this is called clamping. How far you can push these color corrections depends on the image bit-depth.
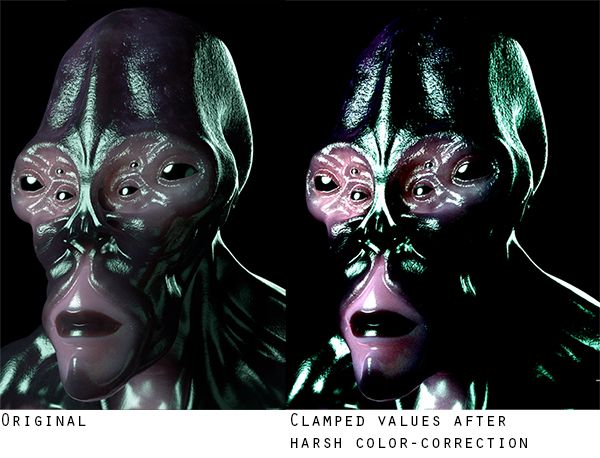
Image by @giorgiomarino
Translations/Rotations/Scaling
Translation: All operations that move an image in its X and Y axis. The resolution of a digital-image is a fixed raster that accommodates a fixed number of pixels. If we move the pixel inside this raster by a full amount (no decimals), then the pixels just travel from one raster unit to the other. This means we should be able to preserve 100% of the image quality. If we would move the image by a non full amount like 0.5pixel, the image raster-position does not match up anymore with the canvas raster. Now the software has to figure out how and with what values to fill the canvas raster based on the image that is lies over it. Depending on the algorithm it will calculate an average color based on the pixels that are closer to that raster unit. Usually this causes the image to become less sharp.
(Example of different outcomes, when we move images using sub-pixel values instead of full values.) image by Marc Edwards
Rotation/Scaling: Any type of rotation and scaling involves a certain amount of filtering. Some image editors gives you the option to choose what type of filtering to use during these types of transformations, giving you better or worse results. If you are not able to choose the filter type, then it would be better to avoid those type of transformations as much as you can to preserve as much of the initial image quality as you can.
Image filters
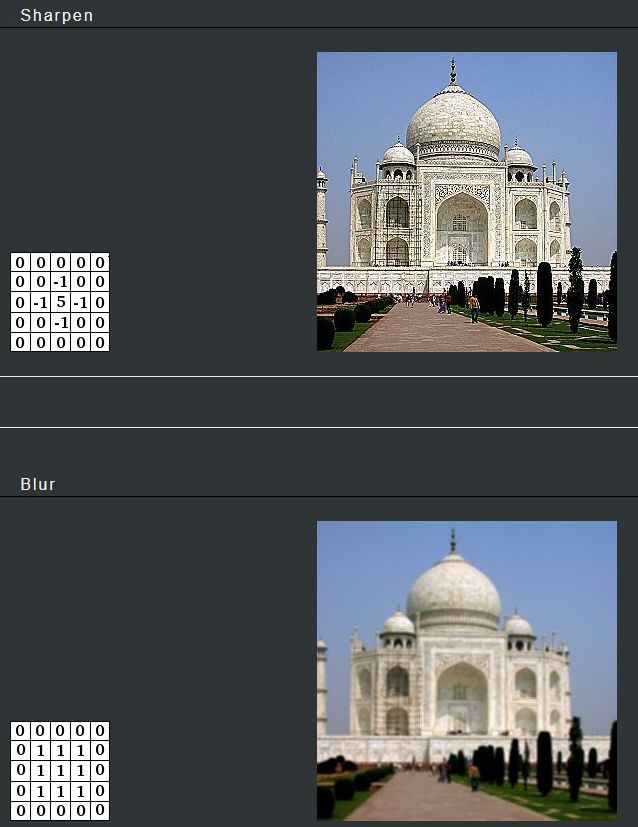
Like we mentioned before every pixel stores a certain set of values. For example a pixel could stores its color-values in a triplet that represent the RGB values. This would look something like this (1, 0.5 , 0.2). If we also have an alpha channel it could be written like this (1, 0.5 , 0.2, 1). Like you can see, these are all numbers, and to manipulate numbers we can (have to) use math.
So if you want to double the luminosity, color saturation and opacity of every pixel in an Image, you could multiply each value in each color channel by 2. Pretty simple right? So by adding, subtracting, multiplying and dividing the values in a pixel you can change the color and its opacity. We can use basically any kind of mathematical operator to manipulate our pixels. A common method to create most of the known image filters, blur/sharpen/edge detect ect., uses a convolution matrix to calculate the new value of each pixel to create the desired effect. If you want to read more about this check out the GIMP documentation online that explains a few basic filters more in depth. Programs like GIMP or NUKE have operators that allow you to create your own matrix that you can apply to any image you want.
Source
I think I will stop here now. I hope this was all not too geeky/boring or too simple =)
I tried to get the basic concepts across without going to much into the technical side of things. I hope this was useful for some of you, and now that this is done I think in my next VFX posts I will write about some more specific examples of image manipulation.
If you want me to cover any specific topics, leave me a comment!
If you like it... Follow/upvote/re-steem! Have also a look at my other posts. Thanks!
@giorgiomarino got you a $3.58 @minnowbooster upgoat, nice! (Image: pixabay.com)
Want a boost? Click here to read more!
This post has received a 4.40 % upvote from @booster thanks to: @giorgiomarino.