EOS Proxy Voting: Basics by Attic Lab
Today, Attic Lab is going to tell you about Proxy Voting: overview, how to set somebody as your proxy and how to create your own proxy account. For all proxy actions, we will tell you by using cleos and eostookit.io.
What is proxy voting
Proxy accounts represent a person/community with a list of Block Producers to which it is willing to vote. Commonly, they support their vision with personal preferences, EOS Constitution compliance, regproducer agreement, etc.
For regular users, it is a handy tool to follow, if they want to contribute to EOS ecosystem’s life. EOS token holders don’t need to research every Block Producer to see if it is compliant, transparent, amount of contribution to the community, etc. Proxies usually just provide the list of chosen Block Producers and a checklist of “why to vote for this certain Block Producer”
To finalize, proxies are your “representatives” in terms of voting. Just find a proxy that can match your views, and deserves your trust. If this happened, let’s go to the next step.
How to set somebody as your proxy
If you are using cleos, this step is pretty straightforward. It is the easiest way to use, from our point of view.
Let’s assume that account “atticlab1” wants to set “123proxy” as its proxy. There is only 1 command to use.
$ cleos system voteproducer proxy atticLab1 123proxy
Now, “atticlab1” proxied their votes and “123proxy” will vote for its chosen list of Block Producers on behalf of Attic Lab.
There is another option to proxy your vote – toolkit
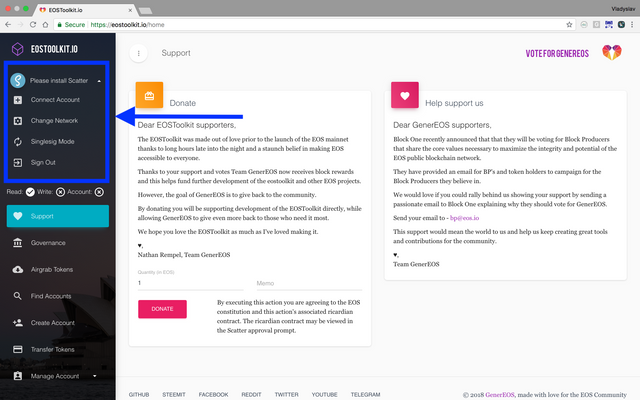
We will give an example of using eostookit.io. First, you should install Scatter browser extension, create or import your wallet and go to eostoolkit.io
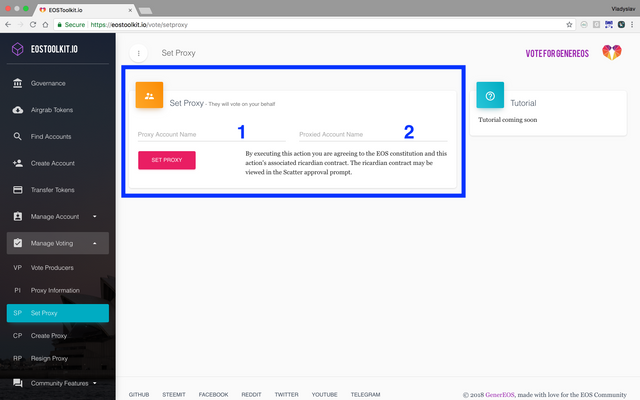
After you’re done with this step, you should go to Manage Voting -> Set Proxy. Here, it is pretty straightforward. Under “1”, as you can see on a screenshot, you provide Proxy Account Name, and under “2” you give your Account Name.
Let’s assume that you decided to dive into EOS ecosystem and create your own proxy account. Then, we will show you the next step.
How to create your own proxy account
Attic Lab will show you this method using cleos and eostoolkit.io.
To register as a proxy using cleos, you should run only 1 command.
$ cleos system regproxy atticlabproxy
After running this command, we’ve created a new proxy account – “atticlabproxy”.
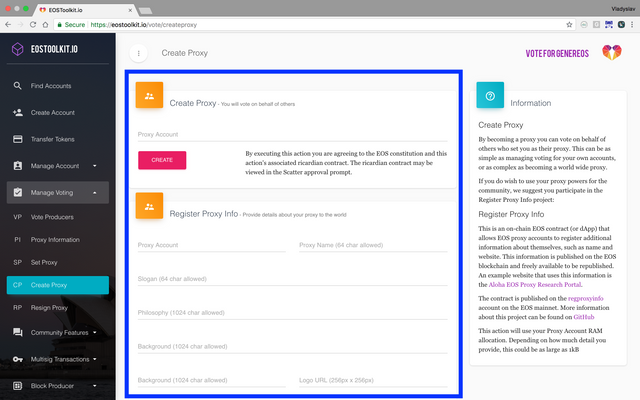
If you want to use eostoolkit.io, you should download Scatter browser extension, create/link your account and go to https://eostoolkit.io . Then go to Manage Voting -> Create Proxy and fill out the form as shown on the screenshot below.
So, today we discussed the basics of proxy votes, how to proxy your votes, and how to create your own proxy account. Attic Lab is here to support EOS ecosystem and the community. We hope that you find this educational content useful and helpful. Share your thoughts about it in the comments section below!
Support Attic Lab as a Block Producer, if you want to receive more important content about EOS.


How do you think @attic-lab what will happen next?
Congratulations @attic-lab! You have completed the following achievement on Steemit and have been rewarded with new badge(s) :
Click on the badge to view your Board of Honor.
If you no longer want to receive notifications, reply to this comment with the word
STOPDo not miss the last post from @steemitboard:
SteemitBoard and the Veterans on Steemit - The First Community Badge.