Dare to Learn with Me !!! Step by step tutorial of simple and striking Fashion Pompoms Tendrils
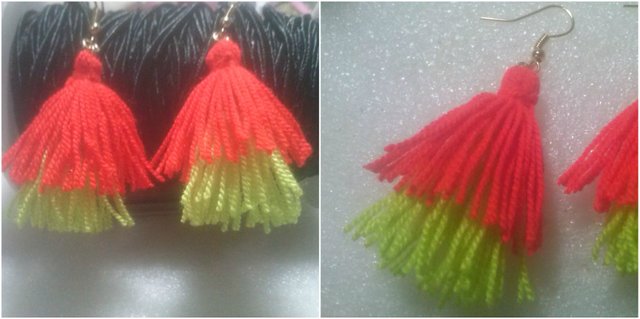
Hello Hello, first of all I want to greet you some know about my work that is also my passion, today it is a great pleasure to show you something new so you can learn and maybe do it. that spark that is in you and just start to create and innovate, as you have written previously, you can only convince others, do not just imagine change in your personal touch ... All materials are easily accessible , you can find them in the haberdashery. Today I bring you fringed tendrils are easy to manufacture and the materials are basic, easy to acquire, I do it with a thick thread so that you can appreciate the details more my recommendation is to use a thread as thin as the thread of sewing anyway I will just give you some ideas.

Materials:
Scissors
Cardboard 4cm high
2 Hoops or Hoops
Hooks for tendrils
Crochet thread or your favorite sewing thread
pin for jewelry
Flat jewelery clip and round tip clip
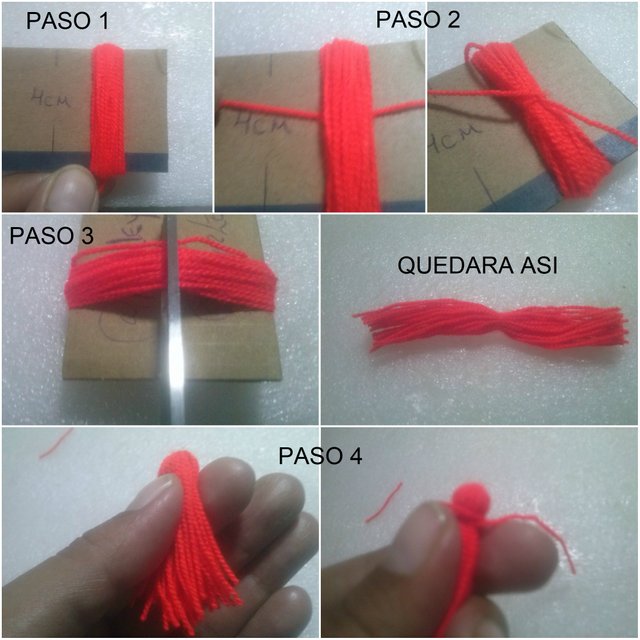
STEP 1: At this moment we are going to use a cardboard of 4 cm high, We are going to wind the thread in the cardboard, I use the yarn to knit called crochet and make 30 laps, my recommendation in this case is done as many laps as you think It depends if you want to sea a thick pompom or tassel
STEP 2: When you finish rolling and you get the thickness you want for the short pompom that is a small thread that is going to be introduced under the threads and a tie that can go in the middle can help you with a rule
STEP 3: We are going to flip the cardboard and at the other end and cut right in the middle, you can help with a rule. It will remain as shown in the following image.
STEP 4: We will fold it in half and it will face a small ball, and the procedures will love all the threads as I show you in the following image of this same step 4.
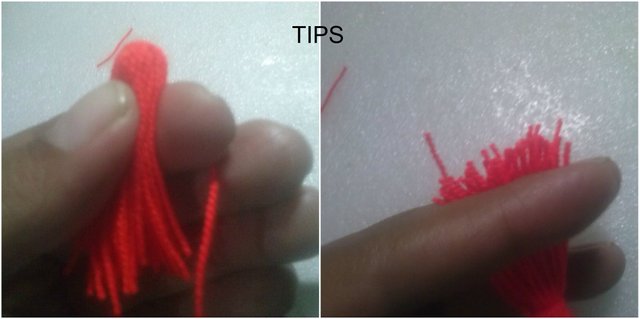
TIPS: after tying the top of the pompom, it is advisable to comb it with the same fingers and then grab it between them and cut the nephews so that it is completely even
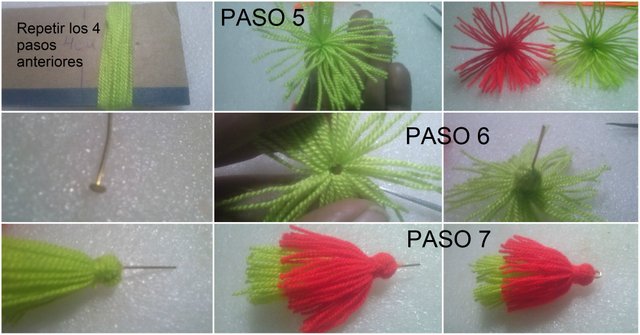
STEP 5: Repeat the first 4 steps according to all the desired pompoms, is not it? Why? The steps that open at the bottom look for the means so that the videos are dispersed in the same way, this process has been done in all the pompoms.
STEP 6: Right in the middle we will totally insert the pin for jewelery.
STEP 7: After introducing all the pompoms you want according to the length of your tendrils with the help of the clip for the round tip jewelery fold the part of the remaining pin making a small circle.

STEP 8: Now, we are going to put the hook to finish, with the help of the tweezers we open the rings or hoops, we proceed to introduce in the ring the pompons and the hook, after this we close the ring and we have ready some beautiful different tendrils and I think the best thing about this is that it was made by you.
you dare me. Lol that nice
hi, yes great
Congratulations! This post has been upvoted from the communal account, @minnowsupport, by Marleyn from the Minnow Support Project. It's a witness project run by aggroed, ausbitbank, teamsteem, theprophet0, someguy123, neoxian, followbtcnews, and netuoso. The goal is to help Steemit grow by supporting Minnows. Please find us at the Peace, Abundance, and Liberty Network (PALnet) Discord Channel. It's a completely public and open space to all members of the Steemit community who voluntarily choose to be there.
If you would like to delegate to the Minnow Support Project you can do so by clicking on the following links: 50SP, 100SP, 250SP, 500SP, 1000SP, 5000SP.
Be sure to leave at least 50SP undelegated on your account.
That is another good guide with a great message at the bottom. It is is said to become a master become a teacher. At least I know I have heard that somewhere.
Today we are students, tomorrow we will be the Masters, an old proverb
this is cool! love it!
Thanks
I think ill try and make some thanks for the post 🌺
thank you show me the result
Im thinking ill change a step and use a jump ring instead of the eyepin😉
I have seen a lot of similar tassels for sale at hobby and craft shops here, but I never seen any that I wanted to use for any of my own projects. This tutorial should help me make my own by using thread of my own choosing should the need arise. Thanks!
Thank you, it makes me happy, I learned from you and it makes me happy that you find in me something that you like and you can use
That beautiful! regards
Thanks for the support
You've received an upvote from @slothicorn! Click Here to Read our New Curation Policy And Updated Rules. (@kennyvaldez)
Thanks for the support