How I lost control my EOS account by changing Permission by mistake and steps to correct it
I assume that you already have a EOS account. An EOS account has two types of permission, owner and active. Both of these permissions have a pair of keys associated with them ( public and private key).
Owner permission has 2 keys:
Public key : Starting with EOS....
Private key : Starting with 5.....
Active permission has 2 keys:
Public key : Starting with EOS....
Private key : Starting with 5.....
It is HIGHLY important that the OWNER private key is written down securely. If you lose this key, then you lost everything.
Lucky for me, I have kept it.
When you create EOS account for the very first time, the owner and active permission key pairs will be the same. I did not know about this at that point in time and it did not bother me because I could do my transactions without any issue.
Now, I have realized that it is not SAFE to have owner and active permission key-pairs the same because anyone that has the OWNER private key will be able to control your account and clean up your funds.
My problem started when I wanted to claim an airdrop. Somehow I changed my active permission on eostoolkit website but I can't recall what I did. But the point is, after that , I could not do any transactions. All my transactions failed. I could not buy RAM, stake, vote etc.
I did not know what to do. I tried to read up articles and watch YouTube videos but was not successful. I joined a EOS telegram group but no one could guide until the problem was solved. I only received links to articles on how to change permissions. If you do not have in-depth knowledge about the permission system, it will be difficult to make it right. You need a coaching hand that will take you through the steps.
Finally I joined the EOS community telegram group and posted my issue and initially some said that I have lost it and that I was scammed but .... one good soul helped me through. A member from Aloha EOS.
Below I will write down the steps that I did together with him. Hope this will benefit other people that have similar problem as i had. Remember that this guide will only work if you have the PRIVATE key to your OWNER permission when you first opened your EOS account.
You need Scatter desktop client installed. If you are installing Scatter for the first time please remember to keep the Scatter backup phrase securely written somewhere. Now lets start.....
Open Scatter and click on add keys

- Click on create new EOS account. This will generate a new key pair for you.

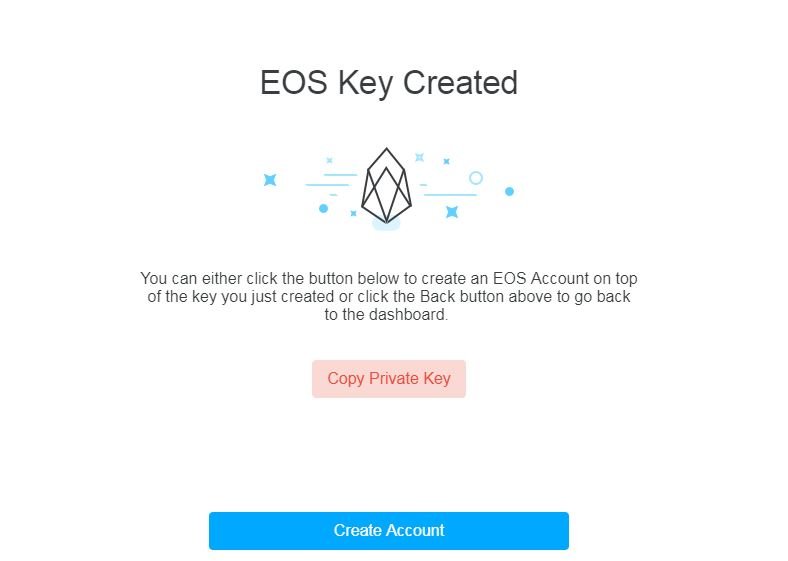
Click on "copy Private key" and save it on a notepad. You can print it out and keep a hard copy. You need to use both keys ( public and private )later.
- Now click back, it will ask you if you want to remove the keys you generated a moment ago. Press yes, because you are not creating an account but only generating the key pairs and you have stored them safely.
The following steps will show you how to create an OWNER account in Scatter using your original public and private key pair that you got when you FIRST opened EOS account.
- Click on import existing keys, then import private keys as text.

Enter the original private key. This is the key that you got when you first open EOS account.( I am repeating this statement so that you don't make any mistakes). If you entered correctly, Scatter will accept and create a new key-name identifier.
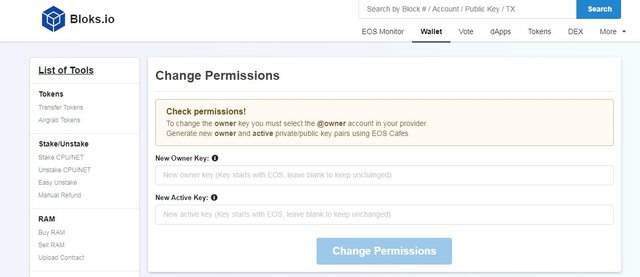
- Now go to website : https://bloks.io and click login . It will open up Scatter and now you have to login with the owner account ( the one that you just created by importing the owner key). In other words you are logging in with your owner permission.

- Now in block.io, click on wallet tab. Go down to account on the left panel and click on change permission.

Now is the time for you to use the new key pair that you generated using Scatter earlier. Copy ONLY the PUBLIC key and paste it under " New Active key". Then click change permission.
Scatter will pop up and you need to press "Allow".

I faced two types of error during the above step
a. First one, long delay time. I waited too long time before pressing "Allow". You should know how to overcome
this.
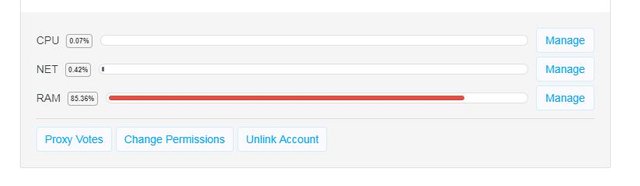
b. I did not have enough RAM to register the permission as a contract on the block chain. I need at least 250 byte of RAM.
My new friend helped by sending some RAM and that solved my second error issue.
So now with enough RAM, I clicked on change permission again and this time ...wow.. success.
What I have done is creating a new ACTIVE permission for my account in block.io using my OWNER account from Scatter and the transaction was registered in the blockchain.
We have to do a few more steps. We have to create the same ACTIVE account in Scatter so that the next time we can log in to block.io directly from Scatter. After that we have to delete the OWNER account. It is safer to remove OWNER account that has the private key in Scatter because we do not want to compromise our funds. Whenever we need it again, we just create the OWNER account using the same steps.
Now back to work on the rest of the steps.
- In Scatter, click add keys. Then click on import an existing keys as text.
- Now copy ONLY the Private key that you generated earlier using Scatter. Just to recap, we pasted the PUBLIC key in active permission change area in block.io and now we are creating the same ACTIVE permission account in Scatter and pasting the PRIVATE key.
- Once above step is completed, Scatter will create a new key-name identifier that holds your active permission PRIVATE key.
If you want to check whether this key works, you can go back to block.io and login. Scatter will pop-up and now you select the new active permission that you created. You can perform a new transaction such as buying a small amount of RAM, just to confirm the new permission is working .
If all is OK, then go back to Scatter and now we have to remove the OWNER permission account.
It is better to leave your OWNER key completely off Scatter. Having it there opens up possibility to be scammed.In scatter, click the key-name that link to OWNER account. Make sure it is OWNER account. Then click on " unlink account button".

A pop-up will ask your permission to remove and you click on " Owner " authorities option button.
Now, you will no longer see that account on screen.
That is it. You have created a new ACTIVE permission which is NOT the same as OWNER and also deleted OWNER account in Scatter.
I hope this guide will be useful to anyone having similar issue or anyone who wants to change their active permission key.
Thanks to Aloha EOS member and my vote is for them.
I never understood the method until I read this post. Excellent!
Congratulations @ukay66! You have completed the following achievement on the Steem blockchain and have been rewarded with new badge(s) :
You can view your badges on your Steem Board and compare to others on the Steem Ranking
If you no longer want to receive notifications, reply to this comment with the word
STOPDo not miss the last post from @steemitboard:
Vote for @Steemitboard as a witness to get one more award and increased upvotes!
it was very helpful, thanks for your informative post!