Iota withdraw my funds from Bitfinex (IOTA wallet instructions)
TUTORIAL - How to setup IOTA lightwallet and transfer IOTA from Bitfinex
I bought in to Iota in the middle of July when its price had crashed below twenty cents USD. Of course this meant that I had to transfer some BTC to Bitfinex, the only exchange trading IOTA.
If you haven't heard, Bitfinex recently updated its TOS to exclude US citizens, immediately suspending new US account creation and instituting a 90 day window before trading would be suspended for existing US accounts.
I have the misfortune of being a US Citizen. I can't say I really blame Bitfinex for wanting to reduce exposure to the US regulatory system:
A surprisingly small percentage of our revenues come from verified U.S. individual accounts while a dramatically outsized portion of our resources goes into servicing the needs of U.S. individuals, including support, legal and regulatory.
We anticipate the regulatory landscape to become even more challenging in the future.
Bitfinex Service Changes for U.S. Customers (Amended as of August 12, 2017) https://www.bitfinex.com/posts/216
In any case, this has prompted me to finally get off my ass and figure out the IOTA wallet. The support documentation for this process seemed pretty lacking to me as I went through it, so I decided to write a post about it.
Installing IOTA light wallet

Iota Wallet graphic by moi
NOTE: These instructions are based on using the GUI wallet (Graphical User Interface aka your standard recognizable program in a window format - unless you want to be entering code into a command line, this is what you want).
Step 1: DOWNLOAD the latest official release of the IOTA wallet
https://github.com/iotaledger/wallet/releases
Look under the "Downloads" heading at the above link. I downloaded IOTA.Wallet.Setup.2.4.0.exe but please note the version number may differ when you visit github if there has been a new release. These instructions assume you are using the .exe (executable program) file.
Step 2: INSTALL the IOTA wallet
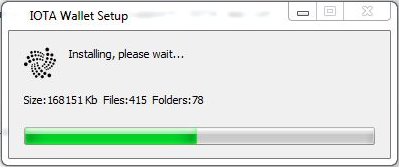
Run the .exe IOTA Wallet you just downloaded.Step 3 - Select "Light Node"

The first hurdle you will come to is this screen asking you what kind of node you want to install. You want to select "Light Node".Step 4 - SELECT your host
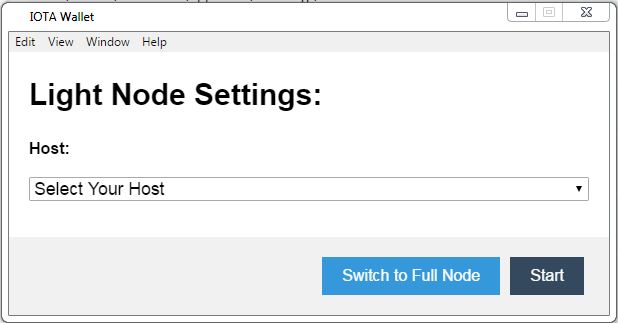
The default host suggestion in the official IOTA documentation is a bitfinex.com URL (http://iota.bitfinex.com:80). Not wanting to use a bitfinex hosted node to connect my wallet to in case of potential issues as a US citizen, I used a different public host.


Pick a host
Visit the following link and scroll down to / search for the heading "List of Light Wallet Servers".
http://iotasupport.com/gui-lightwallet.shtml
You are looking for a host that appears in this list when you click in to the dropdown menu in the IOTA wallet host select screen. I selected "http://eugene.iota.community:14265"

Once you have selected your host, click "Start" to connect your wallet to the host.
Step 5 - GENERATE a seed
This is where the official support documentation really breaks down. The tutorial I was following along with told me to go under the "Tools" menu in the GUI and generate a new seed. There is no longer an option to generate a new seed under the Tools menu.
Here is how you can generate a random seed on your computer (there are online IOTA seed generators as well but you might as well keep your seed offline as much as possible):
Run the following command per your OS (Windows users just use the "Run" utility and type "powershell" to open up Powershell) (Linux and Mac users I have not personally tested these commands):
Windows (PowerShell)
-join ([char[]](65..90+57..57)*100 | Get-Random -Count 81)
Linux
cat /dev/urandom |tr -dc A-Z9|head -c${1:-81}
Mac
cat /dev/urandom |LC_ALL=C tr -dc 'A-Z9' | fold -w 81 | head -n 1
Windows Powershell command line seed generation:

Windows Powershell command line randomly generated seed:

DO NOT USE THE ABOVE SEED - THIS IS A THROWAWAY ACCOUNT GENERATED FOR EXAMPLE PURPOSES ONLY
Step 6 - BACK UP your seed!
No seriously, back up your newly generated seed before you go on to step 7. Save it in your password manager if you have one. At bare minimum save it in a text file on your desktop. Save it on a thumbdrive if you have one as a backup copy. Print out multiple copies and stick them in different (safe and secure) locations.
DO NOT WRITE "IOTA" OR ANYTHING ELSE THAT WOULD CLUE SOMEONE WHO FOUND YOUR SEED WHAT IT IS FOR
Your seed is your USERNAME and your PASSWORD. If you have your seed, you have your IOTA. If you lose your seed, you are out of luck.
Step 7 - ENTER your seed into the wallet
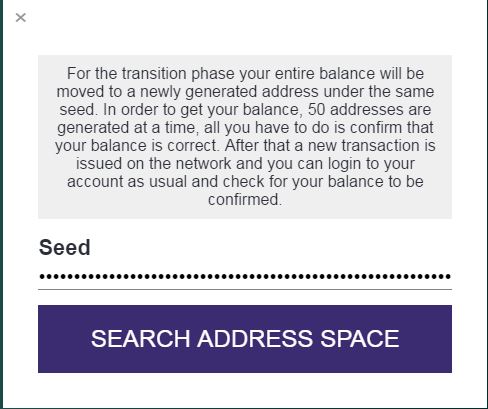
Once you have pasted your new seed into the wallet, click "SEARCH ADDRESS SPACE"Step 8 - CONFIRM your zero balance

The wallet will take a few seconds to a minute to check the 50 randomly generated addresses associated with the seed you entered. Once it has finished checking, the above screen should come up showing a zero balance.


Click on the "BALANCE IS COMPLETE" button. The button will briefly display "ACCOUNT IS EMPTY".

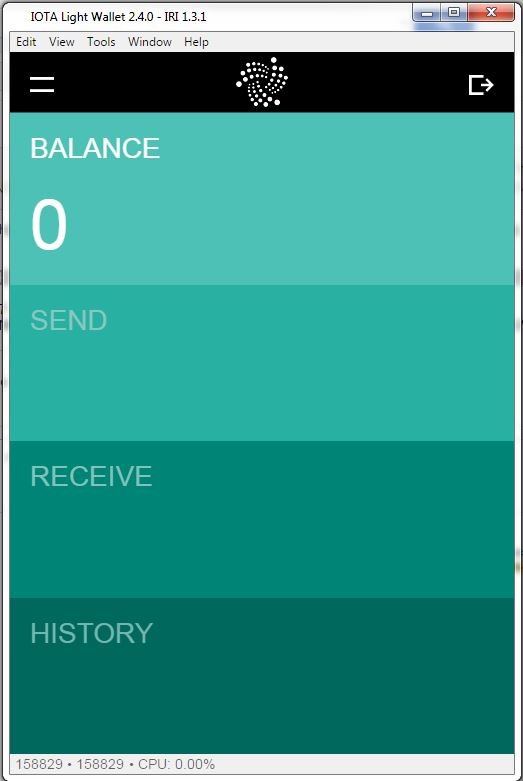
Step 9 - EXIT AND LOGIN to the wallet
Exit out of the balance confirmation screen (click the "X" at the top left of the window) and login to the wallet again using the same seed. Now you should see the normal IOTA light wallet logged in screen:

Step 10 - GENERATE a receive address
Click on the "RECIEVE" button to generate a new receive address for your IOTA:

Do not send IOTA to this address - it is associated with a throwaway account created for this demo. If you absolutely HAVE to send me IOTA, feel free to contact me by leaving a comment and I will happily give you my address ;)

The address inside the white box above is what you paste into the withdraw IOTA screen in Bitfinex. That is all you need to transfer your IOTA to your new wallet!
FINAL NOTE
You must already have enabled two-factor identification for your Bitfinex account to withdraw funds. If you have not already done so I believe Bitfinex will make you wait some number of days before withdrawing funds after you enable two-factor identification.PSA
You should always enable two-factor identification for any of your online accounts that support this! Do it!
Cheers - Carl
Attention:
by now the Windwos Powershell is stated as not random enought.
An Alternative is to use the Linux Terminal which i've heard should be good enought.
cool thanks for this tip
Nice post. I am still waiting for my transmission to the new 2.4.0 gui wallet to confirm my balance. It seems to be experiencing some issues confirming the transaction.
It just took a few minutes for me but I did read on some forums that some users had experienced some delays yesterday on the Bitfinex end before transfers showed up in the IOTA wallet. Good luck - Carl
Thank you for sharing this! I didn't know about the fact you have to wait several days after setting up 2FA on bitfinex! As there are not much tutorials online for wallets for this coin, you did a nice job by creating this post! Thanks!
Thanks @skririm :) Yeah I just went through this process for the first time last night and I didn't think the official documentation / help was very good
thanks clear and simple info
Thanks @nadversion56 :) I checked out your blog - I love your painting! Followed :)
@originalworks
@OriginalWorks Mention Bot activated by @carlgnash. The @OriginalWorks bot has determined this post by @carlgnash to be original material and upvoted it!
To call @OriginalWorks, simply reply to any post with @originalworks or !originalworks in your message!
For more information, Click Here!
This post has received a 0.64 % upvote from @bellyrub thanks to: @carlgnash.
This post has received a 6.00 % upvote from @lovejuice thanks to: @carlgnash. They have officially sprayed their dank amps all over your post rewards. GOOD TIMES! Vote for Aggroed!
Congratulations @carlgnash! You have completed some achievement on Steemit and have been rewarded with new badge(s) :
Click on any badge to view your own Board of Honor on SteemitBoard.
For more information about SteemitBoard, click here
If you no longer want to receive notifications, reply to this comment with the word
STOPResteemed and 100% upvoted. Thank you for using my service!
Read here how the new green bot from Berlin works.
@resteem.bot
Resteemed your article. This article was resteemed because you are part of the New Steemians project. You can learn more about it here: https://steemit.com/introduceyourself/@gaman/new-steemians-project-launch