Building a photography macro rail for focus stacking (Part 3 - Control with Blynk)
Hi and welcome to the third part in this series where I try not to electrocute myself or set fire to things in order to do some funky photography stuff.
Part 1 is here
Part 2 is here.
This is one of the coolest bits of this project - working out how to control the stepper motor with Blynk. Blynk (available from https://blynk.io) is an app that allows you to connect up with an absolute ton of IoT platforms and devices, one of which is the Arduino.
It's a bit hard to judge how much detail to put into posts like these so will give an overview and if you have any questions, please feel free to ask in the comments
Installation and configuration

It's pretty easy to install Blynk to work on a local network with wifi; you need the app on your mobile device and the associated libraries on the server machine
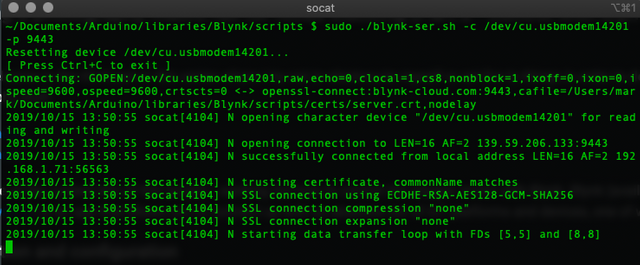
I'm not going to go into detail about installation etc. as all of that detail is available on the Blynk site. What I will say is that getting the Blynk server to run on my mac was a bit of a pain to start with as it kept choosing the wrong port and device by default. The command I have to run from the scripts folder is
sudo ./blynk-ser.sh -c /dev/cu.usbmodem14201 -p 9443
This runs a local blynk server on port 9442 using device cu.usbmodem14201 which is the USB port that my Arduino is plugged into. Once you have the running you end up with the below output.
So let's move onto creating the Blynk app and telling it how to get the Arduino to do things.
The basic functionality that I want the app to do in the first version is
- Move the guide rail forwards and backwards
- Have a manual mode where you set the distance you want to move forward and the number of photos you want to take
- Have an auto mode where you set the start and end positions of the rail and the number of photos you want to take and the Arduino works out the distance and steps automatically
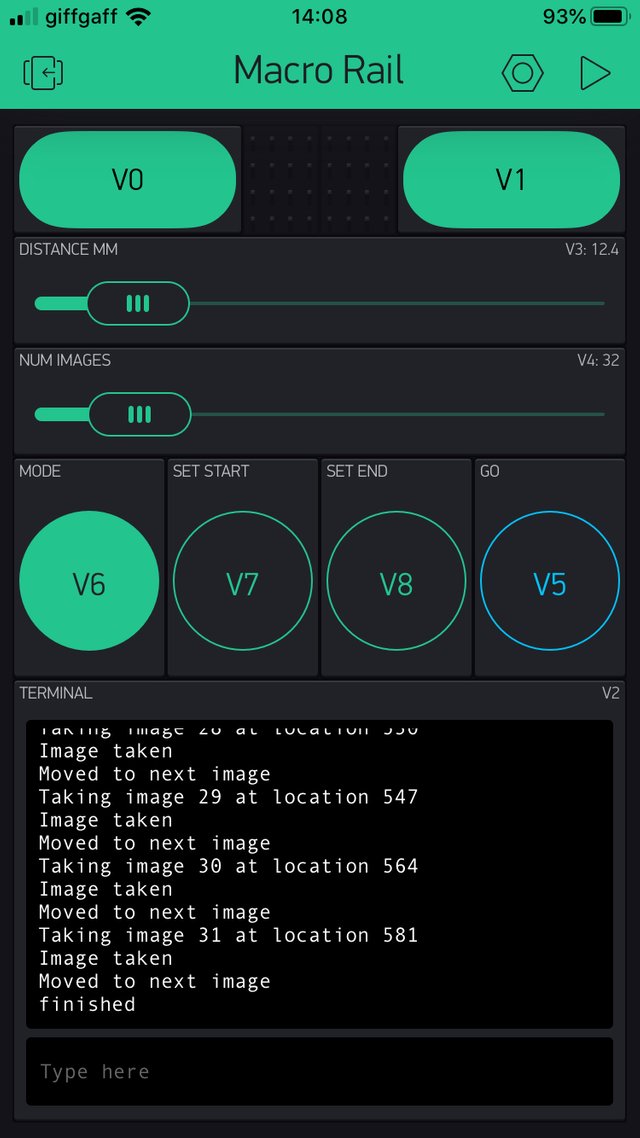
To the right here you can see my Blynk app in "design mode". It's created using a drag and drop UI on the phone. You add buttons and other widgets and then assign them with "Virtual Pins" that can be communicated with from the Arduino code. For example, V0 is the button I'm using to move the motor forward and in the Arduino code this is handled like this
/*
   move forward
*/
BLYNK_WRITE(V0)
{
  int pinValue = param.asInt();
  if (pinValue == 1)
  {
    moveForward = true;
  }
  else
  {
    moveForward = false;
  }
}
So all im doing is setting a variable called moveForward to be true or false depending on if this button is pressed. It is the main Arduino loop that is constantly checking this value to see if it needs to move the motor forwards or not as shown in this code snippet here. the loop() is called continually from within the Arduino. You can also see the moveBackward variable check which calls move(false) to move the motor backwards and a runIt variable that is set by the "GO" button which calls runProcess() and does all the clever work.
void loop()
{

  Blynk.run();

  if (moveForward)
  {
    move(true);
  }

  if (moveBackward)
  {

    move(false);
  }

  if (runIt)
  {
    runIt = false; // stop it running more than once
    runProcess();
  }
}
The move() function is called for both move backwards or move forwards as well as the runProcess() clever stuff to move things around and looks like this.
void move(bool forwards)
{
  if (forwards)
    digitalWrite(dirPin, HIGH);
  else
    digitalWrite(dirPin, LOW);

  digitalWrite(stepPin, HIGH);
  delay(10);
  digitalWrite(stepPin, LOW);
  delay(10);

  if (forwards)
    currentStep++;
  else
    currentStep--;
}
It checks the direction passed into the function and then tells the Arduino to in turn tell the stepper motor driver to set the direction by setting HIGH or LOW on the dirPin. Then it sets the stepPin to HIGH and LOW to move the motor one step. The last bit keeps track of the current step position. I keep a track of step position so that I know where the start and end points are in full auto mode.
So for all of the controls on the page, a variable in the Arduino code is set and the loop does things depending on those variable values. I really don't want to go into every single bit of code. I'd rather just demonstrate what the system does at the moment. If you want to look at the code in its current state, you can check it out on github at https://github.com/markptrueman/ArduinoMacroRail
Here is a video demonstration of some of the UI features and the system working in AUTO mode. I've added in an LED to simulate the camera shutter being fired.
The next step is to get hold of the guide rail and get this all set up with the stepper motor that comes with that. It could take a few weeks to get here from the USA.
Thanks for reading. Looking forward to getting this hooked up to an actual rail very soon. I'll be back to posting photos for the next few weeks.
Mark
nice progress, hopefully you don't get the same delivery driver delivering the rail as your camera :joy: @tipu curate
Upvoted 👌
awesome project :) i did bought a mini cnc from ebay, 2 years ago. that uses nema17 too i think. it has A4988 driver too. minimum resolution it can do is 0.01mm.
Wow your project is going fast!
The Blynk software looks pretty damn easy to create beautiful things together with Arduino. Never knew it was that easy!
Looking forward to part 4!😎
Still researching the right rail and where to get it from. Accuracy can be a problem with the cheaper ones.
This post was shared in the Curation Collective Discord community for curators, and upvoted and resteemed by the @c-squared community account after manual review.
@c-squared runs a community witness. Please consider using one of your witness votes on us here
This post has been voted on by the SteemSTEM curation team and voting trail. It is elligible for support from @curie and @minnowbooster.
If you appreciate the work we are doing, then consider supporting our witness @stem.witness. Additional witness support to the curie witness would be appreciated as well.
For additional information please join us on the SteemSTEM discord and to get to know the rest of the community!
Please consider using the steemstem.io app and/or including @steemstem in the list of beneficiaries of this post. This could yield a stronger support from SteemSTEM.
Congratulations @markangeltrueman!
You raised your level and are now a Minnow!
Vote for @Steemitboard as a witness to get one more award and increased upvotes!