Firebase Hosting and Google Domains
To everyone following me from the introduceyourself post, I told you I'd be posting often! To everyone else, welcome!
I decided my first post was going to be a tutorial describing the steps I took to get my portfolio page built and hosted on Google’s firebase, along with my domain name pointing to this web page.
Motivation
I was initially drawn to creating a portfolio page after taking this Udemy freelance bootcamp. Honestly, I won’t recommend it. But it did open my eyes to the fact that building a freelance client base takes time, and a lot of marketing (hence the blogging and portfolio page). Since my jumping off point was via this bootcamp, I tried to follow the design of the instructor’s portfolio page. In the course, he mentions that wordpress or wix are fine for something like this. So I poked around the websites looking at all the flashy UX templates with coffee and mouse pictures in the backgrounds. Finally, I came to the conclusion that I wanted something simple and easily maintainable. This lead me to this little number. Perfect. Simple, no extra animations, short and to the point, almost like an online resume.
The HTML
The first thing I did was clone the repo. I then used the two demo projects available at the above link to change different aspects of the HTML. Since the page is a simple single page application, I could simply open the HTML in the browser to see my updated changes (word of caution, sometimes the browser will cache the assets, so I’d switch between firefox and chrome when that happened, or simply close the browser and open it again).
A few bugs
Of course, things never go as planned. The HTML featured a github activity calendar and feed functionality, however, this wasn’t working on my page. So I did some digging and found a few problems with the code.
The problem lines were here and here. I’m not sure if you can source code without the “http:” but it looks like that’s what was left out of these lines (if anyone does know of anything, please drop a comment!). They’re also using old versions of the libraries they’re importing.
Finally, the version of github-calendar located in the assets/plugins/ directory of the repo had an old version of code in it. So the library was scraping non existent elements on the github HTML.
I forked the original repo, made the changes and submitted a pull-request, however, the repo hasn’t been committed to since 2016, so it’s highly unlikely that the pull-request will be merged.
init
Now that I had my HTML looking slick, I wanted to use firebase to host the webpage. I’d used firebase previously for hosting a project I built called Github Battle to learn react.js from Tyler McGinnis, who’s since gone on to be an instructor of the Udacity react nanodegree. This guy knows his stuff, can’t give him enough praise.
To deploy to firebase is dead simple. Simply follow these instructions (be sure to run the firebase commands inside the directory you’ll be deploying from, in the case of this tutorial it would be the Developer-Theme directory). I will typically click the Firebase console link, then Add Project and create the project via the console before running firebase init.
When you run
firebase init
You’ll be prompted with this:
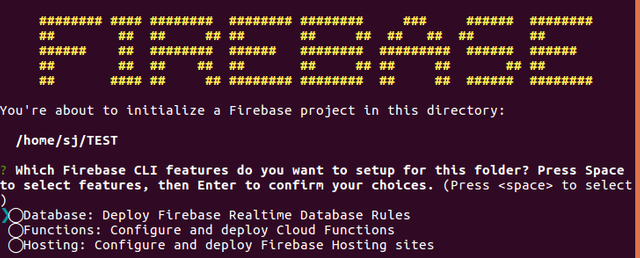
You’ll press down twice to hover over ‘Hosting’ and press the spacebar then press enter. If you’ve created the project in the firebase console prior to running the init command you’ll see your newly created project in the list of default firebase projects to choose from. As you can see I’ve got quite a few projects.

Gotcha
Here’s a gotcha if you’ve been following along with the portfolio website building. Firebase will ask which directory you want to use as your public directory. The repo we cloned doesn’t have a public directory. So, I created one. I made a public directory and copied the assets directory, favicon.ico, and index.html into that public directory. I then allowed firebase to proceed as usually using public as the public directory. You’ll then be asked if you want to rewrite all urls (this means that if, for example a user went to sjkelleyjr.com/TEST, they’ll be redirected to the index.html page). Since this is a single page application, we do. You might also be told that there already exists an index.html page, and then asked if you want to over write it, of course, you don’t.
deploy
You should now be able to run
firebase deploy
and see something like this

If you navigate your browser to your Hosting URL, you and anyone else on the internet should now see your website!
DNS
Now comes the fun.
Great, you’ve got a hosted URL, but you don’t want to navigate users to https://portfolio-2447c.firebaseapp.com/ any time you want them to check out your portfolio, do you? You need a domain name (something cool and flashy, like, maybe scorpiocode.com).
I poked around the web for a bit, everyone and their dog sells domains nowadays. I’d thought about using Amazon’s Route 53 (hoorah!). However, since I was using firebase to host the page, I thought it might streamline the process to use google domains, and I was right. I searched for my domain (sjkelleyjr.com) and paid the $1 a month to reserve it. After my purchase cleared I was redirected to https://domains.google.com/registrar where you’ll see something like this

Now, log into your firebase console and select your newly created project. You’ll see a sidebar like this
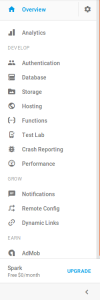
Click Hosting, then Connect Domain and type in your newly reserved domain name. If you elected to reserve the domain name via google domains, you won’t need to verify ownership (I told you it would streamline the process), since google already knows you own the domain name. If you didn’t you’ll see something like this
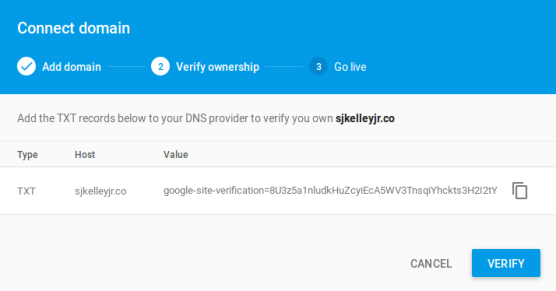
And you’re on your own (however, I assume the next steps are VERY similar). If you did you’ll see something like this
Credit to this stack overflow post for the image, and in fact I’d highly recommend going to it. He has essentially done all the work for us, with a slight gotcha, which I suspect is his problem (and you’ll see my first stack overflow post there hoping to fix the issue!).
The Final Gotcha
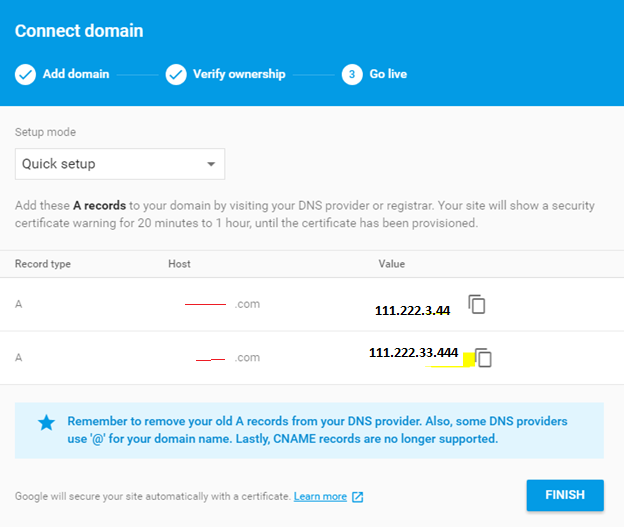
Go back to your https://domains.google.com/registrar page and click the DNS button. This will drop down a bunch of different options you can customize with the DNS portion of your Domain Name. The one we’re interested in is Custom Resource Records, so scroll down to it. You should see something like this.
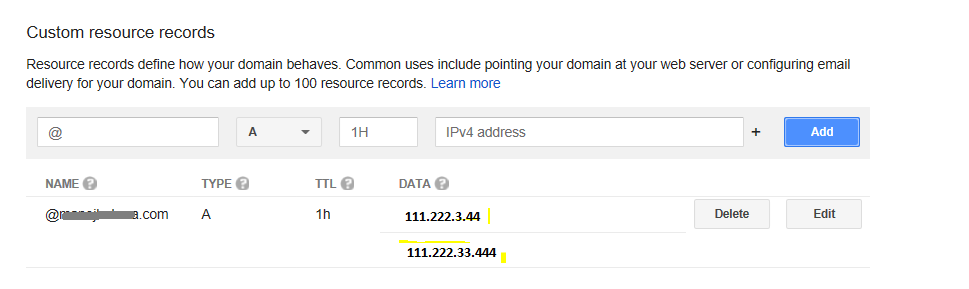
(again from the stack overflow post). Here’s where I believe the poster went wrong. Type in your URL exactly as it was in the Connect Domain modal on your firebase console. The SO poster has his crossed out in red, but for our example it would be sjkelleyjr.com, where it says @, then type in the IP address given in firebase where it says IPv4 address (in this case 111.222.3.44). Now instead of clicking Add, click the + next to IPv4 and add the second IP address given in the firebase console. You’ll notice, the Name entry automatically converts “sjkelleyjr.com” to “@”. You’ll also notice that the poster has “@sjkelleyjr.com”, which is not correct.
@
If you’re like me you’re curious as to what @ means in the context of DNS, so I decided to do a bit of research. @ simply means “this domain name” so in our case @ = sjkelleyjr.com. Feel free to Google this yourself for a more detailed explanation, and I may even do a post at a later date if this is something that interests readers.
Done
These DNS changes take time to propagate throughout DNS servers, so you won’t be able to type your URL into a browser and get directed to your firebase page until then (it shouldn’t take any more than 2 hours from what I’ve read online). Once it does, try typing www . [YOURURL] . com (where YOURURL is the URL you registered). You’ll notice it didn’t work. What gives?
Not Quite
Back in firebase you should see the option to add a redirect. You want to enable the redirect of the www. version of your URL to your firebase URL as well. This involves exactly the same steps as the original URL, however, in https://domains.google.com/registrar you’ll add www. in front of the URL, and use the IP addresses given to you for the www. URL in firebase. When you click Add, the record should once again convert “www.sjkelleyjr.com” to “www”. These changes must also propagate, but I noticed they take less time.
Really Done
Feel free to follow me on any of these other outlets.
https://www.twitter.com/@sjkelleyjr
https://www.instagram.com/sjkelleyjr
https://www.linkedin.com/in/s-jackson-kelley-jr-b63135104/
https://sjkelleyjrblog.wordpress.com/
http://www.sjkelleyjr.com
I'm also available for blockchain consultancy, and freelance blockchain, web, and mobile development.
Great work, appreciate it! I'll be following you for more tech-hacks. Started messing with Firebase just a few months ago. Cheers!
Awesome thanks!
Owww..owww..nice tutorial brother...thanks..so much....for your tutorial....I love ubuntu
Awesome! glad to hear that! I do too!