HOW I HANDMADE A OOAK THE SHINING DANNY TORRANCE STATUE - STEP BY STEP + GALLERY
There are so many killer moments in Stanley Kubrick's film adaptation of The Shining that will never leave me--I'm talking childhood traumatization here... what Mr. Kubrick masterfully crafted was a perfect marriage of audio and visual that penetrated my mind stabbing each and every sensory receptor into agonizing submission. Of course, he had great source material to draw inspiration from in legendary scribe, Stephen King's seminal novel of the same title.
![]()
One scene in particular still haunts me today is little Danny Torrance with his big wheel riding through the hallways of The Overlook Hotel, and then coming to a stop at Room 237. Why? First and foremost, nostalgia. I remember being 10 when I first watched The Shining. It was broadcast on TV in 1982 and Danny being relatively the same age as I was, I guess was the reason I watched it. Back then, the steadycam had not been invented yet until this movie came along, so imagine the thrill and utter terror watching Danny pedal about his big wheel in the vast emptiness of the Overlook Hotel along its unique carpet while the camera, low to the ground followed Danny steadyily without any of the jerks, bumps and shakes. It was like being on a rollercoaster; edge of your seat; heart pounding kind of moment. That was the brilliant set up to Danny stopping in front of the dreaded Room 237. What happened after made me turn off the TV and dash up the basement stairs. That is the moment of the scene I wanted to capture. After four months later, here it is.


Screenshot of the Grady twins from Stanley Kubrick's film adaptation of The Shining.

I used Padico's LaDoll series Premier stone clay to sculpt Danny. Mentioned every chance I get, this clay is super lightweight and strong. Able to hold the finest detail!

There's no secret to sculpting the face. It's eyeballing and refining; adding clay where is needed and removing any excess. Repeat until you're ready to move on.

My go to primer is Mr. Hobby's Mr. SURFACER 1200. Again, the fine features of the face were slightly altered because of the primer thickness even with it thinned out. The troubles of working on this scale...

Once the primer has dried, I can begin sanding and polishing to get back some of the fine details such as eyelids, nostrils, the ears and eyebrows. The body is next. Can you guess how I made it?

That's right! Wire. From a coat hanger. I bent it into the general pose and padded the wire armature with small pieces of styrofoam. The goal was to keep this statue piece lightweight.

Positioned Danny's head and tweaked the neckline to fit snuggly. Gave him very basic hands and feet for the purpose of constructing his ride: the big wheel trike (handlebar and pedal position).

Danny's big wheel seat may look sculpted in solid clay, but it's not entirely. Inside is actually paperboard. Once the clay coating dried, I was able to carve out the details. Next were the tires and because they're identical, I sculpted one tire and made two moulds for each side using thermo plastic. The tricky part after was joining the two halves seemlessly.

Setting Danny onto the seat balanced was just a matter of sanding down his butt to conform to the seat. With his stubby hands and feet in place as markers, I could begin to construct the front of the trike. In the previous photo, you can see aluminum wiring used for the trike's frame. Quite easy to form with a pair of pliers.

Please excuse the horrible quality in these upcoming photographs. I didn't realize my camera lens was covered in a fine film of clay particles. Anyhow, the tires are connected by a piece of coat hanger and glued to the seat. The tires can't actually roll, sorry. Now to add the gooseneck of the trike.

This part was quite daunting because there was no reference I could draw from in the movie. Never once do we see Danny's trike from the front so it was my own engineering and design from here on. Once the aluminum handle bars were set in place along with the front tire, I was all smiles.

I just love scotch tape and styrofoam when crafting. This time, the styrofoam was used as a 'holder' to keep in place the front tire and handlebars that were glued together. I won't lie, adding the spokes was a bee lol. It was one month into the Danny statue and I was ready to paint!

I can't tell you how satisfying it was to paint the blue seat, however the next step was a challenge as you can see Danny in the background broken. I had to literally snap his limbs to get him positioned into the seat because both hands and feet were not aligned with the handlebars and pedals... grrr!
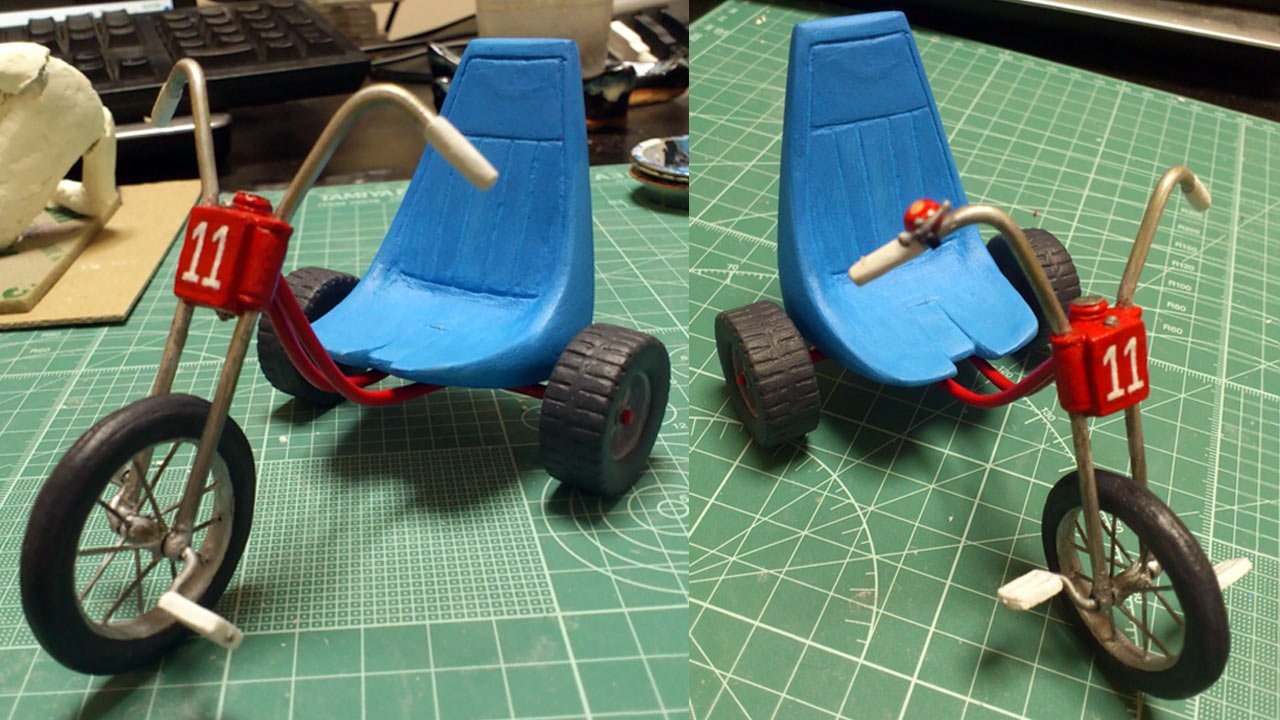
Problem solved after a few days of surgery. In the meantime, I decided what would go on the front of the gooseneck. Number 11. Why? Hmm... his Apollo 11 sweater, the Grady twins, and the amount Danny tallied on the dartboard hehe. Yes, I'm a geek. By the way, do you notice the red bell? Weathered and spray sealed with matte lacquer, here is Danny's big wheel.

Now to get him on it without breaking it. One thing I want to mention which has never been pointed out before I revealed it in one of my THE SHINING analysis videos is that the original trike in the movie had a white frame, basket in front of my number 11 decal, and two bells. Try to find the original trike in the movie, it's there and it'll freak you out.

Now to dress Danny. Scouring the local fabric and craft stores in my former city of Kawasaki is always my favorite part of any statue project. I was lucky to find some very fine tweed, I think it was that matched Danny's sweater, color and all perfectly, however, the plaid shirt was impossible to find... hmm... what to do?

The only solution was to paint the plaid by assembling the collar in fine white cotton which was tucked into the sweater. Notice I also added a lip around around the neckline of the sweater. With Danny able to sit firmly in the seat, it was time to give him those LEE overalls with all those wonderful tiny adornments.

The overalls were made with four pattern pieces of the finest denim I could find: front flap, back flap, below butt with back of the legs and pattern for front of the legs. The seams would be masked as wrinkles... yes, that's one of my tricks of the trade hehe.

The buckles were very difficult on my fingers to make. Luckily there was only two. I had found bronze colored pins in the sewing department that were just the right thickness. The buttons were cut out from thin plastic-like foil. Finished the overalls and gave him shoes--unfortunately no photos were taken due to being in the zone.

Notice the handpainted LEE brand label? With Danny fully clothed, there was a minor complication to get him back in the big wheel. I hadn't planned any wiggle room for the added thickness to his butt and length of his legs with the shoe soles... more surgery.

Finished the hands, sleeves and painting the soles, only Danny's head left to do. Pretty cute isn't it? A headless boy riding a big wheel haha. With the first round of facial paints completed and some lacquer, it's beginning to resemble Danny now.

Here I experimented with doll hair for the first time, ever. The results were decent now that I look back on these photos, but at the time, it just wasn't working. I did some revision work on the face to try to balance it with the doll hair, but ultimately, it just didn't work.

Four more days of stubbornness, I ripped out all the hair and went back to my trusted Premier clay to get the job done. In doing so, I ended up revising more on Danny's face. In particular, his nose. Do you see my black cat in the background? Rest in peace, dear Blue.

Moving on to the base. Color felts closely matching the colors of the Overlook Hotel carpet were used to piece together the enigmatic pattern and then chalk pastels to touch up the colors. Many coats of fixative spray was applied to lock in the pastel chalks from smudging.

The base was constructed in styrofoam (body), paperboard (walls) and wood (bottom). First I stacked a few sheets of 1 cm styrofoam then cut out the hexagon according to the dimensions of the hexagons on the carpet. Paperboard was glued to each side with the top and bottom of the base fitted with wood.

The walls were wallpapered with fine Japanese calligraphy paper. I had toyed with the idea to do it in floral paper as seen in the scene with the Grady twins standing in the hallway, but realized it would likely make the piece looking too busy and cluttered taking away from the unique carpet pattern. So I added an electrical socket instead...

Over the years, many people have asked if the socket works and what's it for? There is really no purpose for it other than a detail I noticed in the film when Danny was riding around the halls of the Overlook Hotel.
And that my friends, is a wrap! I began this project on Jan. 29th 2013 and finished May 9th 2013.

Danny and big wheel aren't locked down to the base. I had the plan initially to embed magnets to hold him down but since it's unlikely the big wheel would tip over from loss of balance, it just wasn't necessary.

If I ever attempt a second Danny Torrance statue on his big wheel, I would definitely make it able to roll and Danny's legs articulated to pedal along with it. Thank you for coming along for the ride and following my journey. It was definitely a worthwhile project to have started and completed.

One last thing before I go. It's a bit of interesting news that came out of this statue piece: I was contacted by Pixar director, Lee Unkrich of Toy Story 2, 3 and Finding Nemo fame who wanted to purchase Danny. I kindly declined and that was the end of it. Little did I know he is also the owner and caretaker of the website: www.theoverlookhotel.com. Pretty cool isn't it? No regrets though.
- If you're interested to see my other step by step how-to handmake statue articles, please check out: OOAK Alabama Worley and OOAK Tang Lung / Tong Loong.
Have a good one!
Would you please post a link to your Steemit here on Facebook and Twitter to help us know this is the real you and not a user that is copying everything from your website? I do not see any mention so far on Facebook or YouTube or Twitter to your Steemit account here?
Definitely. I've been meaning to start spreading the steemit platform to my fanpage on Facebook once I've gotten more experience. Just in case my fans have questions and I would be able to answer them soundly. Honestly, I'm still absorbing information at this moment and I'm liking every bit of it and then some 💪🙇
Hi Jerry, I made my first 'steemit' post on my Facebook fanpage. From here on, I'll be promoting steemit to my Dragons and converting them lol.
🥇 Another marvelous creation! 🥇
The time and effort you've taken, the attention to detail, it really shows. There's just so much to enjoy in this piece from the expression on Danny's face, the buckles & buttons & label on his overalls, his wee li'l converse, right down to the power outlet on the side of the base. Were the shoes sculpted on his feet? It must have been very time consuming & intricate to create the laces & lace-hole rings.
This was definitely worth the wait, I really look forward to posts of your work, they remind me of when I had time & space for scratch-built model making. I regret the loss of the pastime but I can always sate my appetite with the detailed build logs of your fine work.
I couldn't help but notice that hexagons fit together very neatly, was this forward thinking to faciliate a modular diorama?
Thanks for taking so much time and effort to create this post, I'm already eager for the next one.
Nope, no forward thinking with the hexagonal diorama. Just keeping within the theme of the unique carpet pattern. I wanted the base to be equally balanced to the statue in terms of uniqueness and some of the best comments I get are about the power socket :)
Danny's shoes weren't sculpted. I used a similar material--rubber-like to wrap his clay foot and then some very fine vinyl for the soles. Yes the shoe laces were a pain but I didn't go to the extreme to put them through lace-hole rings haha. Thinking back now, why didn't I? lol.
I'm very glad you enjoyed this post. It seems like ages since I've put statuemaking on hold. The work in progress photos I go through to make these posts only tug at my hearts desire to return to clay. It's a matter of time before I do so and the mere thought of having the steemit community follow me on a journey of x amount of months to complete a statue piece, really makes me smile.
Thank you again for the wonderful comment.
My darling mister crayzy :p
Really WOW!!! The face of Danny....again you captured his face beautifully. You can even see in his eyes that he's scared. Really....WOW!!!!
Mimicking his scared look and imagining the terror was such a change from Bruce's intensity. I tend to put myself into the subject's world. Luckily being scared lasted only 4 months hahaha.
I'm really glad you can see the fright in his eyes. Thank you so much! :D
Hahhaha now you can sleep with the lights off then :p .....I really admire your work!
Really appreciate your kindness 😉