Step by Step Tutorial In Adobe Photoshop - Drawing And Creating Collage With Bear

Step 1
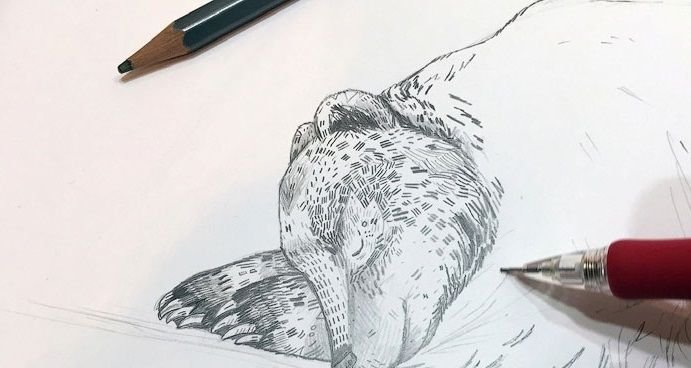
At the first stage of work, I will sketch my idea with pencil and ink. I chose here a very simple but effective composition in which the view without interference follows the image in the center of the drawing.
In this lesson, I will try to stick to the original image, although sometimes during the work process, I leave the original option, working in the Photoshop program on different layers.

Step 2
The first and main element I will work on is the center of illustration, the big sleeping bear. Here is the printed and extended version of my sketch, I liked the proportions of this drawing, and I start drawing out the details.

Step 3
I paint with pencils different thickness of the felt, I put thin and thick uniform lines and strokes, following the contour of the sleeping bear.
Step 4
Then I work out details on all the other elements that will be displayed in my work - in the house, in the trees, on the hill in the foreground, on all the leaves and branches. For drawing, except for pencils, I use black ink, or ink.
Each element is on a separate sheet of paper and will be scanned and imported into the Photoshop program.
I like to draw by hand, with the texture and noise appearing on the image more natural.

Step 5
In the Photoshop program, I add each drawing element to a separate layer.

Step 6
I select the white space around my drawn elements using the Magic Wand tool  and delete it. Position layers with elements in the correct order: foreground, middle and back plan.

Using the Magic Wand tool , highlight a white background. At the bottom of the layers pane, click the Add Layer Mask icon. Click on the layer mask and press Ctrl + I to invert the layer mask. Now the white background in the image has disappeared.
Step 7
Finally, I change the tone and contrast of the drawings.

Apply the Photoshop Auto Tone and Auto Contrast command to darken the dark pixels to pure black and clear the bright pixels into pure white: the menu Image - AutoTone (Auto Tone); Image (Image) - Auto Contrast (Auto Contrast).
Step 8
I like to use Kyle T Webster's downloadable brushes for Photoshop. They imitate chalk, gouache and pencil textures.
Add a separate layer to paint the pattern. Apply the Multiply mode to the layer to see what's under it. You can change the selected color at any time in the Image (Image) menu> Adjustment> Color tone / saturation (Hue / Saturation).

To paint the elements of the illustration, it is better to create a new layer over each layer with the elements of the work: Layer - New Layer (Ctrl + Shift + N), and do not forget to tick the "Use the previous layer to create a clipping mask." The overlay mode for this layer is Multiply.
Also, to change the color, use the correction layers for each layer with the elements of work: the Layer menu - the New Adjustment Layer - the Hue / Saturation, place these adjusting layers above the colored layer.
Step 9
As soon as I set the main color, I copy this layer and work on these copies to create a texture and volume on the bear's body using the Swatches panel and the brush of varying sizes and stiffness.
I add lighter shades to bear wool, choosing darker brown shades, I use light shades for glare. I will do the same with other elements of work.

To color the layer with the next element of work (for example, with a bear), it is better to create several new adjustment layers on top of each other: the base layer, the layer with darker colors for the shadow, and a layer with light shades for light areas. Choose the Сolor picker tool  for various shades of brown to create shadow and light, adjust the size and transparency of the brush, the overlay mode for the base layer with color, and the shade layer - Multiply, for the layer with light areas - Soft Light (Soft Light).
Step 10
I often invert the elements of work, when in my illustration night scenes are shown. You see that the dark stems of grass on white paper have now become bright. This technique will make the small details more distinct from the dark background and shine in the dark with magic light.
Step 11
I chose the blue color as the main one in my entire image.
From the foreground to the background, the shades of blue are arranged in staggered order, becoming darker to create the maximum depth of field in the illustration. The foreground colors are warmer. The term for this effect is "Verblauung" (interpreter's note: Sineva (German)), since everything that happens at a distance is perceived more and more blue.

Step 12
As soon as the image is drawn up, all the components are placed in their places, I turn to the addition of small additions that I have drawn earlier. I cut them off, separated them from the background and inserted them into separate layers.
I place shrubs, trees and grass in different places in my work, looking for suitable places for them, and they add interest and depth to the illustration.

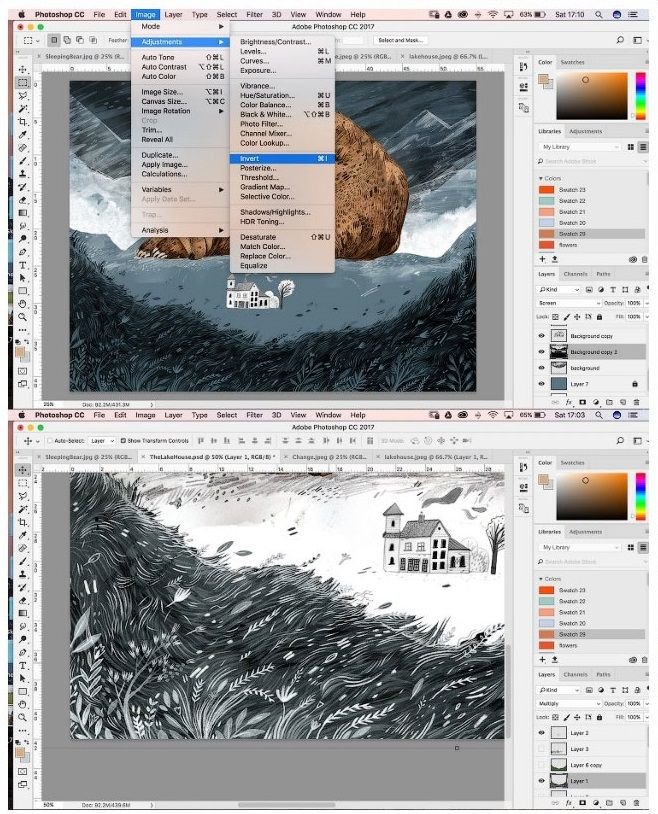
Next, we insert into the work of the image of plants and trees painted black ink on a white background, for these layers, the layer mode Multiply is used, if the plant should be white, then first the image with the plant should be inverted: Image (Image) - Adjustments - Invert, then the background is black, and the drawing is white, and the overlay mode for that layer is Screen.
Step 13
My next step is to focus on a mini-scene in the middle of the illustration - on the lake's house. As before, I add color, working on new layers and coloring the house, and creating a lake on a new layer with a few brush strokes. The windows in the rooms above are lit up to make the house more lively.

Step 14
To reflect a house in lake water, I duplicate the same layer and reflect it vertically: Layer - Create Duplicate Layer, Edit - Transform - Flip Vertical. Then, set Soft Light mode to create a mirror effect in water, and if necessary erase the part of the house with a eraser, which should not be reflected in the water.
If necessary, set the transparency of the layer with a reflection of about 50%, and if the reflection falls on land, wipe off the extra eraser.

Step 15
Following my early sketch of the entire composition, I want a small house surrounded by small hills for which I do not have a finished drawing. Therefore, I use the Color picker tool to select a blue hue on my image and amplify it to a brighter blue, and using a 25 pixel rigid brush I will paint blue hills on a new layer.
Translator Note: To create a hill, create a new layer and place it under the layer with the house. Use the thin brushes and lighter shades to draw the top of the hills.

Step 16
The idea of my drawing is to create a windy night with a large strong bear as a defender lying next to the house. My foreground was created windy still in the drawing stage, but my sky needs more light and movement.
I add diamonds as a graphic element of light, transforming white squares and selecting the mix mode Overlay in the layer properties. I also freely draw wind lines with the help of brushes.

Create a new layer: Layer - Create a New Layer using the Rectangular Marquee tool, create a square shape, and fill in the white color, create several similar squares of different sizes, then use the Transform tool to change their shape. : Edit (Edit) - Transform - Rotate - Rotate the squares with the corners down; again: Edit (Edit) - Transform - Scale - Slightly extend the resulting diamonds.
Step 17
The last part of the drawing process is to make all the parts more alive and bulky. I walked on the grass in the foreground, adding light and dark plants in the grass cover. In the center of the image, I added the latest strokes by placing inverted trees and bushes around the house.

Step 18
Earlier, working on paper, I made a note that it would be nice to add swans to the lake. I think it will give the house and the lake additional life. I will draw swans using a soft brush on a new layer in white. Orange beaks will add bright smears in the dark, I also will not forget to add a small shadow from the birds to the water.

Step 19
And now, the final touch - I paint the red flowers on the created new top layer. Once again, I check the bear figure and the remaining elements of the image to make sure that all the details are worked out and I have not missed anything that is all in order with shades and contrast, and the work looks harmonious.

Step 20
Make sure the elements you draw on the paper at an early stage have clear contours. This facilitates the work of highlighting the white color around the drawings with the help of a magic wand.
Get ready to illuminate the image for printing a bit. The printed image will be different from the image that we see on the monitor.
What a lovely image! All these steps must have taken hours and hours of work (not to speak of the pre-planning, done as sketches or in your head). Resteemed and upvoted!
Really cool! Thank you for detailing all the steps
thx for good comment and from now i will start doing my all lessons in step by step
Hi. I am @greetbot - a bot that uses AI to look for newbies who write good content.
I found your post and decided to help you get noticed.
I will pay a resteeming service to resteem your post,
and I'll give you my stamp of automatic approval!
Resteemed by @resteembot! Good Luck!
The resteem was payed by @greetbot
Curious?
The @resteembot's introduction post
Get more from @resteembot with the #resteembotsentme initiative
Check out the great posts I already resteemed.
Nice tutorial and piece of Art. Keep up the good work!