Let's build an AutoEncoder!
Today we're going to implement our own AutoEncoder using Google's TensorFlow in order to generate handwritten digits!
Background
If you want to know more about how a simple Neural Network works and how to write one in Python, check my other post.
What is an AutoEncoder?
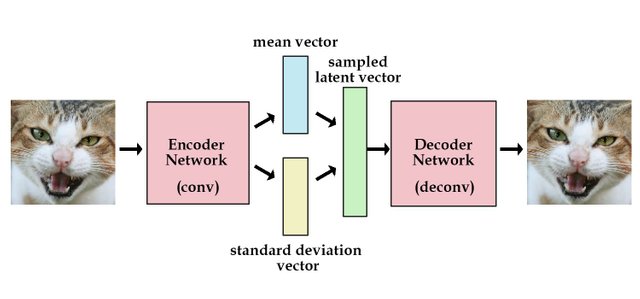
An AutoEncoder is a simple type of Neural Network with only three layers: an input layer, a hidden layer and an output layer. What makes an AutoEncoder special is that the output neurons are directly connected to the input neurons. The goal is to get the output values to get to match the input values.
So if we add the image of a cat to the input layer, the output layer would then output the same image. When we input that image it's a vector in N-dimensional space, but we're using dimensionality reduction to bring it down to an M-dimensional space.
Thus we can think of the first layer of the network as the encoder, since it's compressing data and the last part as the decoder, since it tries to reconstruct the original input from the small representations in the hidden layer.
When do we use AutoEncoders?
Well, one use case is data compression: kind of like creating a zip file for some dataset that you can later unzip.
Another is image search: when you search on Google using an image as your query, instead of text. It's very likely that Google is using AutoEncoders to help fuel this use case. When ever one of Google's bots is crawling the web and finds an image, it will compress it using an AutoEncoder. That would mean Google would have all of its indexed images compressed in the form of an easily searchable array. When ever you search for a new image, it will compress it and find all the points nearest to it in the compression space since there is less noise, then rank them according to their similarity.
There's also the one-class classification use case: that's when we only have a dataset with a single class which is called the "target class". When we feed it to an AutoEncoder it will learn to detect objects of that class. When it receives an object that doesn't fit in that class category, it will detect it as an anomaly. Whether it's a deadly virus, or a fraud attempt, or system downtime - AutoEncoders are for you.
And if you want to train a Deep Neural Network, you could use what's called a Stacked AutoEncoder: that is a set of AutoEncoders where the outputs of each layer are wired to inputs of the successive layer. Once you train it on some dataset, you can use those weights to initialise your Deep Net instead of randomly initialised weights.
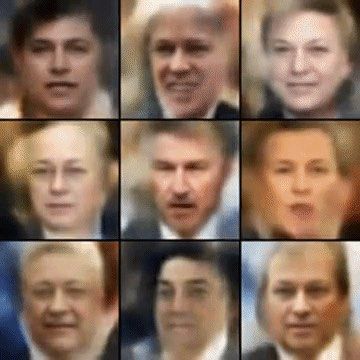
But one of the more recent applications of AutoEncoders is generating novel, yet similar, outputs to our inputs: like faces that look really similar, but are different than the input faces. For this, we use a newer type of AutoEncoder, called a Variational AutoEncoder which learns the distribution around data so it can generate similar but different outputs.
There are lots of techniques used to prevent AutoEncoders from successfully reconstructing the input image, like denoising, where the input is partially corrupted on purpose.
Building our own AutoEncoder
First, we're going to import Google's machine learning library as well as numpy for scientific computing and input_data which is the collection of handwritten character images (get it from here)
import tensorflow as tf
import numpy as np
import input_data
Then we define our AutoEncoder hyperparameters. We know that each character image is 28x28 in size (as we're using the MNIST collection), so we'll set the width to 28. Then we initialise a variable that represents the number of input nodes. We also want to have 500 nodes in the hidden layer. I generally prefer having two thirds of the number of nodes in my hidden layer as my input layer as a starting point. We want to purposely corrupt our data later, so that our decoder gets even more robust and its reconstruction over time. So let's set the corruption level to 0.3.
mnist_width = 28
n_visible = mnist_width * mnist_width
n_hidden = 500
corruption_level = 0.3
Once we have these variables, we'll use them to help us build nodes. Start by creating a node for the input data; then we'll create a node for the corruption mask , which will help us reconstruct the original image.
X = tf.placeholder("float", [None, n_visible], name='X')
mask = tf.placeholder("float", [None, n_visible], name='mask')
Now we want to create nodes for our hidden variable. After we initialise our weights, we initialise our hidden layer as well as the prime values for each that tied the weights between the encoder and decoder and resolved in an output value.
W_init_max = 4 * np.sqrt(6. / (n_visible + n_hidden))
W_init = tf.random_uniform(shape=[n_visible, n_hidden],
                           minval=-W_init_max,
                           maxval=W_init_max)

W = tf.Variable(W_init, name='W')
b = tf.Variable(tf.zeros([n_hidden]), name='b')

W_prime = tf.transpose(W)
b_prime = tf.Variable(tf.zeros([n_visible]), name='b_prime')
After that, we define our model via a function that takes in our variable parameters. We make sure to get a corrupted version of our input data, then create our neural net and compute the sigmoid function to create our hidden state. Then we'll create our reconstructed input and return that. So our model will accept an input and return a reconstructed version of it, despite the self-imposed data corruption.
def model(X, mask, W, b, W_prime, b_prime):
  tilde_X = mask * X
  Y = tf.nn.sigmoid(tf.matmul(tilde_X, W) + b)
  Z = tf.nn.sigmoid(tf.matmul(Y, W_prime) + b_prime)
  return Z
So we can utilise this function by building a model graph with it, which we'll call "Z". Now that we have our model, we need to create a cost function - the result of which we want to minimise over time. The more we minimise it, the more accurate our outputs will be. Then we want to create a training algorithm - so let's use the classic gradient descent to help train our model which takes the cost function as a parameter (so it can continuously minimise during training).
Z = model(X, mask, W, b, W_prime, b_prime)
cost = tf.reduce_sum(tf.pow(X - Z, 2))
train_op = tf.train.GradientDescentOptimizer(0.02).minimize(cost)
Before we start our training, we need to load our data, so let's read from our local directory. We'll set one_hot = True, which is a bitwise operation that will make computation faster, and then we'll initialise the variables for images and labels for both our training and testing data.
mnist = input_data.read_data_sets("MNIST_data/", one_hot = True)
trainX, trainY = mnist.train.images, mnist.train.labels
testX, testY = mnist.test.images, mnist.test.labels
Finally, we begin our training process by initialising a TensorFlow session. We initialise all our variables first, then begin our for loop, which will iterate 100 times. For every image and label we will retrieve an input, then create a mask using the binomial distribution of our input data and use that as a parameter to run our TensorFlow session using the training algorithm we defined earlier. Now we calculate a mask for the outer loop as well, and print out the results as we go along.
with tf.Session() as sess:
  tf.global_variables_initializer().run()

  for i in range(100):
    for start, end in zip(range(0, len(trainX), 128),
                          range(128, len(trainX), 128)):
      input_ = trainX[start:end]
      mask_np = np.random.binomial(1, 1 - corruption_level,
                                   input_.shape)
      sess.run(train_op, feed_dict = {X: input_, mask: mask_np})

    mask_np = np.random.binomial(1, 1 - corruption_level,
                                 testX.shape)
    print i, sess.run(cost, feed_dict = {X: testX, mask: mask_np}))
We can see our score gets better and better over time with training and eventually our neural net is able to reconstruct and classify handwritten characters.
| Iterations 1 - 50 | Iterations 51-100 |
|---|---|
Code preview
import tensorflow as tf
import numpy as np
import input_data

mnist_width = 28
n_visible = mnist_width * mnist_width
n_hidden = 500
corruption_level = 0.3

def model(X, mask, W, b, W_prime, b_prime):
  tilde_X = mask * X
  Y = tf.nn.sigmoid(tf.matmul(tilde_X, W) + b)
  Z = tf.nn.sigmoid(tf.matmul(Y, W_prime) + b_prime)
  return Z

if __name__ == '__main__':
  X = tf.placeholder("float", [None, n_visible], name='X')
  mask = tf.placeholder("float", [None, n_visible], name='mask')

  W_init_max = 4 * np.sqrt(6. / (n_visible + n_hidden))
  W_init = tf.random_uniform(shape=[n_visible, n_hidden],
                             minval=-W_init_max,
                             maxval=W_init_max)

  W = tf.Variable(W_init, name='W')
  b = tf.Variable(tf.zeros([n_hidden]), name='b')

  W_prime = tf.transpose(W)
  b_prime = tf.Variable(tf.zeros([n_visible]), name='b_prime')

  Z = model(X, mask, W, b, W_prime, b_prime)
  cost = tf.reduce_sum(tf.pow(X - Z, 2))
  train_op = tf.train.GradientDescentOptimizer(0.02).minimize(cost)

  mnist = input_data.read_data_sets("MNIST_data/", one_hot = True)
  trainX, trainY = mnist.train.images, mnist.train.labels
  testX, testY = mnist.test.images, mnist.test.labels

  with tf.Session() as sess:
    tf.global_variables_initializer().run()

    for i in range(100):
      for start, end in zip(range(0, len(trainX), 128),
                            range(128, len(trainX), 128)):
        input_ = trainX[start:end]
        mask_np = np.random.binomial(1, 1 - corruption_level,
                                     input_.shape)
        sess.run(train_op, feed_dict = {X: input_, mask: mask_np})

      mask_np = np.random.binomial(1, 1 - corruption_level,
                                   testX.shape)
      print(i, sess.run(cost, feed_dict = {X: testX, mask: mask_np}))
Further reading
For more information and daily insights on Machine Learning and AI in general, please follow me.
Meanwhile, you might want to check my other posts where I talk about the basics of Deep Learning and Deep Convolutional Neural Networks.
Credits
Some of the images used in this post were taken from Google search and the credits go to their original creators.
Thanks for reading.


This is amazing!?
Thank you, follow and stay tuned for more :)
@originalworks
The @OriginalWorks bot has determined this post by @quantum-cyborg to be original material and upvoted it!
To call @OriginalWorks, simply reply to any post with @originalworks or !originalworks in your message!
To nominate this post for the daily RESTEEM contest, upvote this comment! The user with the most upvotes on their @OriginalWorks comment will win!
For more information, Click Here!
nice detailed post?
Thank you! Follow me for more quality content on the recent developments in AI :)
Congratulations @quantum-cyborg! You have completed some achievement on Steemit and have been rewarded with new badge(s) :
Click on any badge to view your own Board of Honor on SteemitBoard.
For more information about SteemitBoard, click here
If you no longer want to receive notifications, reply to this comment with the word
STOP