Drawing the TARDIS and a Dalek | Doctor Who
I took a 3-unit arts course during my sophomore year in college. My professor happened to be a professional artist whose name has been published many times in local newspapers. On our first day of classes, she asked us to bring a small mirror and drawing materials. Apparently, we had to draw ourselves in under 50 minutes.
The next meeting, she surprised me when she mentioned that I "have potential." She told me further (non-verbatim), "Keep drawing. Buy a sketchpad, draw anything every single day. Watch as you grow with arts." Unfortunately, I wasn't able to do this.

The past few days however, that's all I ever do - draw everyday. This time, I'm continuing with my entries for the Learn to Draw with Friends contest by @tonyr. This week's theme is Doctor Who!
So far, I have one entry submitted, which fell under the advanced category. It's Doctor Who, himself! The past two days I spent my time drawing for the remaining categories - beginner (the TARDIS) and intermediate (a Dalek).
Drawing the TARDIS
.png)
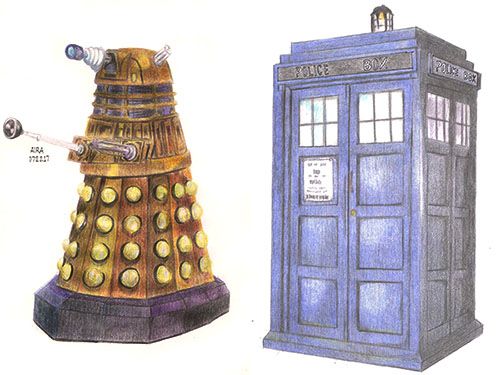
The TARDIS stands for Time And Relative Dimension In Space. Wooh! Very physics!

To the left, you can see a GIF image of the drawing process.
A rectangle. My sister said that the TARDIS is just a rectangle. So sure, I began by drawing a rectangular box while still minding perspective. This proved to be hard; I'm more used to freehand drawing.
Vertical then diagonal. I drew the sketches in this particular way. All the verticals first, followed by all the diagonals. This way, I won't have to adjust dimensions in case I drew too much or too less (makes sense? I can't articulate this properly. 😂)
Darkening the outline. I decided to use my black colored pencil to darken the details. For the written POLICE BOX, however, I kinda have to cheat using a 0.3 point ink pen. Yikes.
Base colors. This is the first time I did this. I colored all base colors first before adding details later on. Usually, I color one part with details and more layers and all before moving to the next part. I think I did this because the TARDIS was, over all, blue.
Details, then finishing touches. Over all, I made use of dark blue, black, purple, grey, brown, white, and peach colored pencils.
Drawing a Dalek

I could have sworn that the Dalek should have been in the advanced category. 😂 No kidding. It was hard. I salute everyone who managed to draw this easily.
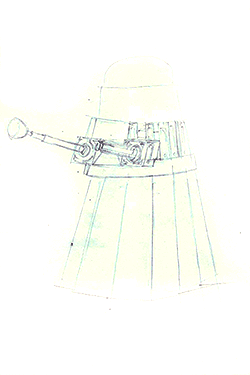
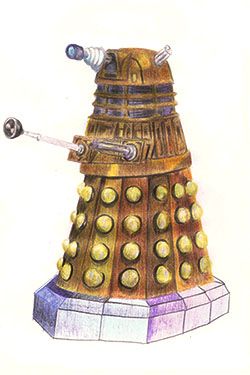
On the right is the process it took for me to draw the Dalek.
A triangle... and circles. I'm taking my big sis @arrliinn's way of thinking. The Dalek is just a triangle... with a rounded top and many circles. That's what I was forcing myself to think, but I could't help but still cringe and say, "This is going to be tough."
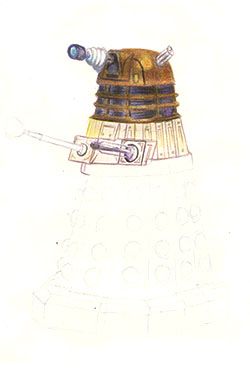
The colors. The colors were what made this difficult. I couldn't find the proper colors in my very limited set of pencils. It was tough. In the end, I decided to use the gold one as the base for the body, layered with burned brown, dark brown, orange, yellow, pink, and peach. Crazy, huh? Let's not forget the black for the shadows and outlines.
Who the heck designed this character? I kept asking myself that as I went on to draw the circles. At this point, I knew I messed up the Dalek. LOL. At the same time, I kept wondering what I got myself into. There's no point in turning back. I decided to play around with the colors here.
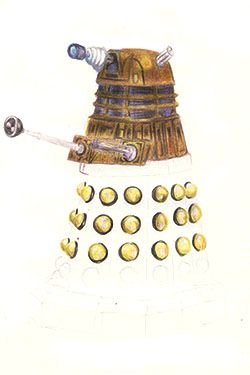
Finally through with the circles. I don't think I ever disliked drawings circle the way I did with the Dalek. It was frustrating! Probably if I do this without colors, I'd love drawing it. But the colors made it difficult for me (the gold colored pencil was especially stiff, and it made the coloring even more difficult). I have to remember to lengthen my patience, I learned.
Finishing touches. In the end, I put a grey overlay over the whole drawing. I wanted to somehow desaturate the colors. The orange and gold made it too bright. Furthermore, the grey helped smooth the texture and further mix the layers of colors, so it's all good.
Learn to draw with friends; what I learned.
Learn to draw with friends could mean two things:
- Learn to... draw with friends;
- Learn to draw... with friends.
I don't know which meaning the contest was specifically going after, but heck yeah, I'm learning both.
Technically, on the other hand, these are what I learned:
- It's good to always sharpen your pencils; colors are more vibrant, and it fills in the small white spaces.
- Color with small, circular and even strokes. It helps avoid stringy lines. (I'm still having a hard time doing this).
- Color lightly. Very lightly first. Then, layer it with more colors. Be patient. The coloring will soon come to an end. 😂
- Faber-Castell polychromos exist. Too expensive. I will have to save up for it. Haha
TL;DR
These are my entries to the Learn to Draw with Friends contest by @tonyr, and the processes involved. 😂
Also, your drawings are stellar! Keep it coming!
Awesome! 😊 Thank you so much, @jaymorebeet!
One of the best process posts I have seen on steemit @erangvee! Absolutely packed with great advice and tips and I love how you were able to make your drawing come to life step by step using the animations. That is absolutely awesome.
I hope you see the reward your effort deserves for this post! I am honored to have you enter my little contest my friend!!
This is the fourth time -- thank you so much, @tonyr! 😊❤️️ I'm glad that you found this process post helpful and over-all good. Can't ask for more. 😊
I also agree with you on the Dalek....it was an advanced drawing.. Way too technical...
Your posts are a delight to read. I also love the structure of your posts, been trying to achieve something similar. May I ask how do you wrap text around images?
Thank you, Christian! 😊
<div class="pull-left"> here's the object</div><p>text</p>
That pulls the object to the left, and the text to the right. You can change the value of
classattribute to "pull-right" to pull the object to the right and the text to the left. 😊 Looking forward to seeing this format on you future posts!Thank you, Aira! Saved me a whirl of a headache. I tried tables on my post but it didn't work out and had to shamelessly re-edited my post after publishing. xD I hope nothing but the best for your art and steemit journey!
Thanks again, and you're welcome! 😊😂
Dalek reminds me of the Lost In Space robot when he said, "Danger Will Robinson." Love art. I draw too. Good work.
HAHAHAHA. 😂 Now that you mentioned it... It kinda does, huh? Thank you @joeyarnoldvn! 😊
Man I love those process gifs! How did you do them!?
I'll take that as a compliment, LOL. 😂 In addition to what @chrsart shared, you can also make GIFs using Adobe Photoshop. I used Photoshop for that one. Here's an online tutorial I found on making GIFs with Ps... just in case you want to try. 😊
Ooh goody goody thanks! I guess I have to dust off my photoshop skillz :)
GIFs can be done in a simple software such as powerpoint, put each process in individual slides- make sure you have the right size template and crop them accordingly too- then save as a gif.. You can even set the timing if you wish to make one slide stay longer.
Free software such as GIMP can make GIFs easily. :)
Great Art and detailed process drawings! Upvoted and look forward to your future posts. Have a great day!
Thank you so much, @apprentice001! 😊 I'll drop by your channel later to check out your works, too. Cheers!
Really nice drawings i would say! Keep it up!
Thank you, @damien-swift! 😊
Wow, I don't know which one is my favorite from these. Amazing! :D
Thank you @kristyglas! 💕 This, coming from you!! 😭❤️️
Great post @erangvee (ノ◕ヮ◕)ノ*:・゚✧
Thank you @raizel!!! 😃