ZenCash SecureNode Setup Guide v1.0 (VPS on Digital Ocean) (Mac Local Wallet)

ZenCash SecureNode Setup Guide v1.0
Mac 10.13.2 (Local Wallet)
ZenCash Swing Wallet 0.75.9a
Ubuntu 16.04 LTS x64 (VPS securenode on Digital Ocean)
Date 3/3/2018
By @controllinghand
Credit to @ROLF https://blockoperations.com/author/owner/
How to Build and Operate a ZenCash Secure Node – Complete Guide
https://blockoperations.com/how-to-build-and-operate-a-zencash-secure-node/
Credit to @Patrick Heyman
How to set up a ZenCash SecureNode
Donation to my zencash please: znfJDWcpPw55Ugua9m6mndeP1a9KimkQZuG
Digital Ocean referral link https://m.do.co/c/4f0c81328877 Free money $10 credit
Introduction
Welcome to this step by step guide that will take you through the process of creating your own ZenCash SecureNode. This guide is aimed at the casual MAC user who has already installed the ZenCash Wallet, purchased ZenCash but has little or no experience of using Linux or VPS (virtual private servers).
As a recommendation, please read through each section first and try to understand what is going on before doing it. As soon as one section is complete, please move to the next one. Don't miss any steps and please take your time.
This document is not an official document of the ZenCash team and has only been created by a member in the hope to assist others.
Creating a Virtual Private Server (VPS)
For a small monthly fee, you can run your own Virtual Private server to host a SecureNode without having to create one at home and having the extra headache of worrying about having your machine running 24/7 and managing static IP-addresses etc.
This guide has been created to give a step by step account using Digital Ocean. However, I would like to state that there is no recommended preference from the ZenCash team for picking a VPS service.
Requirements
Secure Node Criteria
Each of the following criteria must be met and maintained for a Secure Node to be eligible to receive a share of the reward pool. These items may be added to or modified at any time.
- Must maintain a balance of at least 42 ZEN in a 'stake' transparent address
- Must maintain a minimum balance of .001 ZEN in a private address on the node for challenges
- Must be available with minimal exception time for at least 92% of an earning period (appox. 1 day)
- Must perform a challenge in under 300 seconds
- Allow 8 or more peers by allowing public connections on the configured zen port (default 9033)
- Must maintain a valid public SSL cert properly configured for zen
- Must not fall behind the current block height by more than 4 blocks
- Must update to current versions of the zen and/or tracker software within the posted time frame
- Note: only one public Ip address is allowed per node (IPv4 or IPv6).
- Computer for running a local wallet only to hold funds. Mac is used in this guide, but other version wallets work.
- Domain name or ability to add an A Record to a Domain name
VPS server for remote node running 24hrs/day which includes:
4GB RAM (I'm not 100% sure what is the min requirement)20GB drive (Again not 100% sure)1 Static IPV4 Address per node (I don't know if IPV6 works?)
Section 0: Protect Yourself
- Backup:
- (!) IMPORTANT! First step you need to perform.
How to backup and recover your ZenCash Wallet (Mac Version)
Placeholder I will create a guide to follow
- (!) IMPORTANT! First step you need to perform.
Protect Yourself:
- $70,000 in ZCoin Stolen: User Gets Scammed Trying to Set up Znode https://cryptovest.com/news/70000-in-zcoin-stolen-user-gets-scammed-trying-to-set-up-znode/
- Don't give anyone access to your VSP.
- Don't give anyone any of your passwords
- Don't give anyone your private keys
- Don't trust anyone
- Disclaimer:
- The Author of this Guide is not responsible for, and expressly disclaims all liability for, damages of any kind arising out of use, reference to, or reliance on any information contained within document. While the information contained within the document is periodically updated, no guarantee is given that the information provided in this guide is correct, complete, and up-to-date.
Although the guide may include links providing direct access to other Internet resources, including Web sites, The Authors are not responsible for the accuracy or content of information contained in these sites.
- The Author of this Guide is not responsible for, and expressly disclaims all liability for, damages of any kind arising out of use, reference to, or reliance on any information contained within document. While the information contained within the document is periodically updated, no guarantee is given that the information provided in this guide is correct, complete, and up-to-date.
Section 1: Configure Mac ZenCash Wallet
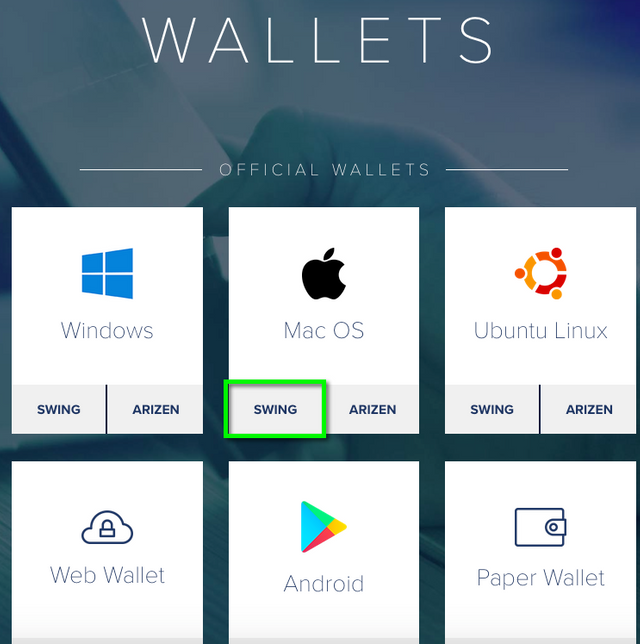
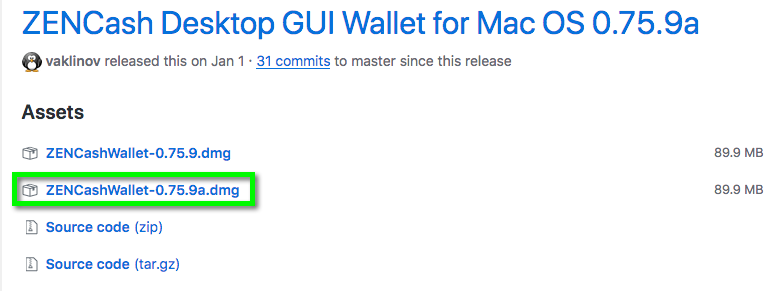
- Install 0.75.9a ZenCash Wallet
https://zensystem.io/wallets/
- On your Mac machine start your ZenCash wallet
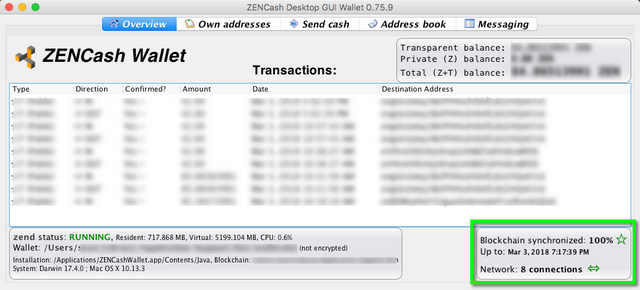


- It will take a longtime before your wallet will become fully synchronized. So in the meantime we can start to work on setting up the VPS and using the Mac built in SSH
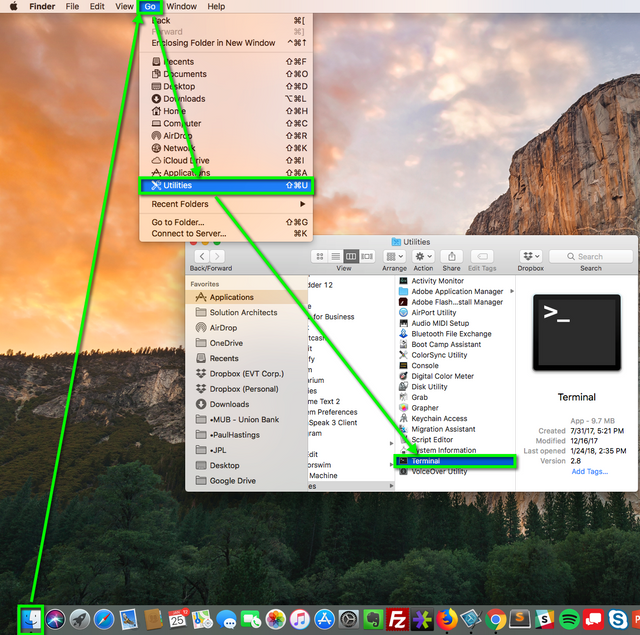
Section 2: Using the built-in SSH client in MAC OSX
Mac OS X includes a command-line SSH client as part of the operating system. To use it, go to Finder, and select Go-> Utilities from the top menu. Then look for Terminal. Terminal can be used to get a local terminal window, and also supports SSH connections to remote servers.
RUNNING SSH FROM THE TERMINAL COMMAND LINE
Once you have the terminal window open, you have two alternatives. The first approach is to type ssh hostname or ssh user@hostname into the terminal window. This is more familiar for Linux and Unix users who are used to using a command line.
RUNNING SSH WITH A GRAPHICAL USER INTERFACE
The second option is to select New Remote Connection... from the Shell menu of Terminal. This opens a graphical dialog asking for the host to connect to and the user name. This also allows saving connections. This is recommended for users who are not accustomed to using a command line.
We will show you examples how to use this in the next section.
Section 3: Digital Ocean sign up and Droplet Creation
Digital Ocean referral link https://m.do.co/c/4f0c81328877
If you click the referral you get a $10 credit

Next are the steps to create a Virtual Server on Digital Ocean. For a small amount each month you can have an Ubuntu machine running in the cloud 24 hours a day, 7 days a week to run your SmartCash SmartNode.
- Open Google Chrome and go to
https://www.digitalocean.com/
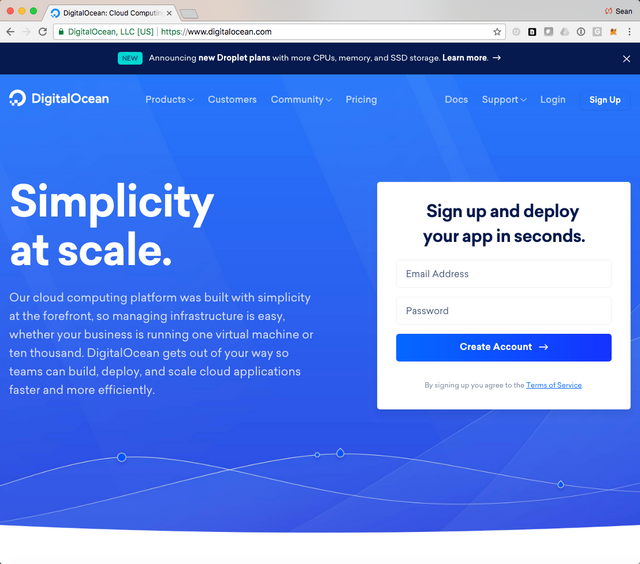
- Click on the blue "Sign In" button in the top right
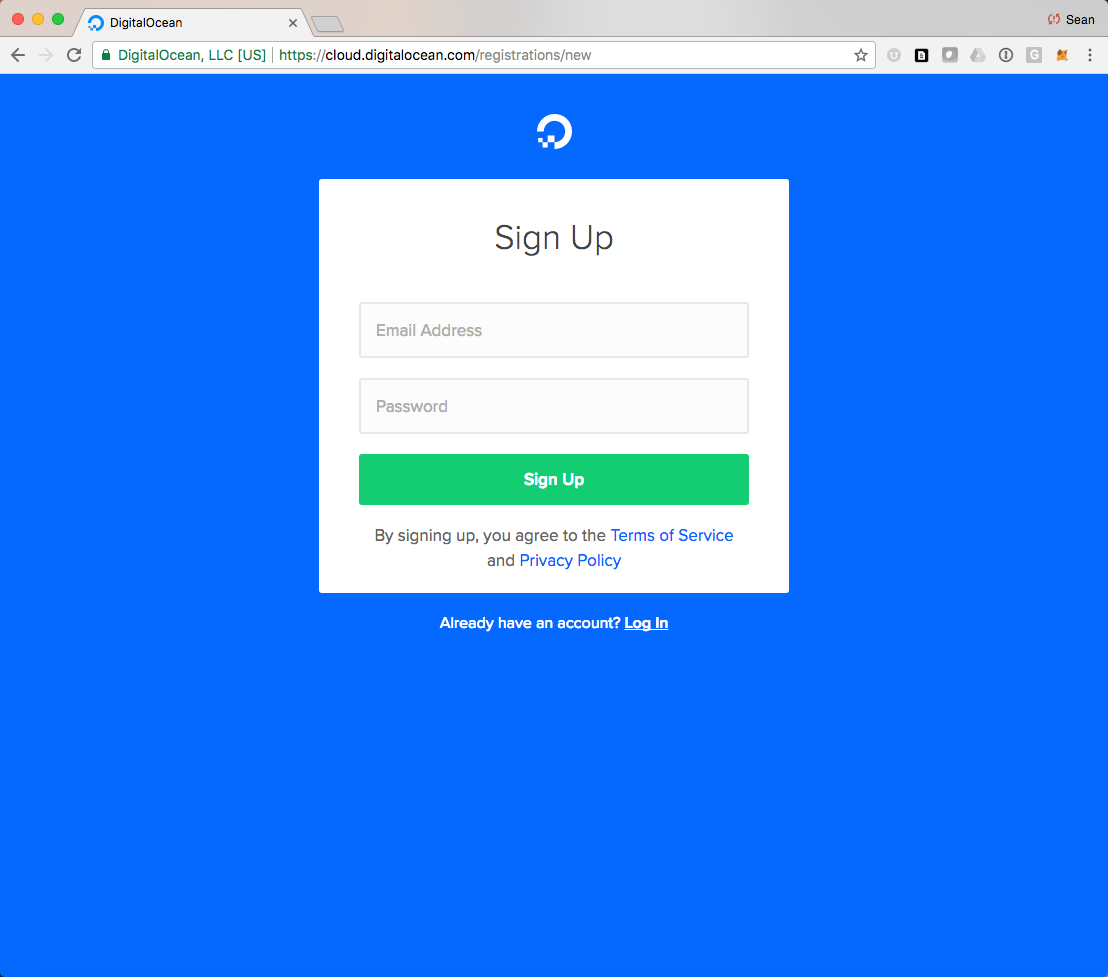
- Enter your email and create a password.
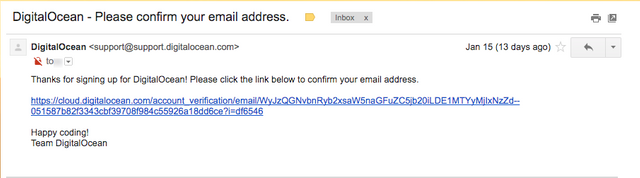
- Go to your email and check for a digital ocean email. Confirm the email.
- Enter in Payment Details so that you can create a Droplet (VPS)

- Once this is all done, log in again to Digital Ocean and go to "Create Droplet"
- Select an Ubuntu Distribution use Ubuntu Version 16.04 LTS. Select a monthly plan.
Setup with 4GB or more of RAM. You don't want the SecureNode to lockup when it runs out of memory. As they add features, our SecureNodes will use more resources too.

- You Don NOT need to Add block storage so leave this empty.
Choose a Datacenter Region. If you have multiple nodes use different locations.
DO NOT select additional options
DO NOT add SSH keys
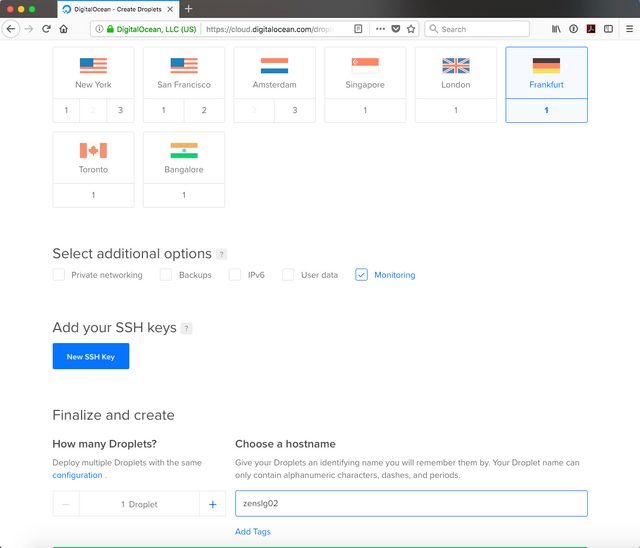
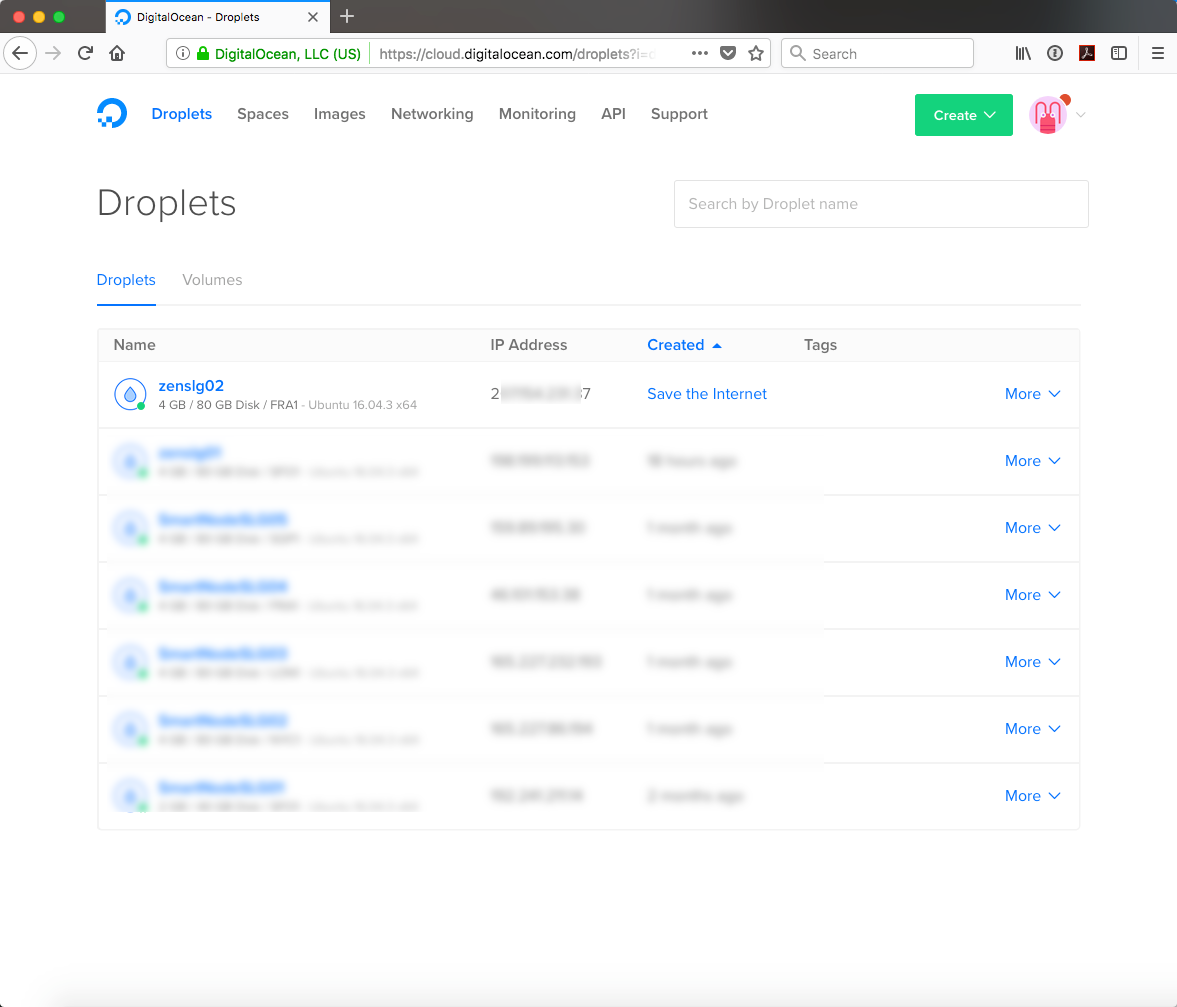
- Give your VPS a name and select create.
- Check your email account for an email from Digital Ocean which will contain the root password.
- Back on the Digital Ocean page in your Internet Browser.
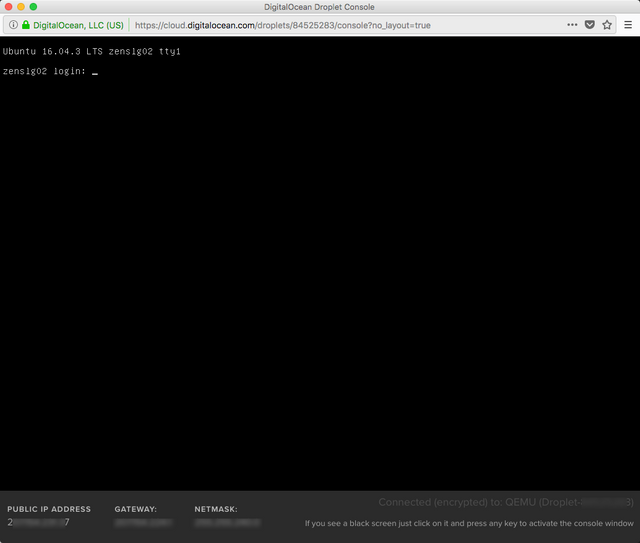
Once the machine is created you will be presented with this screen. Click on more link and select Access console.
- On the console screen enter the root credentials with the password from the email (step 10) to log in.
Please note copy and paste may not work. So please type carefully.
- You will be asked to change your password so please follow the instructions and make note of your new password and keep it safe.
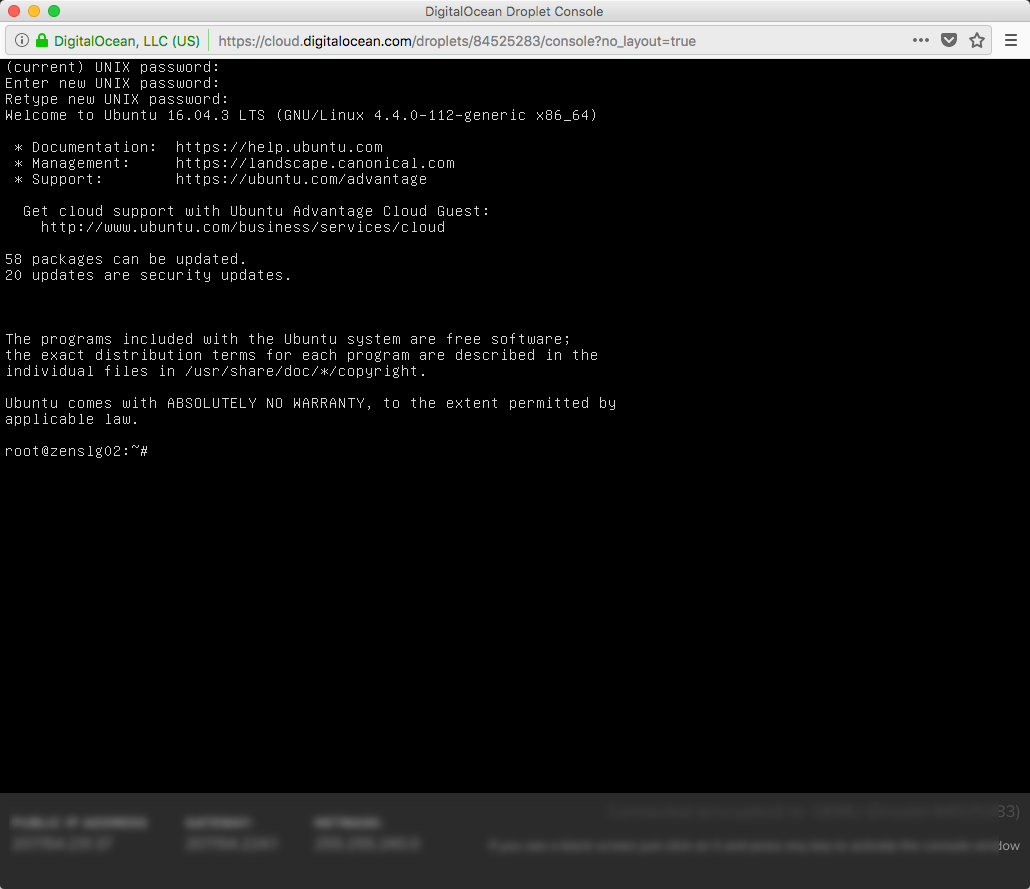
Congratulations. You have successfully created and logged into the VPS in Digital Ocean


Section 4: Add the zenadmin user to help secure your node.
- Let's open up a terminal session on your local Mac
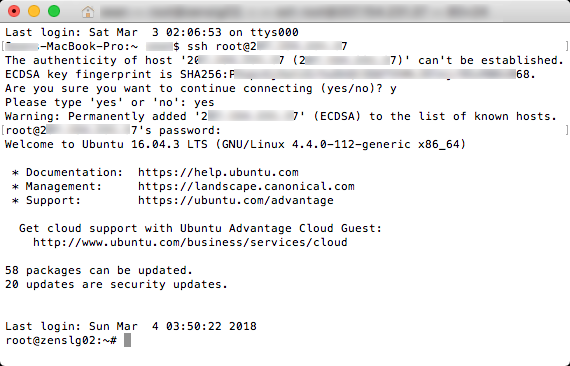
- Now let's log into our VPS with ssh as root
ssh root@VPS-IP
The first time you ssh into the VPS it will ask you about the fingerprint and typeyes
Then log in with root password you just created in section 3
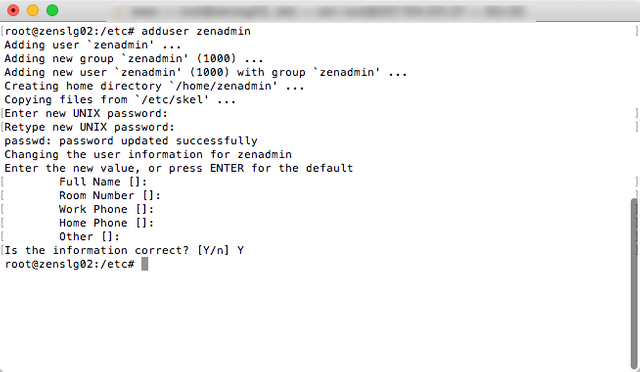
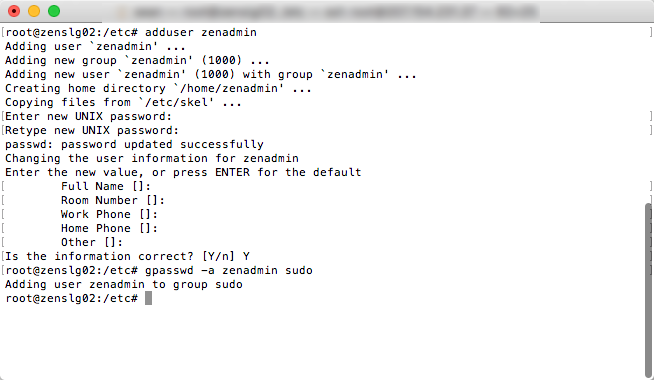
- Now let's create an admin user so we can start to lock down root from the bad guys
adduser zenadmin
Add the zenadmin user
Enter the details for a password and keep it safe.
You can enter the optional information but it is not necessary so you can just skip it by pressing enter.
Type Y for the questions “Is this information correct” and press enter
- Give the zenadmin the ability to elevate the user privileges when needed by adding the user to the sudo group with the command
gpasswd -a zenadmin sudo
- logout as root and login as zenadmin
exit
ssh zenadmin@VPS-IP


Section 5: Prepare your VPS to install your SecureNode
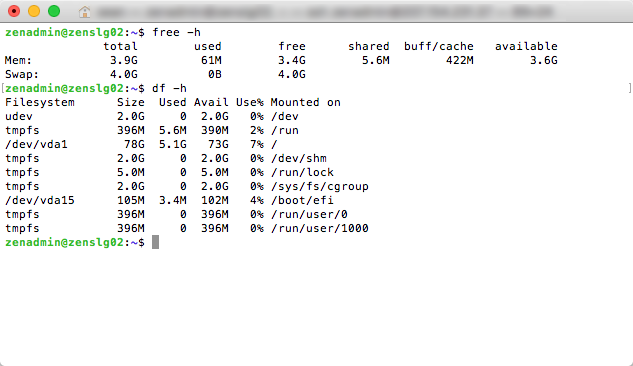
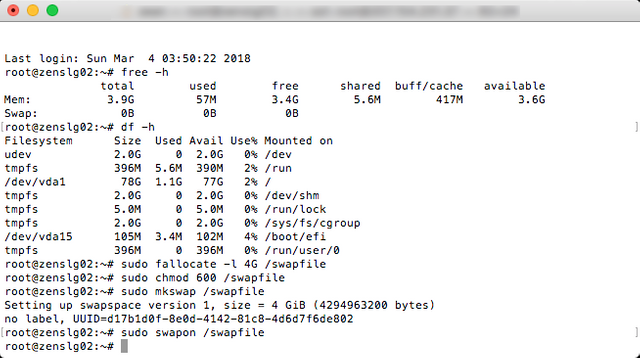
- Check free memory and hard drive space:
free -h
df -h
- If you do not have more than 5G of memory when you add your existing Mem and Swap, add some swap space to the server:
sudo fallocate -l 4G /swapfile
sudo chmod 600 /swapfile
sudo mkswap /swapfile
sudo swapon /swapfile
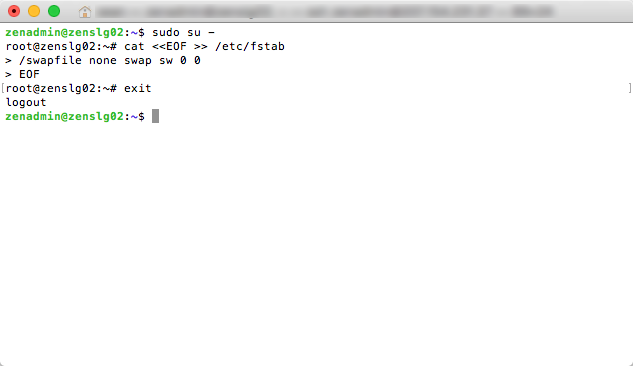
- Make the swap come back on after a reboot:
sudo su -
cat <<EOF >> /etc/fstab
/swapfile none swap sw 0 0
EOF
exit
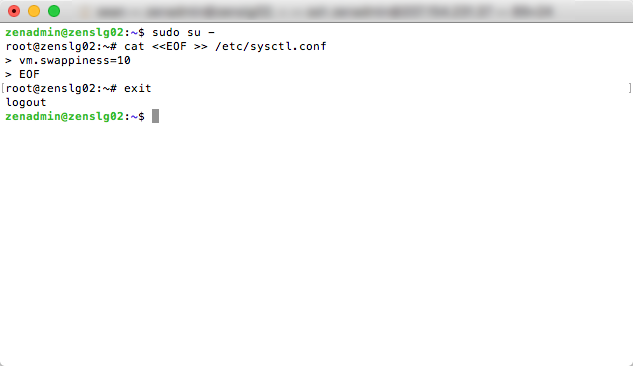
- Make the swap work better do this for your existing swap even if you did not add any. This setting makes the server wait until memory is 90% used before using the hard drive as memory:
sudo su -
cat <<EOF >> /etc/sysctl.conf
vm.swappiness=10
EOF
exit
- Check free memory and hard drive space again:
free -h
df -h


Section 6: Install zen from packages
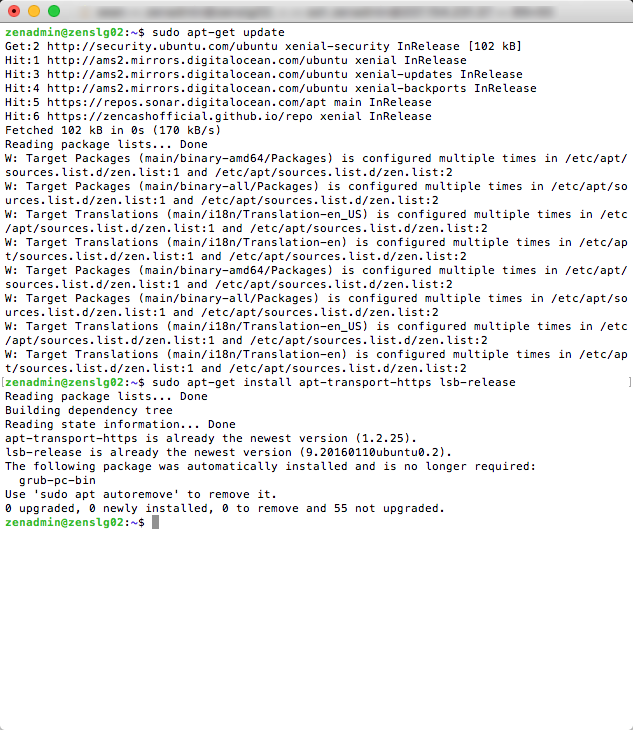
- Install Zen from packages from this page – https://zencashofficial.github.io/repo/
sudo apt-get update
sudo apt-get install apt-transport-https lsb-release
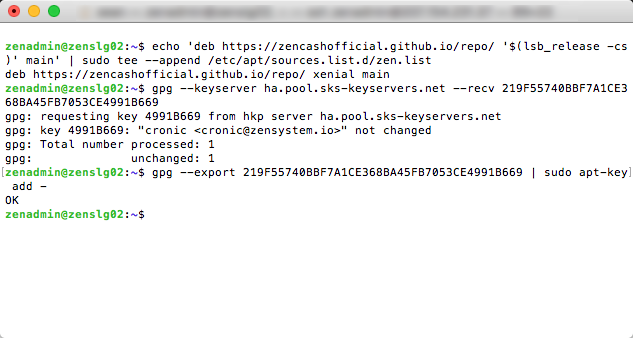
echo 'deb https://zencashofficial.github.io/repo/ '$(lsb_release -cs)' main' | sudo tee --append /etc/apt/sources.list.d/zen.list
gpg --keyserver ha.pool.sks-keyservers.net --recv 219F55740BBF7A1CE368BA45FB7053CE4991B669
gpg --export 219F55740BBF7A1CE368BA45FB7053CE4991B669 | sudo apt-key add -
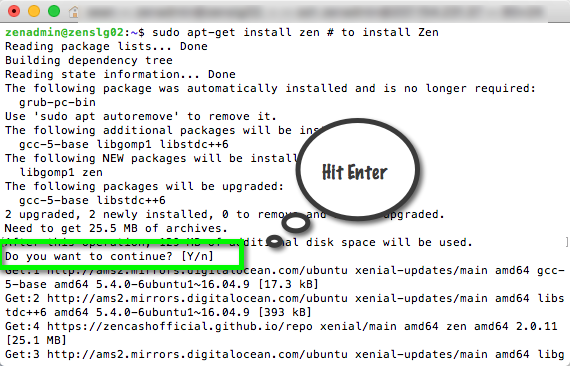
sudo apt-get update
sudo apt-get install zen # to install Zen
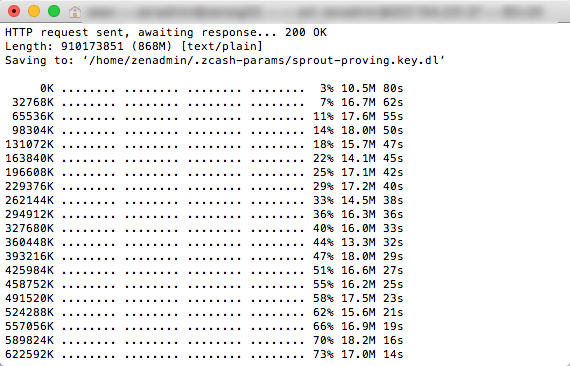
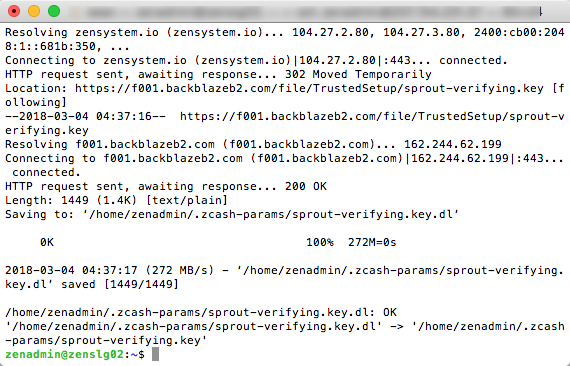
zen-fetch-params
When Prompted hit enter


Section 7: Configure Zen SecureNode
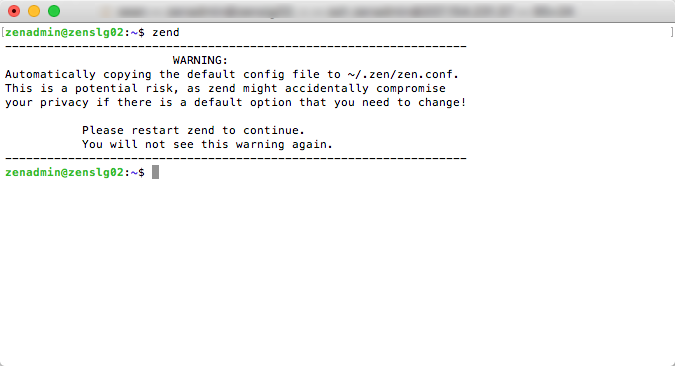
- Run zend once and read the message. It then stops.
zend
- Create a new zen configuration file. Copy and paste this into the command line:
cat <<EOF > ~/.zen/zen.conf
rpcuser=zenuserorsomebettername
rpcpassword=replacethiswithagoodpassword
rpcport=18231
rpcallowip=127.0.0.1
server=1
daemon=1
listen=1
txindex=1
logtimestamps=1
### testnet config
#testnet=1
EOF
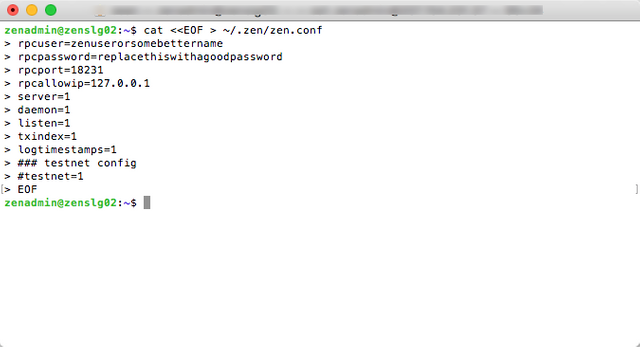
Its a good idea to go back and edit the rpcuser and prcpassword to something unique - Run the Zen application as a daemon:
zend
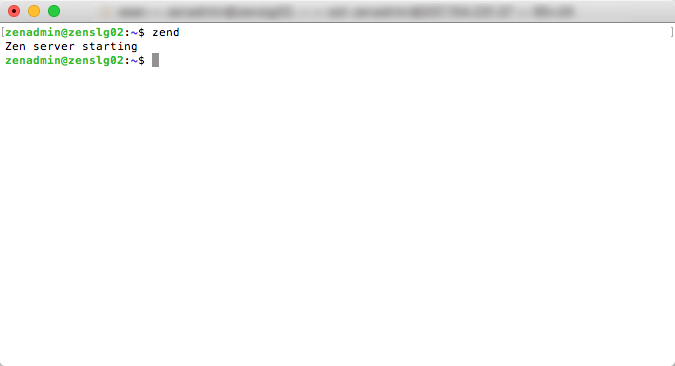
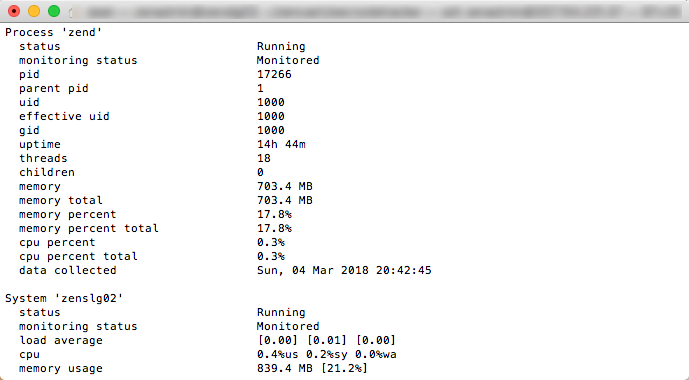
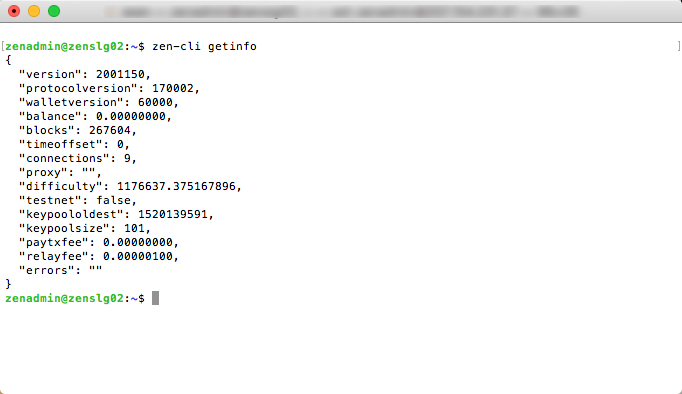
- Check status and make sure block are increasing:
zen-cli getinfo
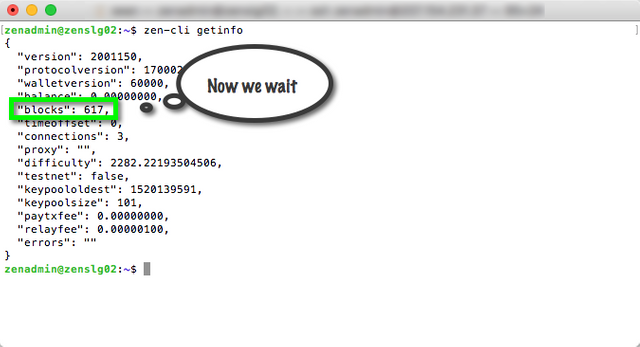
The entire block chain needs to download to your securenode and this can take hours if not a day.
Let's try and do some other steps while we wait.


Section 8: Install a free certificate from LetsEncrypt
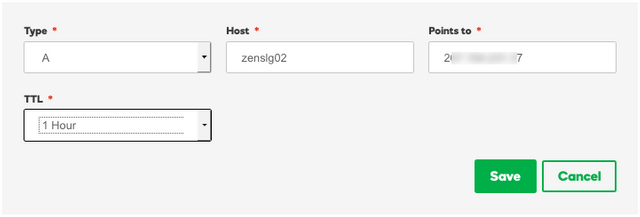
- Create an A record for your host on your DNS control panel for your domain. This is your FQDN
Wherever a word is<CAPS>you need to put the appropriate value in place. For example, the<FQDN>of the ZenCash blog server is blog.zensystem.io - Here is an example I use at Godaddy but you can use any DNS provider should have a way to add an A Record
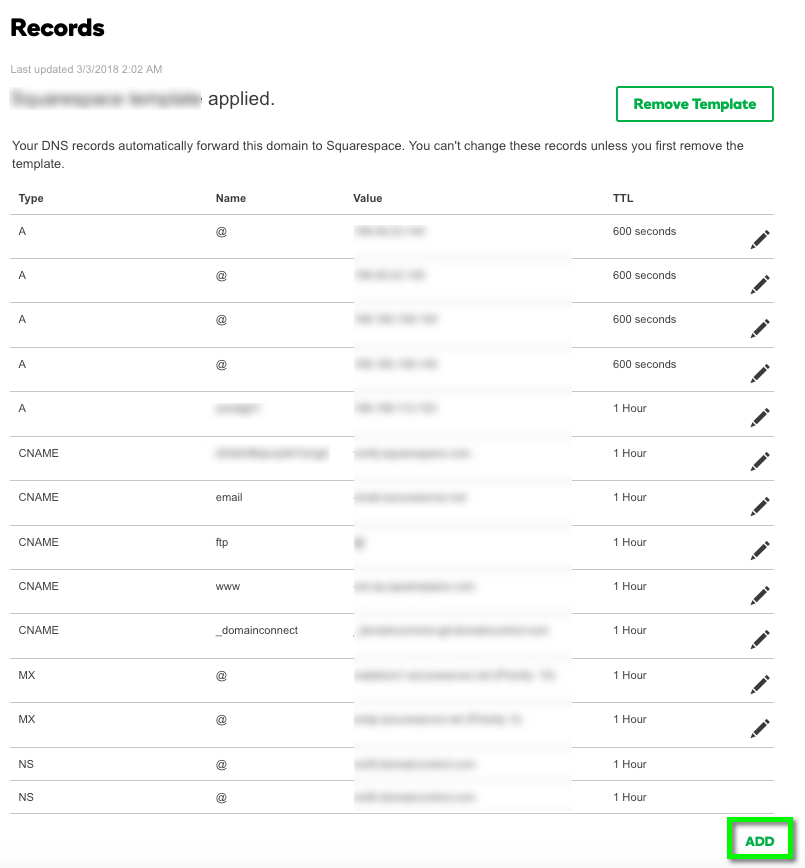
Click on add
Put in the hostname of your securenode and the IP address and make sure you select as anARecord
- Check your domain name has propagated and it matches the public IP address of your server:
ping <FQDN>

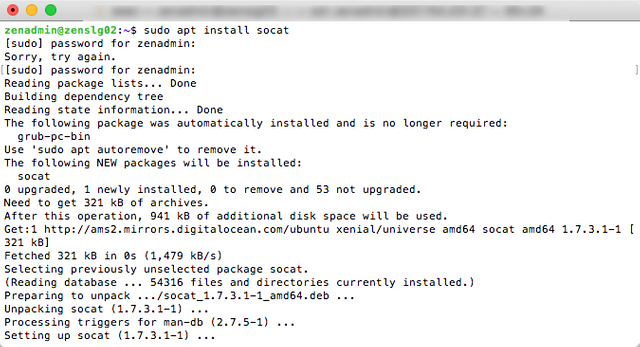
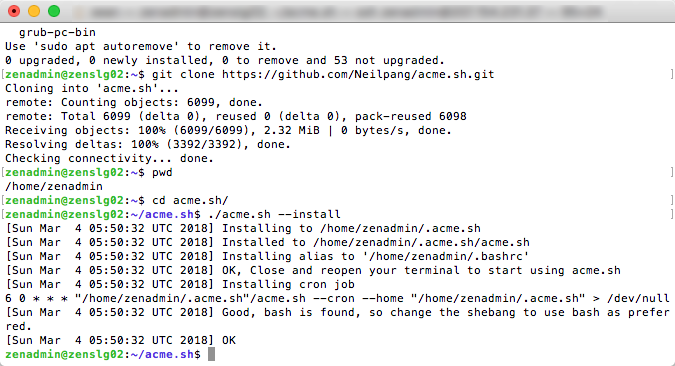
- Install the acme script for creating a certificate:
sudo apt install socat
cd
git clone https://github.com/Neilpang/acme.sh.git
cd acme.sh
./acme.sh --install
- Create the certificate:
FQDN=<FQDN>
echo $FQDN
sudo ~/.acme.sh/acme.sh --issue --standalone -d $FQDN
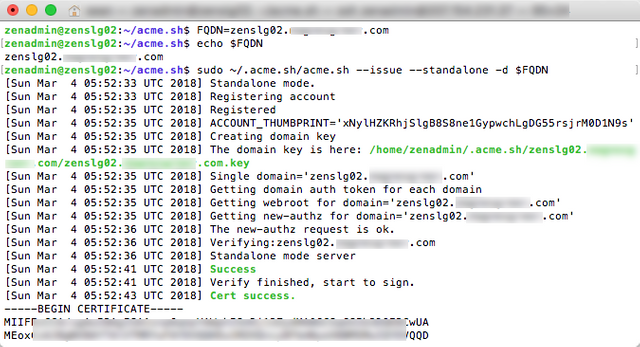
It should tell you where your certs are. They should be in
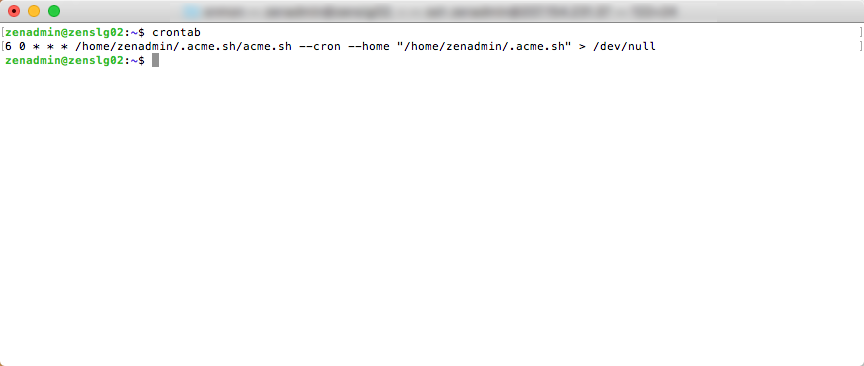
~/.acme.sh/<FQDN> - Install the crontab that will check the script expiration date and renew it if necessary:
crontab
6 0 * * * /home/zenadmin/acme.sh/acme.sh --cron --home "/home/zenadmin/acme.sh" > /dev/null
CTRL-D
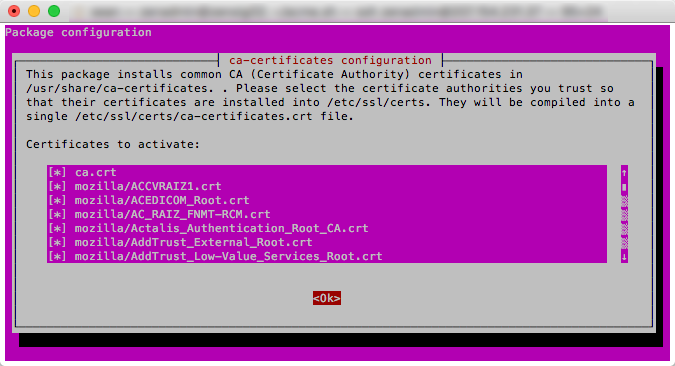
- Copy the intermediate authority certificate to the Ubuntu certificate store and install it.
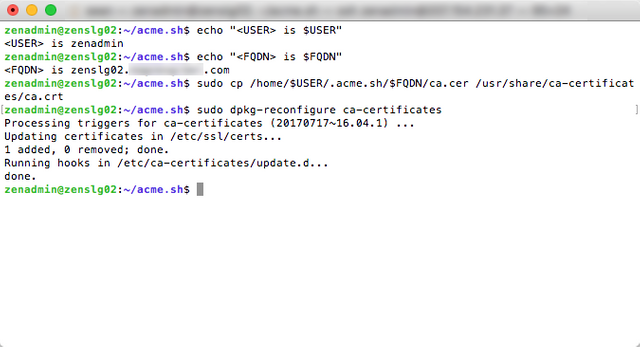
echo "<USER> is $USER"
echo "<FQDN> is $FQDN"
sudo cp /home/$USER/.acme.sh/$FQDN/ca.cer /usr/share/ca-certificates/ca.crt
sudo dpkg-reconfigure ca-certificates
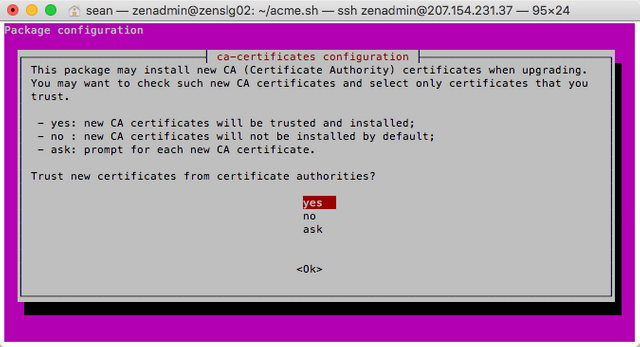
Make sure to hitspaceto mark ca.crt
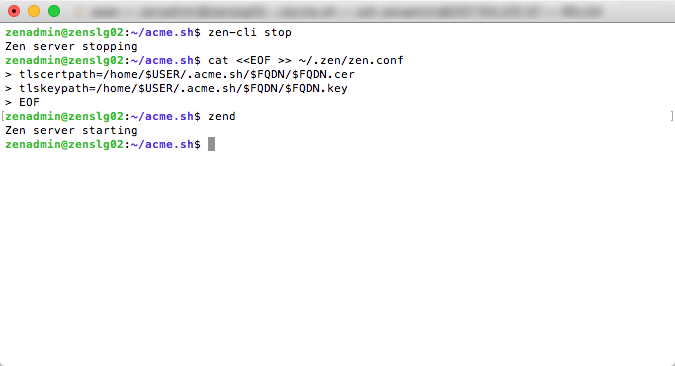
- Stop the zen application and configure the certificate location, then start zend again:
zen-cli stop
cat <<EOF >> ~/.zen/zen.conf
tlscertpath=/home/$USER/.acme.sh/$FQDN/$FQDN.cer
tlskeypath=/home/$USER/.acme.sh/$FQDN/$FQDN.key
EOF
zend
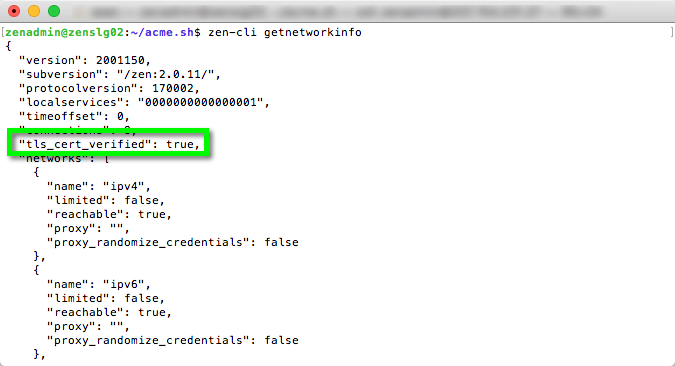
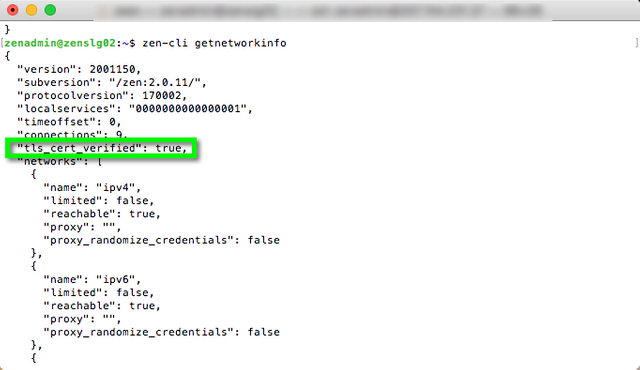
- Look for TLS cert status true – a line should say “tls_cert_verified”: true
zen-cli getnetworkinfo


Section 9 Config SecureNode Requirements
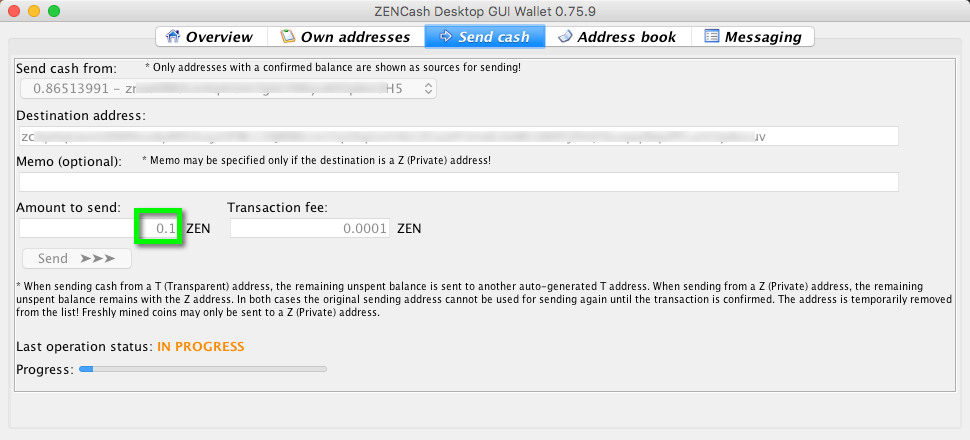
Create a new transparent address on your swing wallet – send it 42 zen. This is the collateral address <T_ADDR>. Make sure the ZEN stays in that address, else your Secure Node will fail its checks.
- See if the node already has a shielded address:
zen-cli z_listaddresses
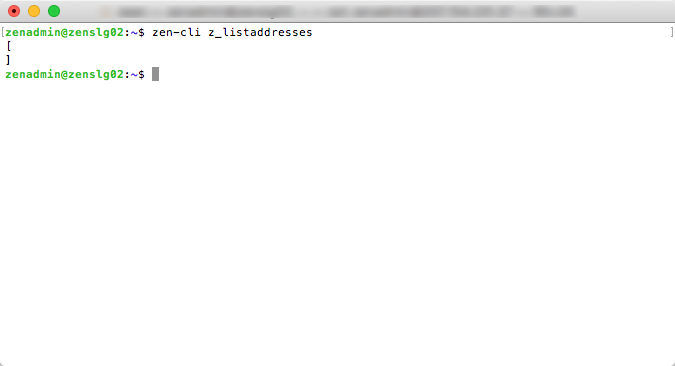
- If not, create a shielded address on the zen node:
zen-cli z_getnewaddress
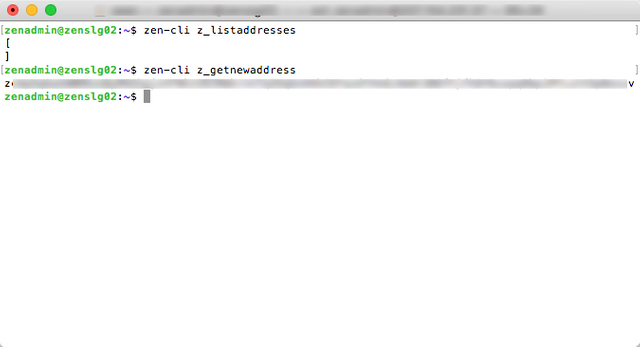
This address will be referred to as <Z_ADDR>. Send 4 or 5 transactions of 0.1 to 0.25 zen to <Z_ADDR> from the ZenCash wallet you have running on your PC or Mac. Check to make sure the node knows it has funds. You are ready when it has between 0.3 and 1 ZEN: - Send Zen to this address from your Wallet
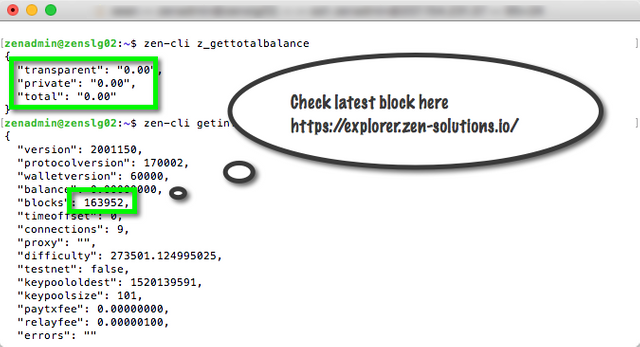
- Check the Balance on the VPS securenode
zen-cli z_gettotalbalance
If the balance is still zero, the blockchain might not be fully updated. Check with the command
zen-cli getinfo
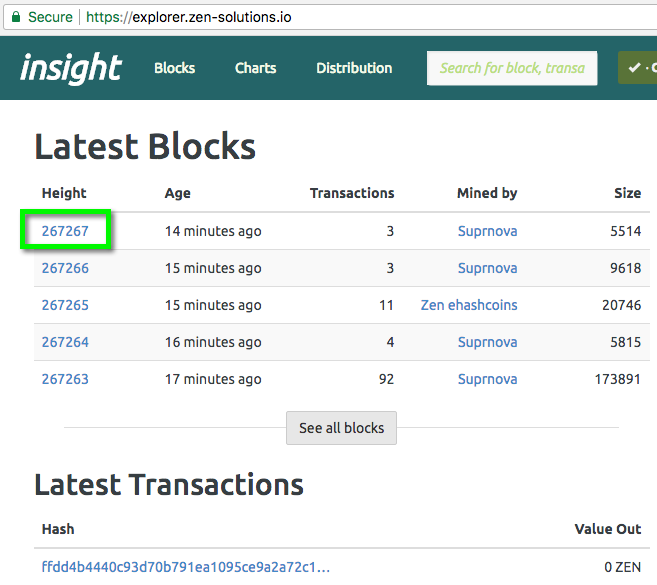
Check for latest block here
https://explorer.zen-solutions.io/
They need to match. Warning this can take a long time like many hours


Section 10 Install the Tracker
Install the tracker application. If you are upgrading your tracker application, read the upgrade instructions here: https://github.com/ZencashOfficial/secnodetracker
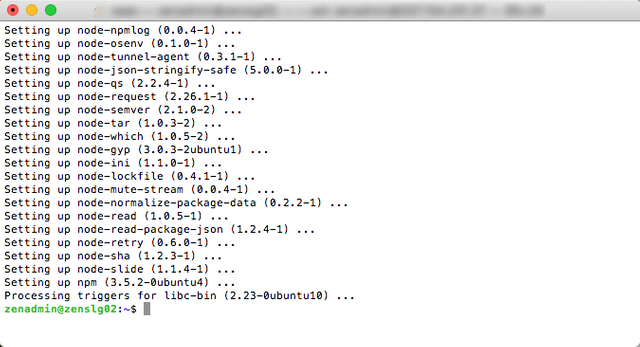
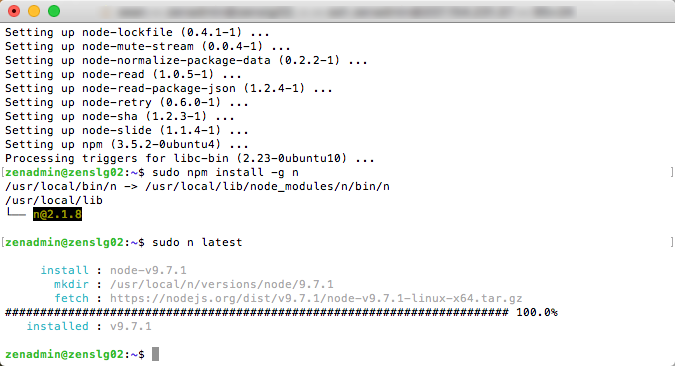
- Install npm and Node.js:
sudo apt -y install npm
sudo npm install -g n
sudo n latest
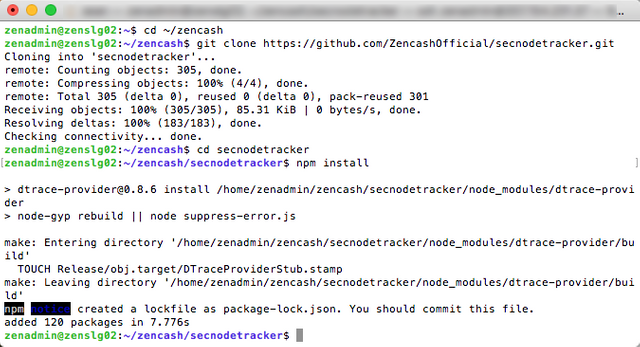
- Clone this repository then install node modules:
mkdir ~/zencash
cd ~/zencash
git clone https://github.com/ZencashOfficial/secnodetracker.git
cd secnodetracker
npm install
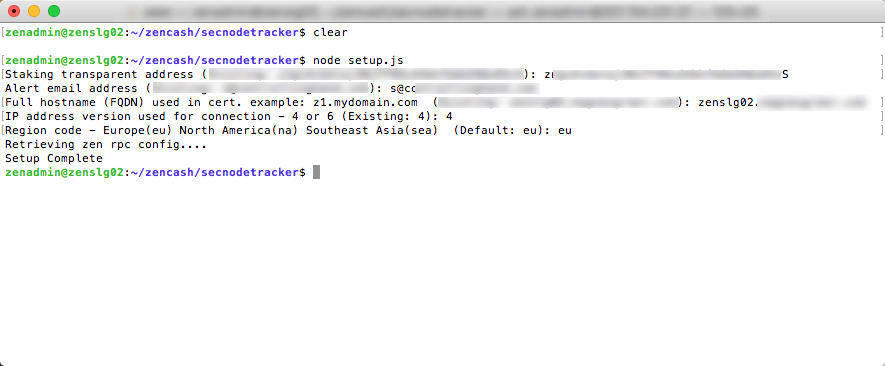
- Run the node setup application. You will need <T_ADDR> and an email address to receive alerts.
node setup.js
Enter in your T_ADDR that has 42 ZenCash in your Local Wallet
Enter in an email address you would like to receive alerts
Enter in your FQDN
Enter in your Region code
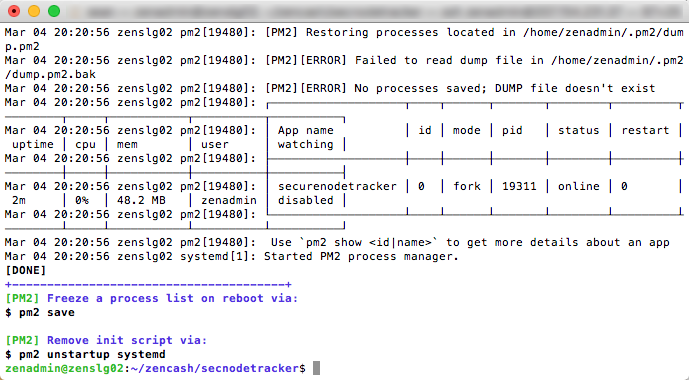
- Start the tracking app and make sure it is working:
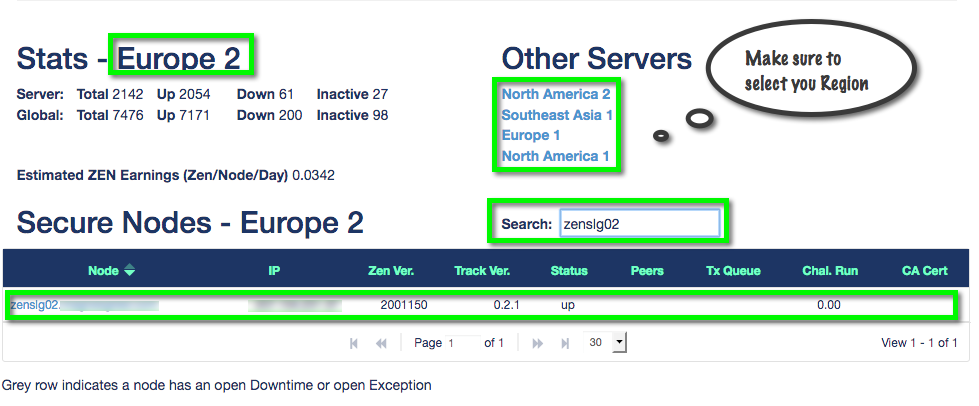
node app.js
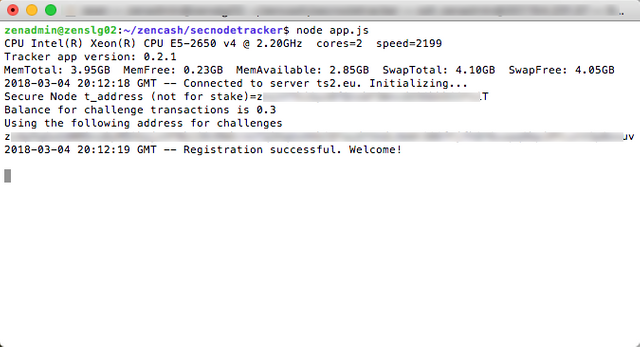
https://securenodes2.zensystem.io/
If it looks like it has registered properly, and looks good overall, type ctrl-c to stop the app. Next we will run node app as a process: reference is psyrax blog post at https://www.zen-solutions.io/using-pm2-to-keep-your-secnodetracker-software-running-when-you-close-the-terminal-session/ - Run node app as a process
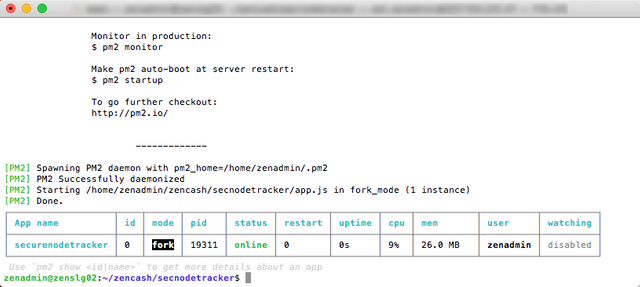
cd ~/zencash/secnodetracker/
sudo npm install pm2 -g
pm2 start app.js --name securenodetracker
- Make it run at boot:
pm2 startup
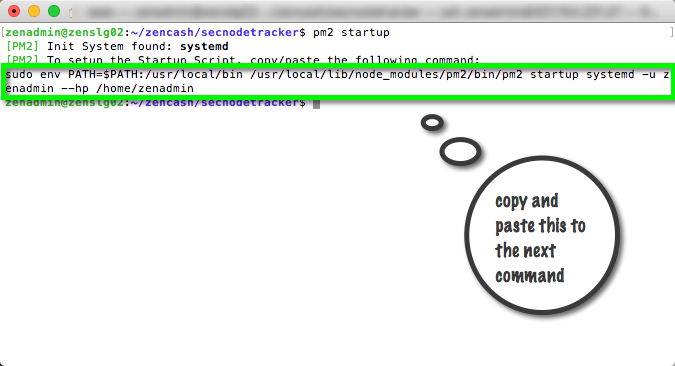
You will have to copy and paste a command to get pm2 to start on boot – it tells you what to do

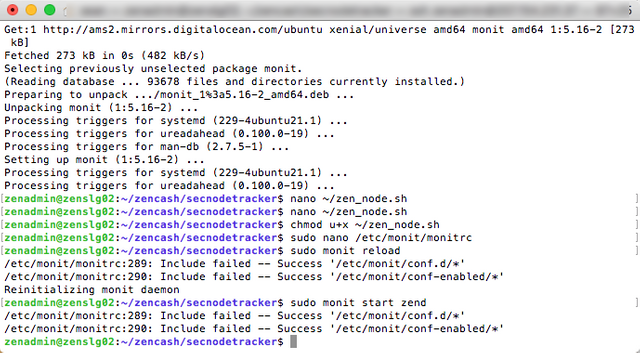
- Install and configure monit so the zen node application runs. Install monit:
sudo apt install monit

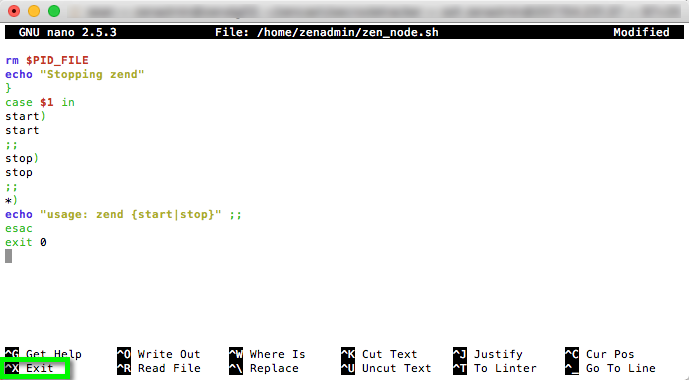
- Create a small file to start zend. Edit it with:
nano ~/zen_node.sh
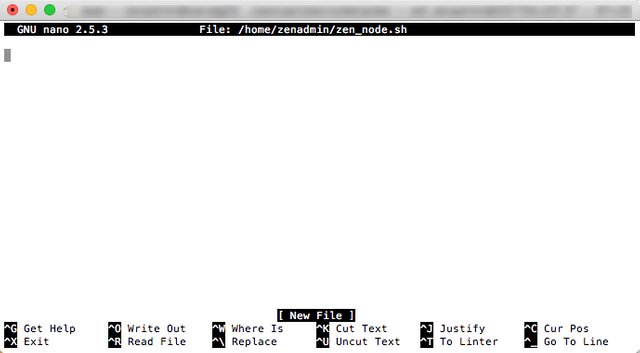
- Paste this into the file.
#!/bin/bash
PID_FILE='/home/zenadmin/.zen/zen_node.pid'
start() {
touch $PID_FILE
eval "/bin/su zenadmin -c '/usr/bin/zend 2>&1 >> /dev/null'"
PID=$(ps aux | grep zend | grep -v grep | awk '{print $2}')
echo "Starting zend with PID $PID"
echo $PID > $PID_FILE
}
stop () {
pkill zend
rm $PID_FILE
echo "Stopping zend"
}
case $1 in
start)
start
;;
stop)
stop
;;
*)
echo "usage: zend {start|stop}" ;;
esac
exit 0

Then hitCTRL-X
Save Modified buffer type 'Y'
File Name to Write hitEnter - Make the helper file executable:
chmod u+x ~/zen_node.sh - Add configuration settings to the bottom of the monit configuration by editing it:
sudo nano /etc/monit/monitrc - Paste this into the file at the bottom.
### added on setup for zend
set httpd port 2812
use address localhost # only accept connection from localhost
allow localhost # allow localhost to connect to the server
#
### zend process control
check process zend with pidfile /home/zenadmin/.zen/zen_node.pid
start program = "/home/zenadmin/zen_node.sh start" with timeout 60 seconds
stop program = "/home/zenadmin/zen_node.sh stop"
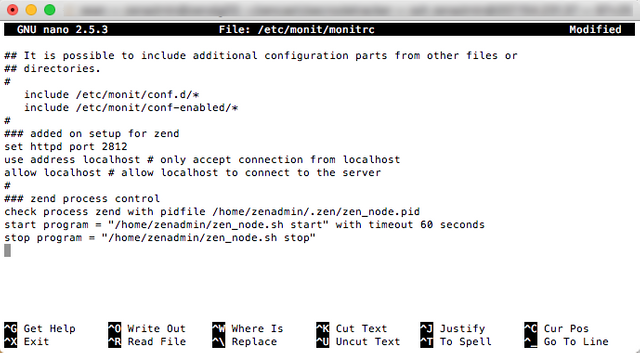
- Load the new configuration:
sudo monit reload
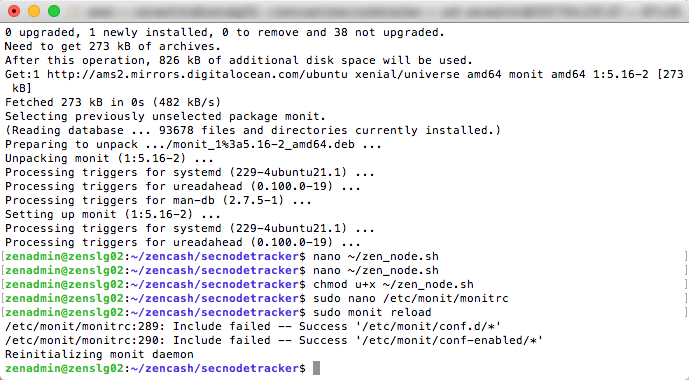
- Enable the monitoring service:
sudo monit start zend
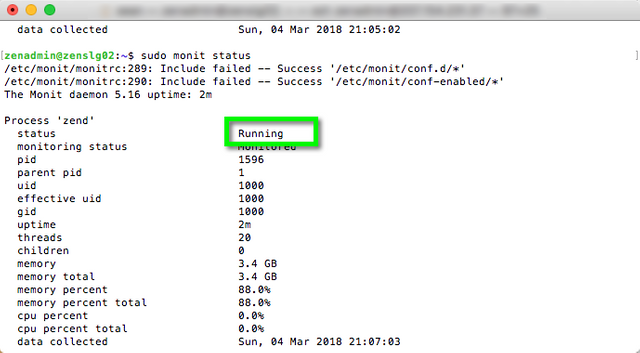
- That’s it. You only have to do the above once. You can check monit’s status with the command:
sudo monit status
This will keep the zend application running. If you stop it, it will restart it. If you really need to stop it, type:
sudo monit stop zend


Section 11 Add Basic Security to the Server
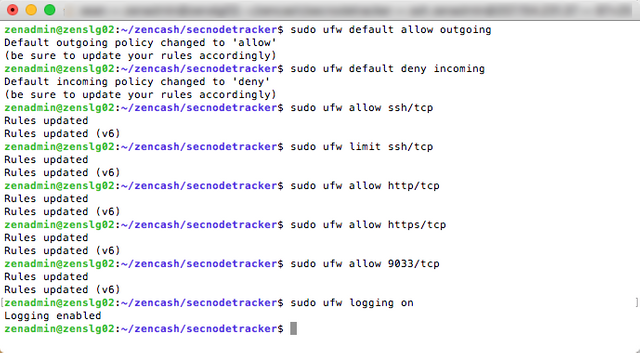
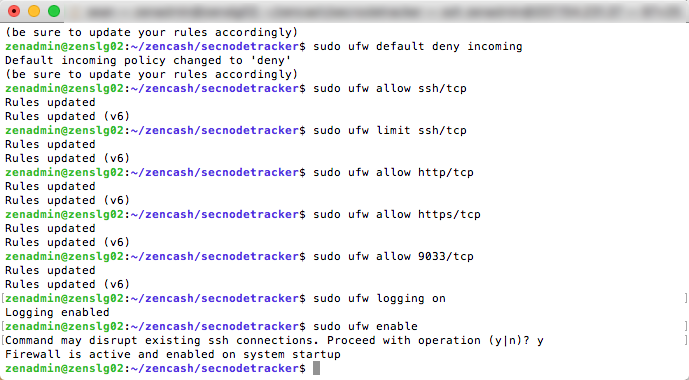
- Create a firewall:
sudo ufw default allow outgoing
sudo ufw default deny incoming
sudo ufw allow ssh/tcp
sudo ufw limit ssh/tcp
sudo ufw allow http/tcp
sudo ufw allow https/tcp
sudo ufw allow 9033/tcp
sudo ufw logging on
- Enable firewall
sudo ufw enable

- Install and enable banning of dictionary attack login attempts:
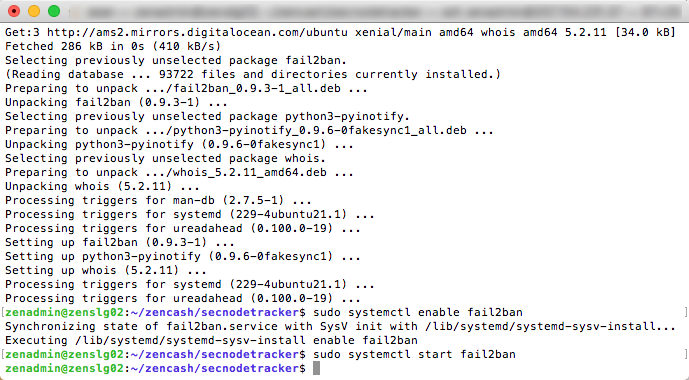
sudo apt -y install fail2ban

sudo systemctl enable fail2ban
sudo systemctl start fail2ban
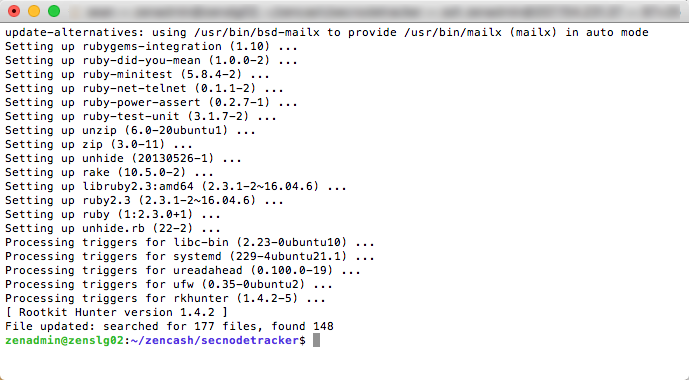
- Install a rootkit detector:
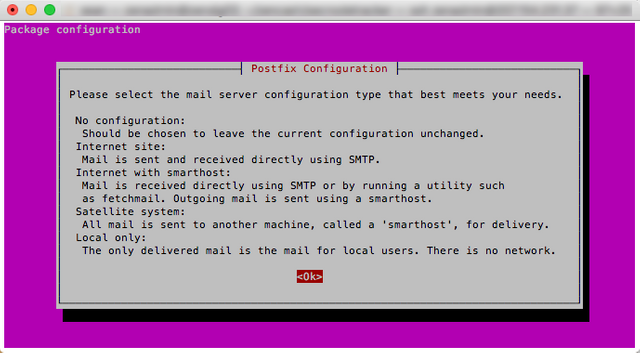
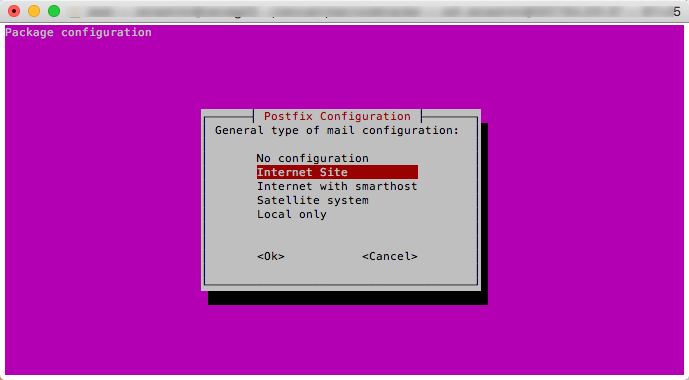
sudo apt -y install rkhunter
When it asks for mail configuration, choose Internet Site and type in your FQDN on the next page.

- Create an upgrade script that will also update the rootkit hunter after you upgrade your node:
cat <<EOF > ~/upgrade_script.sh
#!/bin/bash
sudo apt update
sudo apt -y dist-upgrade
sudo apt -y autoremove
sudo rkhunter --propupd
EOF
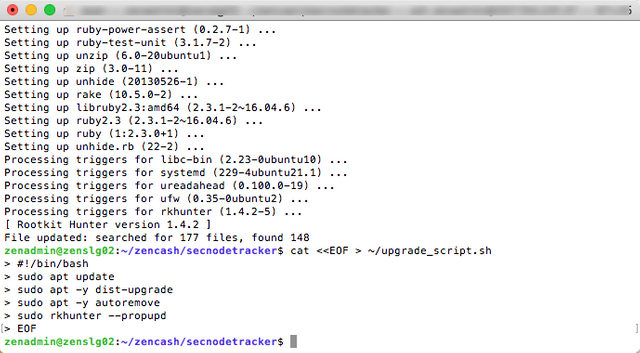
- Change permissions to enable execution of the script:
chmod u+x ~/upgrade_script.sh

- When you want to upgrade the node, run the upgrade script by typing:
sudo ~/upgrade_script.sh
You should now have a ZenCash Secure Node running.


Section 12 Final Test
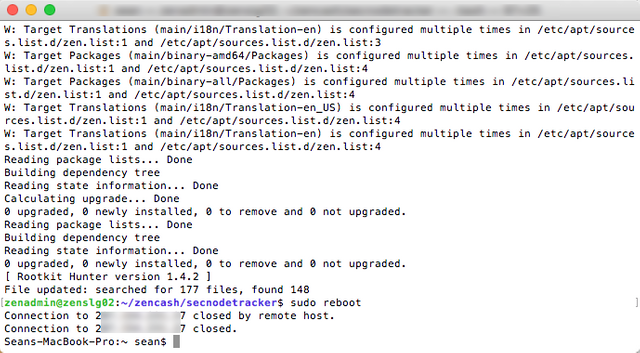
- Reboot your server and check that everything comes back up and starts running again.
sudo reboot
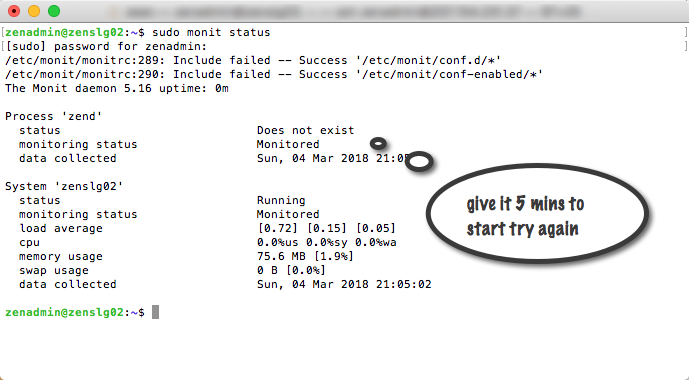
- After it reboots, reconnect, and check things are working:
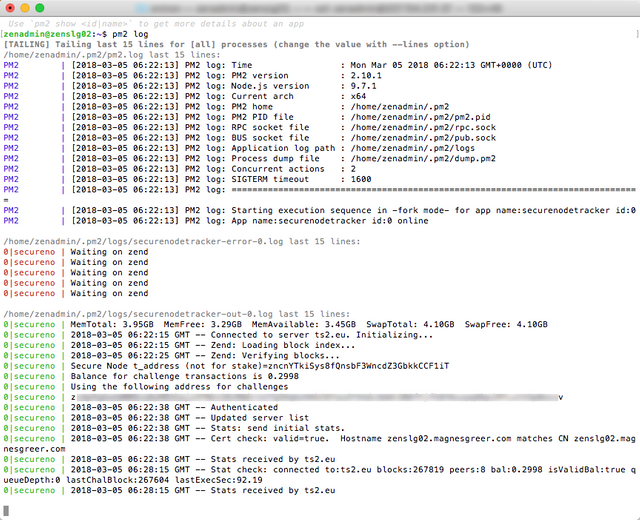
sudo monit status
pm2 status
check PM2 is running

pm2 log
to verify your secnodetracker is connecting to the server correctly.
zen-cli getinfo
zen-cli getnetworkinfo
- That should be everything for a basic secure node.


Section 13 -Optional Steps- Setup ssh on local MAC and send keys to VPS server (Lock out root)
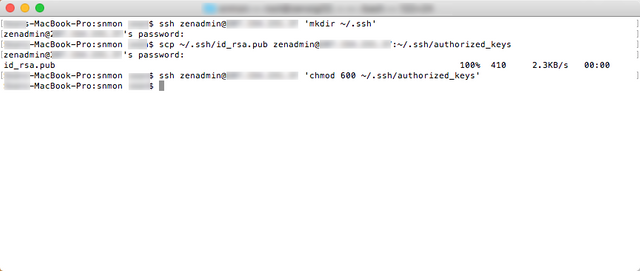
- Let us create the ssh key on the local MAC
(!) WARNING if you are doing multiple securenodes or you already have a ssh-keygen you can skip this step, if you already performed this for your 1st smartnode. Do not overwrite your .ssh/id_rsa. (!)
ssh-keygen -t rsa -b 2048
It will offer to save the file in the default location:
/Users/youname/.ssh
Press Enter to Accept Defaults.
Create a Passphrase.
Enter the Passphrase Again.
Remember this Passphrase as you will need it to log in to all your ssh hosts going forward.

- Secure copy the pub key to the VPS server
First make a directory for the .ssh keys on the VPS server.
ssh zenadmin@VPS-IP 'mkdir ~/.ssh' - Now copy the keys over from the MAC to the VPS
scp ~/.ssh/id_rsa.pub zenadmin@VSP-IP:~/.ssh/authorized_keys
now set the permission correct on the authorized_keys
ssh zenadmin@VSP-IP 'chmod 600 ~/.ssh/authorized_keys'
- Now to disable root access for ssh
ssh into your VSP
ssh root@VSP-IP
edit the sshd config file
pico /etc/ssh/sshd_config
Scroll down the file till you seePermitRootLoginyes and change it tono
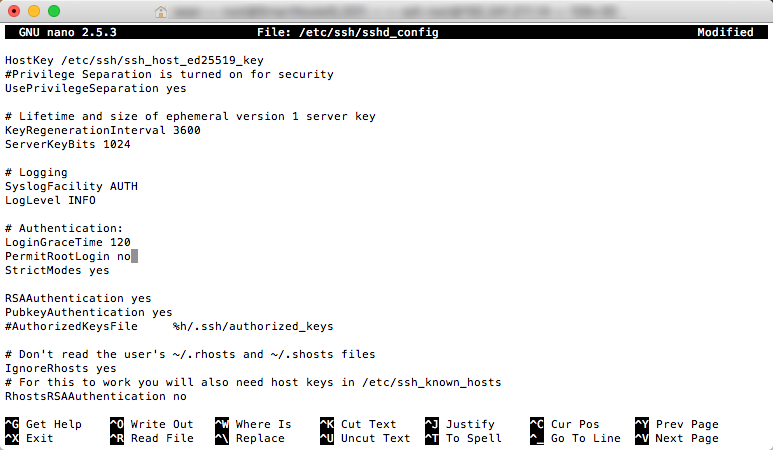
Scroll down toPasswordAuthenticationand make sure it hasnocharacter in front and says no (check screenshot)
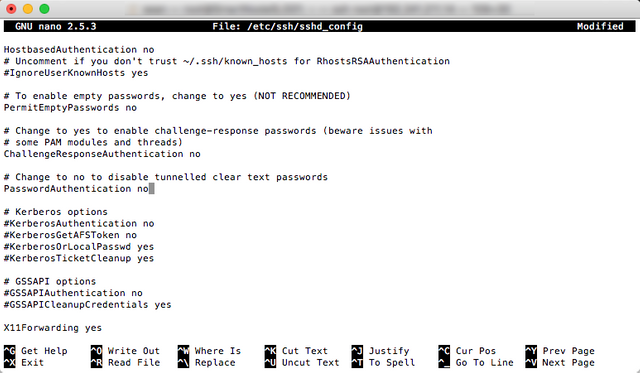
Now press CTRL + x to close.
“Save modified buffer?” will appear at the bottom.
Press Y to save.
Hit Enter to confirm the filename to save as.
Now it is time to restart the ssh service, so the changes become active.
systemctl reload sshd
reboot
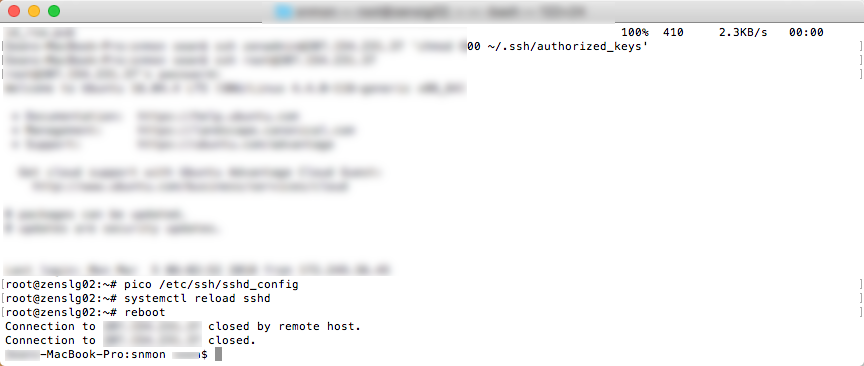
- Validate root doesn't have access and login in with zenadmin user
ssh root@VSP-IP
You should get Permission denied (publickey)


Note: when it asks for your
Enter passphrase for keyit is not the root password or zenadmin password, it is the passphrase you used to create the ssh key
Now login with zenadmin
ssh zenadmin@VSP-IP

Nice article, upvoted thanks. Can you create one more about how and where the mining rewards are sent.
Since you are using ssh to connect the terminal please explain how to check the balance and send the required Zen using only console?
A live example would be nice :)
Since the secure node reward will be 10% an overview of profitability would be nice.
Thank you so much for making this.
It was very useful for me... to just copy-paste.
Have encountered some difficulties, but made it.
https://steemit.com/zencash/@octav/my-first-crypto-masternode-zencash-tutorial-extension
right now i am getting 0,025 ZEN / day => 0,75 ZEN / month
a nice guide, how profitable it is ?
See above
Would be nice to see how profitable it is.
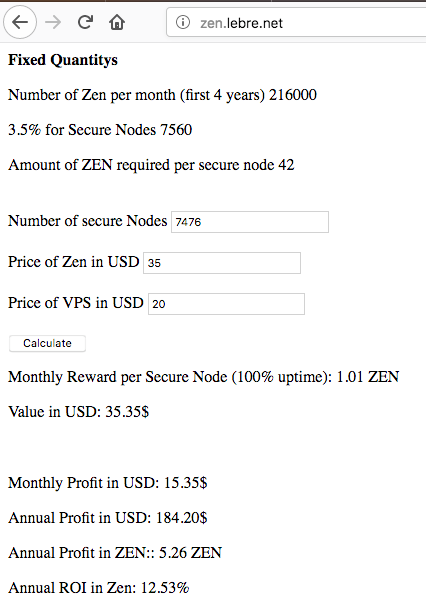
Here is a site and I put in variables for today.
Yeah, I found this site and did theoretical calculation, too. I was more curious if you are doing it for real and get rewards.
I was checking the site that lists all Masternodes. For me, most of them look like a scam. And in that case it is not very profitable to invest in those games. Trading is more profitable.
Trading could be profitable. But a miner's way of thinking is to set it up once, automate and forget. You'll end up with few tens of ZEN, and each ZEN could be 100 USD.
That is an admins way of thinking, too. I'm still thinking.
think before leap.