Beneficial Yoga Sequence For Beginners (with pictures)
Yoga has uncountable benefits; and for experts and beginners alike, the Sun Salutation (Surya Namaskar) is one of the best ways to start your practice.
The main reason for this, is that it warms up the entire body; and gives you energy for your yoga practice, as well as the rest of your day. The sequence works all of the muscles, and therefore builds equal heat in the body.
If you are new to this, here are some important things to remember before beginning.
- yoga is for all who are willing. It has nothing to do with fitness or flexibility levels.
- start slow, and don't rush. If it takes you two months to be able to touch your toes, but it took your friend a week, makes no difference. There is no competition.
- lastly, and most importantly, yoga and most other forms of physical activity teach us to listen to our body. Do not push yourself too far, it takes time. Just be persistent, and have fun!
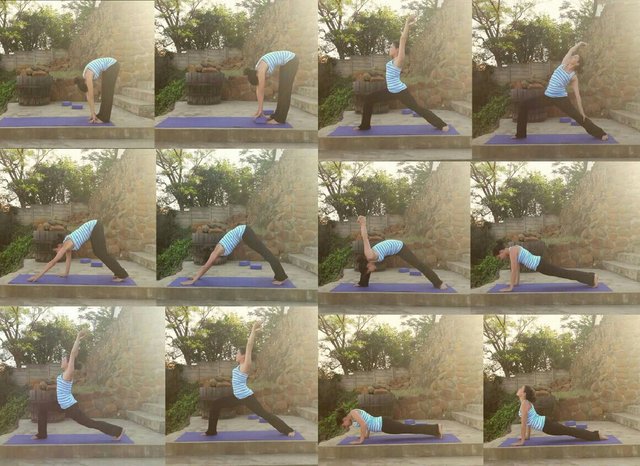
Surya Namaskar
To begin, inhale and stand with your feet hip distance apart.
Keep your muscles slightly engaged, which will make you feel strong and grounded. Place your palms together, and then lift your arms, directly above your head. This is Tadasana, or Mountain Pose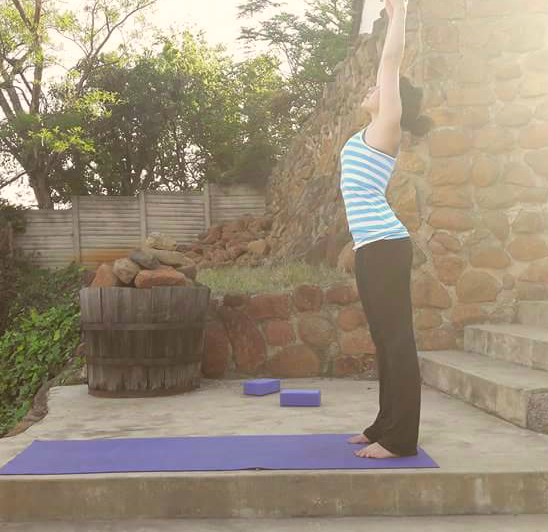
From here, you are going to exhale and swan dive forward(slowly bend forward, with your arms spread at your sides) and touch your toes, ankles or calves, depending on your flexibility. The benefits are the same. If you find it easier, use a yoga block to place your hands on.
Do not bend your knees, and focus on bringing your head to your knees, but do not curve your back. Bend from the hips. This is Uttanasana or forward fold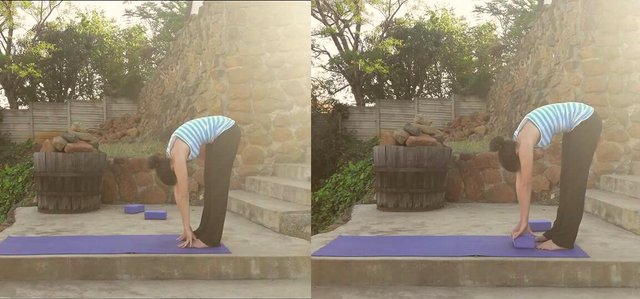
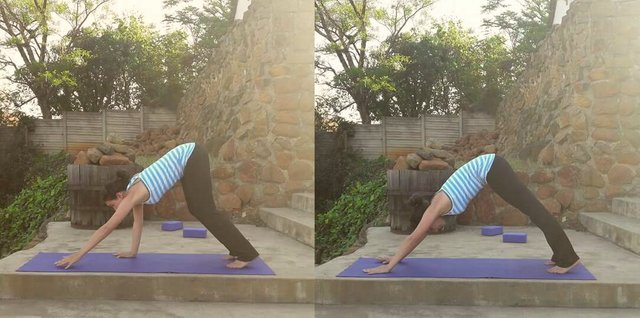
Next you are going to inhale, and walk your hands forward, keeping your heels as flat on the ground as possible. Push your chest towards your thighs, and keep your legs straight. Stay in this pose as long as possible, you will feel your hamstrings loosen. This is Ahdo Mukha Svanasana or Downward Facing Dog
You are now going to exhale and bring your left foot forward, and between your hands. Inhale and lift your upper body, and come into a high lunge. Your legs are strong, the front leg is bent at a 90° angle, and your back leg is straight. Your arms are up, straight and strong. Draw your shoulder blades together, and leave a space between the arms and the ears. Stay in this pose for 5 breaths. This is * Anjaneyasana or Crescent Lunge*
Inhale, and drop the back foot, maintaining the posture, except the back foot is now flat on the ground. Keep the hips and torso facing forward, ensure the front knee is not passing the toes, and that the front leg is 90° while the back leg is straight. This is Virabhradrasana 1 or Warrior 1
Arch the back slightly and hold for 5 breaths.
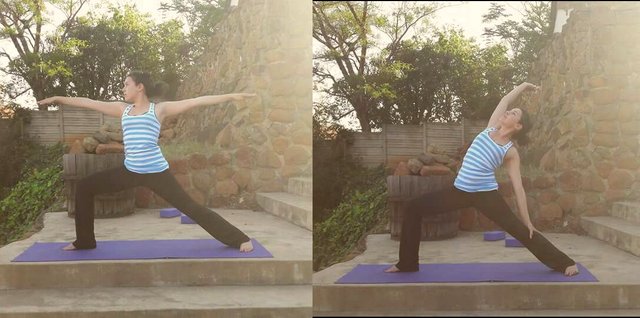
Exhale, and open the hips and arms to the side. The legs stay in the same position. Keep the shoulder blades drawn together, and keep the arms strong, as well as parallel to the ground. Look in the direction of the front arm. Hold for 5 breaths. This is * Virabhradrasana 2 or Warrior 2*
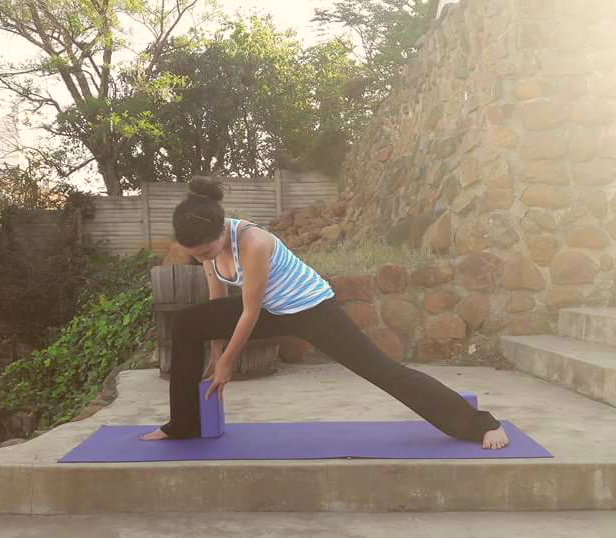
Inhale. Slide the right arm down the back leg, keeping the chest open and the leg posture maintained. The front knee does not pass the foot, and there is a 90° angle. Back leg is straight. The front arm points upwards, and try to look upwards too. Hold for 5 breaths. This is Viparita Virabhradrasana or Reverse Warrior
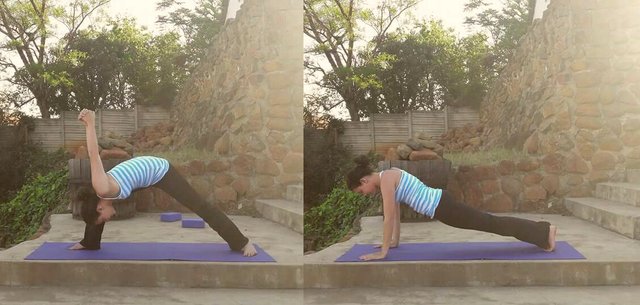
Exhale, bringing the upper body forward, and bending down, as if bowing. Clasp the hands together behind you,and fold forward next to the front leg, pushing the arms forward. The legs are strong and in the same posture. Hold for 5 breaths. This is Bhadda Virabhradrasana or Humble Warrior
Inhale, and drop the arms to the ground,on either side of the front leg. The leg moves back to meet the back leg, and you are in a plank position. Keep your whole body level, look forward, and try to hold for 5 breaths. The body is strong and the core is engaged . Do not sink into the shoulder blades, so push upwards. This is Phalakasana or Plank Pose.
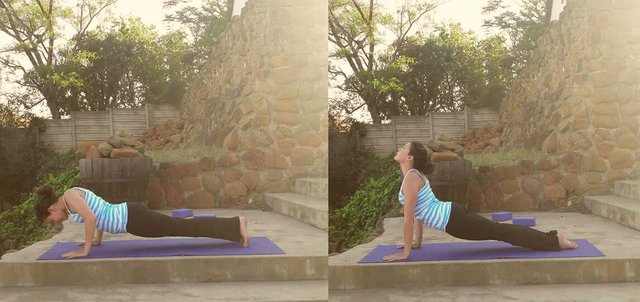
As you exhale, hinge forward,coming onto your toes,and bend the elbows to a 90° angle, and keep them close to your chest. This asasna is not easy, and I still haven't mastered it. Just go as far as you can, and keep the core tight. Hold for 3 breaths. This is Chatarnga
Inhale and straighten the arms, opening the chest and untucking the toes (the feet are now flat, top of the feet against the floor). The thighs are elevated,and only the hands and feet touch the floor. Push out of the shoulders and look up. Hold for 4 breaths. This is Urdhvamukha Svanasana or Upward Facing Dog
From here, push your hips up and go back into Downward Facing Dog as you exhale. Inhale and you back into the forward fold, and exhale as you come back up into Mountain Pose.
Repeat this on the right hand side, and go over the sequence another two times, or as desired. After this Salutation your body will feel warm, send ready for anything.
Some tips:
- breathe slowly, and do not rush the poses.
- fix your gaze upon one point, and concentrate on it. This will help with balance.
- You can use a yoga block to check if your leg is bent at a 90° angle.
Thank you for reading, I hope you found this helpful, and enjoy your practice!
Namaste
Thank you
Hope you try it out!
Excellent post.., and beautiful instruction!
Thank you so much!
Great exercise for people that sit all day.
Yes of course!
I just LOVE yoga!
interesting post. hopefully there continued posting about this yoga.
Will do! Uploading today. Thanks for reading!