Design your business website with WORDPRESS Easily
WordPress is a famous CMS (Content Management System). Wordpress is number 1 in CMS. Then the position of Jumla.You can make a website easily with WordPress you have no knowledge of programming.
Before you work with WordPress, you need to download CMS. This is an open source project so you can download and use it.
Download link: https://wordpress.org/download/

By creating a site with WordPress, the default login, signup, new menu/page addition, latest added article, etc. can be done from the admin panel. Even if you need something that is not in default WordPress, you can find thousands of plugins that are free from WordPress.
If you are non-technical, you can create your own site with WordPress (only through the admin panel). However, if PHP (and HTML, CSS) is known to be fair, then the theme can be developed. As a result, you can create your own site's Outlook.
If you install WordPress then a blog has been created. Installing is also very easy.
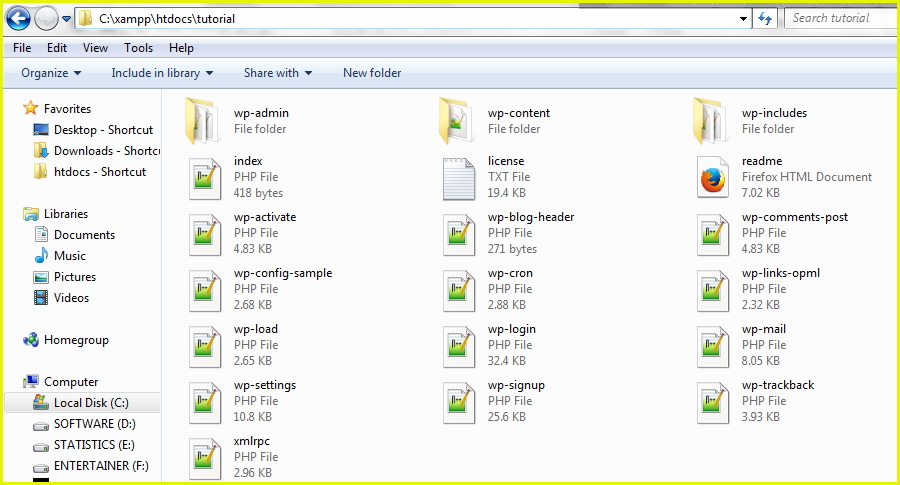
Create a directory / folder named "tutorial" on your server (localhost / development server) on htdocs and download the downloaded zip archive (latest.zip). You can find an extracted folder named "wordpress". Paste this into the folder and paste it in "tutorial". All of the above was the localhost / tutorial / wordpress and now in the original localhost / tutorial, nothing else. The contents of the "tutorial" directory will be found in the image below (click on the image to enlarge)
Now you have to create a database. Let's say, tut_db, if you do not know how to create databases, please see this tutorial. http://www.webcoachbd.com/database-tutorials/database-creation
Now go to "tutorial" directory and rename wp-config-sample.php file as wp-config.php. If you do not want to rename or create a file named wp-config.php, then it will also paste all the contents of wp-config-sample.php. "DB_NAME", "DB_USER" and "DB_PASSWORD" (1922225 line) respectively, the name of the database (tut_db), database user name (root) and database password (the password of all databases in localhost is stuck in this way) Will be the day).
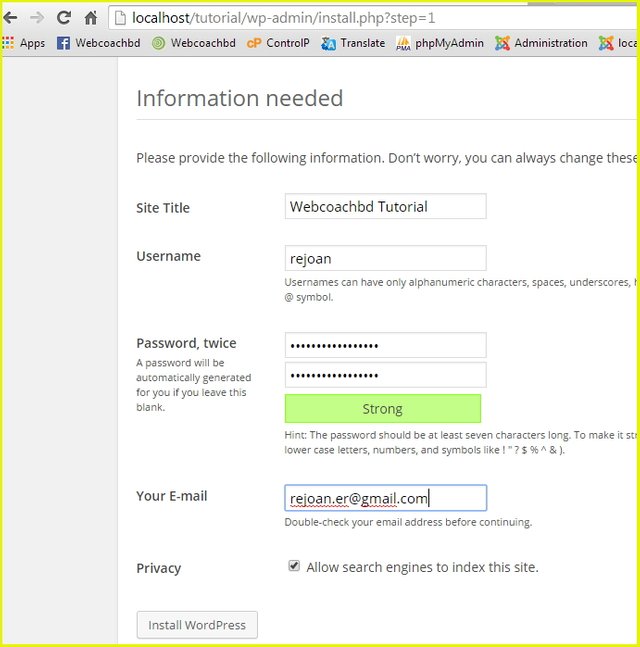
Now the http: // localhost / tutorial day will start installing in the browser. First, there will be a list of long languages as the option of creating a site in the first language, select "English" and click on the "Next" button to get a form. Click the "Install Wordpress" button by completing the form below (you can enter the information you want).


The diameter will be displayed in the last installment and the "login" button below will come. When you click Login, the login form will appear when you fill in the form above and enter the username and password of the WordPress admin panel.
WordPress Admin Panel

This is the admin panel, this is your site's back-end. If you want to see the front end of the site from here on the home icon, then the "Visite Site" link will appear on the home icon, click here to see the site. Using this admin panel, we can show you how to post new articles on the site and create new pages. Many of the work from the admin panel can be done, there will be lots of technical discussions.
Look at the admin panel to see how many menus, make them a bit hotter, then the next tutorial will be useful to understand.
Clicking on the admin panel (http: // localhost / tutorial / wp-admin) and clicking on the "Posts" link in the "Messages" menu will list all the posts, as well as list all the submenu entries.
The "All Posts" sub-menu will show a list of all the posts, actually the same link for "post" and "all posts"
After clicking the "Add new" next submenu, the new post will be displayed, the title, the content and the form will be published by clicking the "Publish" button on the right.

After publishing, go to the localhost/tutorial on the site and see the new post came above all. Check out the "Screen Options" section in the picture here. This allows additional options to be added to each post.
If you select the Format option, there will be a post-formatting list on the right. By default here is the default "Standard" selection. There are also "Aside", "Image", "Video" etc. The post that will be shown in the same way.
After selecting "Categories", the "Categories" section below the Format tab will show you all the categories that you have created here. We have not created any category yet by default, a category named "Uncategorized" will be displayed and all default posts will be saved in this category.

You can create a new category by clicking the "Add New Category" link.
Then there is "Tags" and if you select it, you will see a text box named "Tags" below "Categories". From here, you can write some related tags or keywords for the post. If you want to give more than one word, write one by one and click on the "Add" button. If your post is above PHP, then you can tag "PHP", "Programming", "Tutorial" and so on. This is optional. The post will not save or publish.

Clicking on the "Choose from the most used tags" link will show a list of the most used tags (if you have previously created the tag during posting) from which to select the tag.
The next option is called "Featured Image", by default it is selected and you can select a picture for this post from the "Set featured image" link in the "FeaturedImage" section at the bottom right. Will be). This image will appear at the beginning of the post. However, the post can be shown anywhere. We'll discuss later how to show it, the theme development time.
If you select the option "Excerpt" then the RETI text area will appear in the text area below the content. Here you can post or describe some of the posts, it is also optional. If you give any description then it can be posted to post. After the theme development show will show how excerpt is shown
After ticking "Send trackbacks", a text box will appear below "Excerpt". It is actually used for notifications. If this blog is associated with any other blog, then enter the address (URL) of that blog in the textbox.
After this, "Custom Fields" is a very useful option, and if you have been checked, "Text Tracks" will appear in the text box to add a custom field. One or more fields can be added.
Here let's name any custom field in name and value in value. You can add a custom field by clicking the "Add Custom Field" button if you want to add more than one field. Suppose you are writing a post where there are 5 other people contributing, you also want to name them. In such a situation, you can add those names here and show them in the post. That's why the function is to show them during the development of the theme.
Then selecting the "Discussion" option will allow two things to be active, disable checkboxes. If the "Allow comments" is checked, then the user will be able to comment on the post. Or the default is enabled. If you want to keep comments off the post, uncheck it. And if this is checked, "Allow trackbacks and pingbacks on this page", then this post will be pingbacked and trackbacked. This post can be connected to any other blog post through pingbacks and trackbacks and the notification is transmitted.
If you tick "Slug", a text box will appear, here you can fix what the URL will look like in that post. If you do not, then by default, the title of the default post or the title of the word format WordPress. If you want you can give yourself a slug. For example, if we go to our first created post, the URL in the browser will show http: // localhost / tutorial / webcoachbd-start-new-stuff / but if I had given "test-post" in the text box of slug then the URL would be http: // localhost / tutorial / test-post /
Then the "Author" by default is checked. Here the list of all authors will appear in the drop-down if multiple authors are created (create new author from the Users menu).
Then on the "Screen Layout" radio button 2 by default is checked, so that the form appears in two columns, select 1 and all will be displayed in one column.
Every post in your WordPress post should be kept in any category/category. Suppose you have a category called "Programming", you can keep all the programming related posts in this category. You can create categories according to your post type.
In the "Post" menu submenu, go to the "Categories" menu, add the new category from here. If you wish, you can even delete any category editing. Adding categories is very easy. Just fill in the form below and click the "Add New Category" button to add a category.

In the Name field, the category name will not be slang, and if you browse categories, then the slug URLs will look neatly. If you give slug, you should give it all the time so that the URL can be guessed that where it is now and also it is very useful for SEO.
From Parent Dropdown, you can decide which category will be the main category of this category. If you select "None" then this will become the main category. It will be able to create a new category (subcategory) on the other side. Then you can give the description.
After adding a category, the categories can be seen right, if you move the mouse over any category here, the category will be able to see the link, edit, delete, and click on the links to make the corresponding task. The number of posts in the count column of the category list will be displayed, the number of posts in that category.
@resteemator is a new bot casting votes for its followers. Follow @resteemator and vote this comment to increase your chance to be voted in the future!