How to Modify Wordpress Contact Form 7 Plugin's Design
With today’s web 2.0 standards every website needs a contact form. A contact form let’s your users to engage themselves more with your website and stay in touch. And if you are running an online business than a contact form is a must have feature.
There are many wordpress contact form plugins available to use both free and premium ones. Some of the highest rated ones include Contact Form 7, Gravity Forms, Fast Secure Contact Form, Contact Buddy, and Ninja Forms. Among these Contact Form 7 is one of the most highly used and it’s free as well without any upgrade plans, so you have all the features in your hand to deploy.
Contact Form 7 is very easy to configure and run compared to many other contact plugins. It’s very light weight in terms of resources for your hosting account, as a result your page won’t have any extra loading time or lag.
Though Contact Form 7 is easy to use and maintain, one biggest problem of it is the design. The form design that comes with it appears very plain and it isn’t device responsive. Meaning on cell phone and tablets the form fields don’t auto resize which can be problematic for users. If you are running a website with dynamic theme Contact Form 7’s average design layout very likely won’t blend in and the responsiveness issue adds more to it.
Now don’t worry a bit, luckily Contact Form 7 design can be modified and given a nice looking appearance and auto responsiveness functions with correct customizations. You don’t have to learn programming or anything else to do this. We have made a nice step by step tutorial to help you accomplish this.
1. Assuming you already have Contact Form 7 installed in your wordpress admin panel. In case you don’t already have it, just install it from ‘Add New’ under Plugins.
2. Next go to ‘Add New’ under ‘Plugins’. In the search bar write ‘simple custom css and js’ and search for it.

3. Now you can see the Simple Custom CS and JS plugin as shown in the picture below. Click ‘Install Now’.

4. Then when the installation is complete, which only takes a few seconds you have to activate the plugin in order for it to work. Click ‘Activate Plugin’.

5. After the plugin is active you will see ‘Custom CSS and JS’ on the left side of the admin panel. Put your mouse pointer on it and you can see more options. Click ‘Add Custom CSS’ from the options.

6. Now give a title to it (ex: Contact Form 7) and in the body delete any existing text first. Then copy the following code into it:
#responsive-form{ max-width:400px; margin:0 auto; width:100%; } .form-row{ width: 100%; } .column-half, .column-full{ float: left; position: relative; padding: 0.65rem; width:70%; -webkit-box-sizing: border-box; -moz-box-sizing: border-box; box-sizing: border-box; color:#222; font-size:17px; font-weight:600; } .clearfix:after { content: ""; display: table; clear: both; } /---------------- Media query ----------------/ @media only screen and (min-width: 48em) { .column-half{ width: 70%; } } .wpcf7 input[type="text"], .wpcf7 input[type="email"], .wpcf7 textarea { padding: 8px; border: 1px solid #ccc; border-radius: 3px; -webkit-box-sizing: border-box; -moz-box-sizing: border-box; box-sizing: border-box; background-color: #eee !important; border: none !important; width: 70% !important; -moz-border-radius: 0 !important; -webkit-border-radius: 0 !important; border-radius: 0 !important; font-size: 14px; color: #222 !important; padding: 16px !important; } .wpcf7 input[type="text"]:focus{ background: #fff; } .wpcf7-submit{ color: #002060 !important; margin: 8px auto 0; cursor: pointer; font-size: 20px; font-weight: 600; -moz-border-radius: 3px; -webkit-border-radius: 3px; border-radius: 3px; padding: 6px 20px; line-height: 1.7em; background: transparent; border: 2px solid #000; -webkit-font-smoothing: antialiased; -moz-osx-font-smoothing: grayscale; -moz-transition: all 0.2s; -webkit-transition: all 0.2s; transition: all 0.2s; } .wpcf7-submit:hover{ background-color: #eee; border-color:#eee; padding: 6px 20px !important; } span.wpcf7-not-valid-tip{ text-shadow: none; font-size: 12px; color: #fff; background: #ff0000; padding: 5px; } div.wpcf7-validation-errors { text-shadow: none; border: transparent; background: #f9cd00; padding: 5px; color: #9C6533; text-align: center; margin: 0; font-size: 12px; } div.wpcf7-mail-sent-ok{ text-align: center; text-shadow: none; padding: 5px; font-size: 12px; background: #59a80f; border-color: #59a80f; color: #fff; margin: 0; }
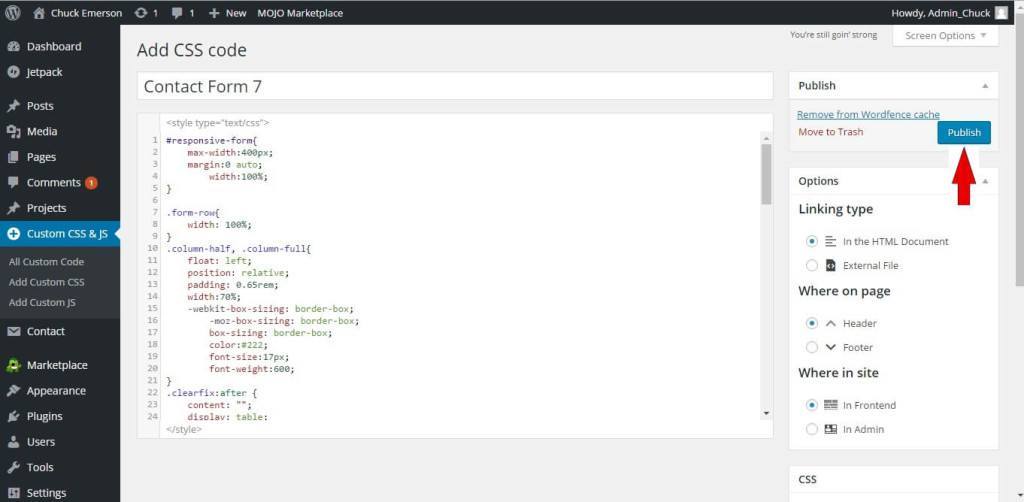
After copying the code click publish.
Personal customizations
Now if you want to change the colors of different elements to match with your website, you can do that too.
To change the font color, font size and background color of the fields, you have to modify the following elements described and marked in the picture below:

Under ‘.wpcf7 input[type=”text”], .wpcf7 input[type=”email”], .wpcf7 textarea {‘ modify the following elements for your personal changes.
‘background-color’ refers to each fields background color. If you want to change it just replace the #eee color code with your own. But don’t delete ‘!important;’ text. Otherwise it will malfunction.
‘font-size’ refers to the size of the font in the fields. Just change the number text next to it for increase or decrease.
‘color’ refers the font color itself. If you want to have different color just change the ‘#222’ color code with your own color code.
To modify send button, customize the following elements under ‘.wpcf7-submit’:

‘color’ refers to the text color on the button. If you want anything different simply change the ‘#002060’ color code with the color code you want.
Font-size depicts the font size of the text on the send button. Simple change the number if you want smaller or larger font.
Border is the border of the button. If you want to increase it change it from 2px to more and vice versa. It currently has black color(#000). You can change it with your own as well.
Now the ‘Send’ button has hover effects too. It changes color when you hover the mouse pointer over it. To change the hover effect colors as well, just change the following under ‘.wpcf7-submit:hover{‘

background-color here means the color of the background during hover.
border-color also refers to the color during mouse pointer is over the button.
There you go! You now know how to modify Contact form 7. I hope you enjoyed the article and are well on your way to modify Contact Form 7 to your liking.
Nice one! I am doing also web stuff and coding. If you are intrested check my posts ;)
Thanks! Will do. :)