Howto: Using Nginx to Load Balance Servers
In researching how to implement a proxy to insulate my BitShares full-node servers to provide public API service, @roelandp recommended the article published by @jesta. I used that as the basis for this howto and added a few things to improve security.
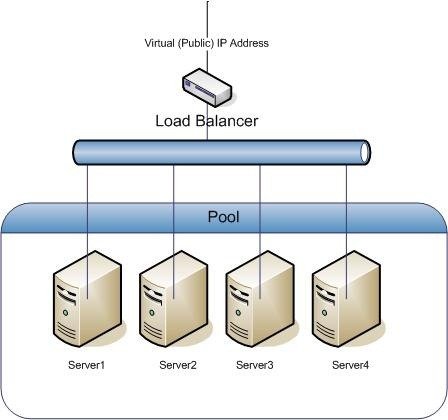
What is it and why do I need it?
If you are a witness or have websites that need to handle a lot of requests, or if you want to provide failover protection should one of your servers fail, this is one way to do it. In my case I was only looking for a proxy, but realized that adding load balancing was also quite easy to do as well, didn't require any additional software and only minor configuration changes to nginx as a proxy.
I have many servers, all of which are full nodes on the blockchain and capable of providing public API access and are scattered around the globe in different jurisdictions. I considered 2 basic approaches, and I may change the configuration to allow connections to each server as well as through the load balancer proxy which may be more reliable for people closer to a server node than the load balancer. That would also eliminate the problem of the load balancer being a single point of failure.
For now the approach I've chosen is to have a single server act as the load balancer and proxy for all the rest as opposed to allowing each server to respond to requests directly. I also considered making all of the nodes a load balancer for the others, which might be a way to avoid the single point of failure, however I believe that would cause a loop condition at worse and at best increase the traffic and latency of forwarded requests as they bounce around before being serviced by a local server. Neither of those 2 outcomes sound good to me.
I will observe the server logs over time and adjust my configuration after further analysis. In a nutshell, these are the pros and cons of the centralized approach vs. proxying each server individually:
Pros
- Uses a single connection URL
- Balances the load between several servers for high volume traffic
- Provides failsafe redundancy (of server nodes) to improve reliability
Cons
- Longer latency for geographically distant clients may reduce connection reliably
- Load balancer proxy is a single point of failure
You can decide for yourself which approach will best serve your needs.
I have uploaded the nginx configuration files to the my github repository to save you some typing. Point of fact there isn't many changes to what @jesta has already published. The changes I made consist of:
- Using a combination of remote and local server instances
- Adding filtering to eliminate non-websocket requests
- Adding filtering so only requests from the load balancer are processed at each node
The github repo has 3 nginx configuration files:
- nginx.conf
- load_balancer.conf
- server_node.conf
I am assuming for the sake of this article that nothing else is being served by the nginx web server besides websocket requests. If that is not the case I recommend creating separate configuration files in the /etc/nginx/sites-available directory and associated links to them in the /etc/nginx/sites-enabled directory. The request filtering is particularly important if you use port 80 as your public API port, as it will be hammered by port scanners and search engine robots, not to mention hackers trying to make a name for themselves with "I was here" file droppings.
It's also worth mentioning that it's very easy to disable a virtual server by simply removing the link in the /etc/nginx/sites-enabled directory. Using a modular approach by defining each virtual server in a separate configuration file simplifies management considerably.
Description of Configuration
File #1 in the list above is the main nginx web server configuration file, suitable for any settings that apply to all virtual servers defined in the sites-available directory. The default settings this file contains are generally fine, and the only addition required for a load balancing proxy is the line below the Request rate limiting comment:
limit_req_zone $binary_remote_addr zone=ws:10m rate=1r/s;
This is the exact same addition offered in @Jesta's article. I will leave it as an exercise for the reader to research adjustments to this statement if needed, for example how to specify a different rate limit value or to rate limit different types of requests.
File #2 is the primary balancer configuration. This file defines the list of servers to load balance between. @jesta's article described a configuration to load balance between 2 websocket servers running locally on the same system as the nginx load balancer / proxy. The file in my github repo is an example that begins by defining 5 websocket servers:
# Hosts we will load balance between.
upstream server_pool {
    server localhost:port;
    server 002.xxx.yyy.zzz;
    server 003.xxx.yyy.zzz;
    server 004.xxx.yyy.zzz:port;
    server 005.xxx.yyy.zzz;
}
You will note that the list of servers needn't be limited to the local host, nor all use the same ports. That normalizes access to a single URL of the load balancer on whatever port you wish to provide the public API websocket service on. I decided to use port 80 as that is likely to be open to support web traffic and thus not typically blocked by firewalls.
# Public API websocket
server {
    listen 80;
    server_name _;
    ...
Further down in that same file you will see:
   # Reject and terminate illegitimate requests with prejudice
   location / {
        return 444;
    }
# Matches websocket URL address
    location ~ ^/ws$ {
...
}
The server block defines the public API. Here no server name is specified and this becomes the default nginx server that listens on port 80. The next 2 location blocks contain the remainder of the load balancing proxy server. These 2 blocks must be ordered this way to insure proper request filtering occurs.
The first location block matches all requests except those handled by the second location block which processes websocket requests. It uses the special nginx status of 444 which causes any matching requests to be terminated immediately with no further processing or response to the client.
The second location matches URLs of the form: "ws://server domain or IP/ws". The URL must end with /ws or it will be rejected and terminated by the first location block.
Further down in the second location block you will see the reference to the upstream server_pool list (proxy_pass http://server_pool;) at the top of the file. Use any name you want but just make sure the names match. Also note the last line of the location block which is required for load balancing.
The 3rd and last file is used to configure an individual websocket server. It acts as a proxy to forward websocket requests received on one port such as port 80 onto the appropriate port the witness_node listens to (named "rpc_endpoint" in the witness node's config.ini file). It also serves to reject requests that don't originate from the load balancer by the inclusion of these 2 lines:
        # Allow requests only from the load balancer; IP only, no domain names!
        allow   www.xxx.yyy.zzz;
        deny    all;
Please refer to the files on github to view them in full. These lines must also appear in the order shown, and the first one must be a numerical IP address. Use of a domain name will trigger an error. Also note the almost identical structure of this configuration file to that of the load balancer, and the 2 lines of the 2nd location block that are commented out, both related to timeouts. Also note that the websocket server is defined as a single witness_node instance running on the local server along with the nginx web server proxy.
These 2 lines (allow & deny) restrict service to respond only to the load balancer. If you want your nodes to also respond to public requests comment these lines out and the node will be proxied to the outside world.
That about covers a basic proxy and load balancer based on the efficient and versatile Nginx web server. Keep a look out for my next article on encrypting your public API with SSL using free LetsEncrypt certificates.
Again, thanks to @jesta for his article and @reolandp for recommending it. And thanks to you for your support!

Thanks for all you do (with such incredible honesty, integrity and forethought).
I know that you have been in crypto from the start because of your vision of an agorist humanity under the NAP, not government by threat of violence. I am very sure that you are one of those (few) for whom success is not and never will be at the expense of compromising your values.
Upvoted and resteemed.
WOW! That's... I'm so amazed to receive such high praise from someone who likewise values the NAP and agorist principles as yourself. Maximum respect to you sir! Namaste
Followed after once's comments. Nice to meet you fullsteem.
Thank you!
You can eliminate the load balancer as a single point of failure by running two (or more) nginx VMs that share an IP via keepalived.
wao , gonna try this soon
Amazing. Thanks
Thanks for the post and detailed instructions on setting-up the load balancer
I'm quite new to the crypto/blockchain technology in general but I have a background in systems/network admin, I understand running multiple server involve a cost, what do you benefit from running these full BTS nodes servers? Do you earn BTS tokens on a regular basis or is it a fully volunteer service?
Thanks
voted you as witness :) Can you follow me and upvote my postd
Interesting to learn this! Now following you.
Great post @full-steem-ahead
Great post very detailed but a bit a too advanced for me,thanks for sharing
Upvoted. I'm going to resteem this now :)