How to Clean System Junk Files on Windows 10 PC/Laptop
Did you know that when using the Windows operating system to perform tasks, it automatically generates many system junks, such as temporary files and caches? The longer you use your Windows, the more system junk files it accumulates. This is especially true if you do not clean up regularly.
Having too many system junk files consume valuable hard disk space, especially C drive space, and even cause Windows to run slowly. For some corrupted temporary files or caches, if they are not cleared in time, some programs may run abnormally. Therefore, in order to avoid this, you need to clean system junk files on a regular basis.
Although you can easily delete temporary files manually, other types of system garbage are difficult to delete manually. Moreover, deleting system files cannot be as arbitrary as deleting personal files. If you delete something important by mistake, your Windows or apps may not work properly. But you don’t have to worry. Here are some ways you can safely clean all system junk files on Windows 10. Following these methods and steps, you don’t have to worry about any risk or losing any important data.
Way 1: Clean system junk files using Disk Cleanup
Disk Cleanup is a built-in app in Windows 10 and any other version of Windows, which helps you clean up unnecessary system-related files to free up disk space.
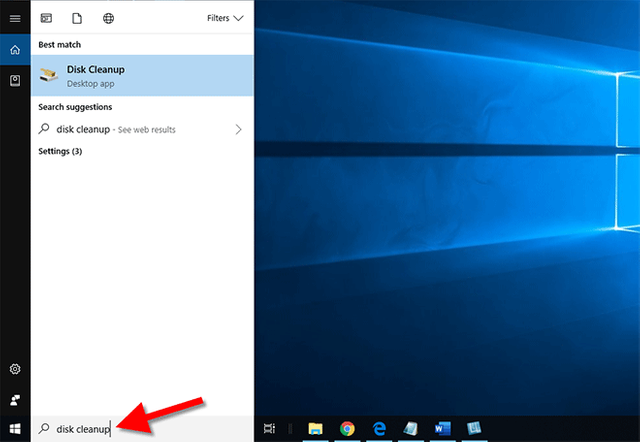
Step 1: Type disk cleanup in the Cortana search box and hit Enter to open the Disk Cleanup app.

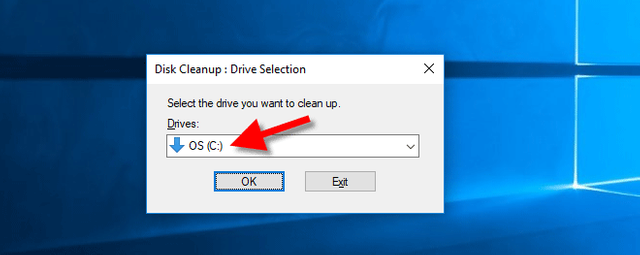
Step 2: When the Drive Selection dialog opens, select your operating system drive (C:) and click OK to proceed. Disk Cleanup will calculate how much space you will be able to free on the C drive. During this process, it quickly scans your C drive for unnecessary system junk files.

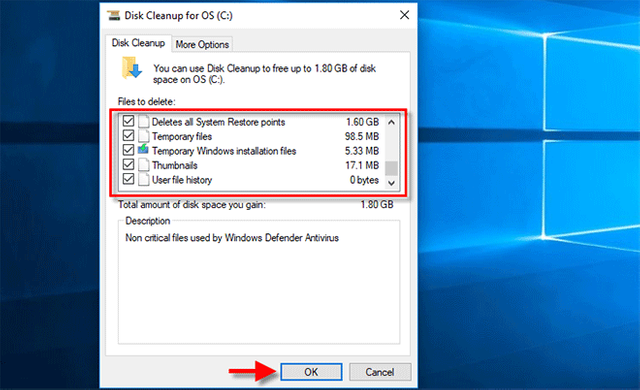
Step 3: When the main window of Disk Cleanup opens, file types that can be deleted are listed under the Disk Cleanup tab, including temporary files, temporary internet files, previous Windows installation files, thumbnails, etc. All of these are unnecessary junk files for the Windows system. Deleting them is safe and won’t adversely affect your Windows. Select all file types you want to delete and click OK.

Step 4: When you are asked if you are sure to permanently delete these files, click Delete Files and all these system junk files will be removed from your Windows 10.

Way 2: Clean system junk files with a third-party tool
In fact, there are more types of system junk files in your Windows 10, such as IIS log files, WinSXS backup folder, scan history, font cache, etc., which the Disk Cleanup cannot reach. Deleting them is beneficial, especially if you don’t have enough storage space on your C drive. However, Windows does not have any tools for you to reach and delete these files, so you need a more advanced third-party system cleanup tool like iSumsoft System Refixer.
Step 1: Download the iSumsoft System Refixer tool for free and install it on your Windows 10. After installation, launch this tool.

Step 2: Select the Junk File tab on the top, and then click Scan. iSumsoft System Refixer will scan your C drive quickly for all kinds of system junk files.

Tips: iSumsoft System Refixer is not just a junk cleaning tool, but also a system optimization tool, which can help you optimize your Windows operating system to speed it up. Here, we focus only on its junk cleaning function.
Step 3: When the scan is complete, all types of system junk files are displayed on the screen. Click the Clean button to clean them all in one go.
