Installation of a waves testnet node
Installation of a waves testnet node
I was asked to provide a video tutorial for the installation of a testnet node
for the waves network. I'm currently running a couple of nodes in different
environments and helped a couple of people installing nodes. Therefore, some
experience in how to set up nodes for the waves network exists. :)
Basically, I'll follow the steps for the installation of a node on the
wavesplatform github page:
https://github.com/wavesplatform/Waves
and the page for the configuration of a node:
https://github.com/wavesplatform/Waves/wiki/How-to-configure-Waves-node
Installation of the Oracle Java8 JDK
First of all, we have to install the Oracle Java8 JDK. The following commands
will take care of this:
echo "deb http://ppa.launchpad.net/webupd8team/java/ubuntu precise main" | tee -a /etc/apt/sources.list
echo "deb-src http://ppa.launchpad.net/webupd8team/java/ubuntu precise main" | tee -a /etc/apt/sources.list
apt-key adv --keyserver hkp://keyserver.ubuntu.com:80 --recv-keys EEA14886
apt-get update
apt-get install -y oracle-java8-installer
In contrast to the original steps provided by the waves team, I've added -y to
the last command in order to avoid apt asking if we really want to install
the package. At this step, some users (including me) had some trouble answering
the question and this pitfall could be avoided by just adding the -y. Finally,
these steps ensure that we have the latest JDK version (originally from Oracle)
installed on our server.
Installation of the Waves node software
After the successful installation of the Oracle Java8 JDK, we can start the installation of the nodes software. Therefore, we will download the latest release from:
https://github.com/wavesplatform/Waves/releases
At the current state, the latest version is 0.2.1, so we download the release
via:
wget https://github.com/wavesplatform/Waves/releases/download/v0.2.1/waves-v0.2.1-testnet.zip
Of course, this link will change with upcoming releases...
After downloading it, we will need to unzip it. If you have not yet install
unzip on your server you can do so with the following command:
apt-get install unzip
After unzipping the formerly downloaded waves-v0.2.1-testnet.zip file with:
unzip waves-v0.2.1-testnet.zip
we have two new files in our filesystem:
waves_0.2.1_testnet.deb
waves-testnet.json
Fianlly, we can now install the waves software by:
dpkg -i waves_0.2.1_testnet.deb
Remember, all the steps so far should be done in a root account. If you are not
logged in as root (or with an account that has root privilegous), you should add
"sudo" in front of the commands.
Configuration of the waves node
After the successful installation of the waves node software, we can now start
configuring it according to the steps explained in subsection "Configuration"
here:
https://github.com/wavesplatform/Waves/wiki/How-to-configure-Waves-node
After the successful configuration, you can start your node in the background
with the following command:
waves waves-testnet.json &
Those steps are shown in the following video:
Check installation
Since you have now a clean installation, your node needs to sync first. Here,
syncing means that your node has to download the history of blocks / transaction
that occured in the network so far. In order to check if your node is syncing,
you can connect to the Swagger UI of your node by pointing your web browser to
the following URL.
http://<ip address of your server>:6869
Since one of my server is running on ip 138.68.56.182, the URL would be:
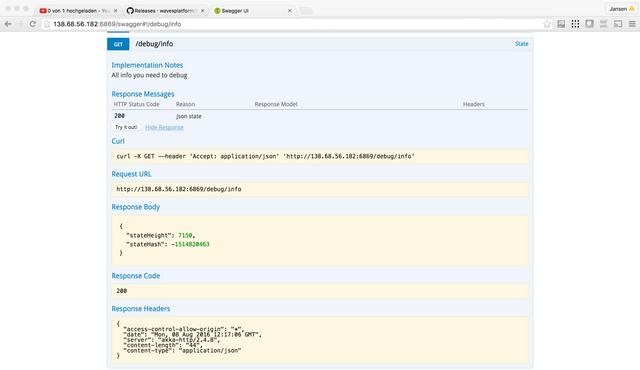
On the loaded page, you'll find an endpoint called "debug". If you click on it,
you'll find another endpoint called "/debug/info". Again, click on it and hit
"Try it out". The result you'll get should look something like the following
image.
Here, you can see that the stateHeight of my node is currently at 7150.
We can compare this to synced nodes, e.g., the ones you find unter "knownPeers"
in your waves-testnet.json file on your server, in order to check how far your
nodes is in the syncing process.
On you server, you can also check the "scorex.log" file. If you find entries
like:
08/08 11:34:19 DEBUG[t-dispatcher-11] s.n.HistorySynchronizer Got blockIds: Vector(1111111111111111111111111111111111111111111111111111111111111111, EoeZ7RSQVZ7QXvrpfXgrDeBS61z
ByRsdz4fmHSxRLv3LHWcAWzM22fZYsd8gMbemQBn83BvkFpURiHy6u9zgNJQ, 3xSfryez3w2cCTj7vq2QSoWgYxZmSZXttRyii2y6QCqE2cTv9vfG1BfMGyWpK3fyvushjCrfNFqrMwnifZJ58wU, 4diJ2cx7RW9WAysitNdkX5R9b
RLULThNkmhkMRyYFRLgGqWt8zJ1HTCnW4SgWqSfsgggUQEV3ZWwB9GGUjvCDpjq, 65gTSJ5Ha1xWrdKDXU3voQ57mFNL4qnUMA7mFiVPTL53RwJTt9SfjktR911BN2sN6JMQjvzVLmL2xREqP9k5LDdT, 2oFphHrGMMTQeKhZJwzvD
DiPnsc3V3HKjsVjasX5bgRJTUNNJza3j26wyuKVU5eJ18u7PKS8LZ31GnyD1A6TafvE, TygmcnAPTynrKavZfpVEbxhPziLaedxq1XJd296TPbrrxB3QRrSjQ7kGFxg3bNHvWUAgcrr2pjisKD8PwzcM1t7, 2Ko4eGmmnKkdwbbYUv
Ct75mjhyUUuuLFRtkndsnbrygnbKXs3jriLmynDdNcmVDoKCeseqx74d2FSBXXW28gxGkB, 21d6iFPmAELHynfQyoGB74ibRSYCMNmvgyYgRX93E2mFhNogfTZKWf6ncrETY9zu1Yp6tmvQ1JPg8bG1zLYmtsMe, GmB1PaRnbdDDoz
TNrPxZXMFL97PDS5etadLanmAVZx93EVqAib5HsJAg3D5WmubW78KFr45PYmHy6HiYS3oeGrm, 36BDtsEXoLxsvjCyWXCDUzr9yJGDuEEWWSj2HqLRjAx1dVAdFReLTe8LTY9B8oAuf9EScAdVC42zZqT72uKE7FCG, 5VsVZQXuuoL
CXPhCtTm8bFapst3CN6jRvM653ZUMn2YJXguqGg5mUesgCQZb3jYG3ha74jxAArN7kRMpdFwtmCCh, 3QXWR8kmA1HK7SGjEpaiqoWpULXWHtwfiSuJ7a1Xd9kfWCxuPH1pZubtpqGdGGnRyHrnEfC1dydLsX4jH8BeVUY1, 5PjFUiX
zvCuQfcQ7aA6HgCYn3aXc8jSJ7Zdg9MqDtPsLBN6DjQewq6KH7Er5x5n1EAv7z7sEHp8VEkiTStm7Pa96, 4sokUJSzh2gh7PnxvZXyNpp66nvUYWvRWAgx92ECZBzNi8q4z4XEehaRYtDDaQjKff4Hd3WwJJNwex5WqcuiodE9, 4iS
AgU5wdKJaQuRJ2v5gT3WPwUZsaSYu63SuqP5AEbkj9GWfVFfyrdpT67LvTV24q2aPKHZzmvHJaSgfyWpD83DH, 4Eqp7vcojfiupUjiCiDFMr87pwLkXWrkW41JDmAEa9gFwaT9Yno27mbigD8xRBTq1Re4jmFJwPHaeMHbBpYFhxVx,
2v1UGCHgtFwaFNX91shpLQyS2dYaTURXfXqeSREvdjCUfPdUey31TmZvUNdsufx2nyqGDAGAmZeC14iueZxtUxEE, 5kTEjA8tauSUoF7Z2NqBDqHCH6wnkXkfxLzmA87PHocL7GDfcDmyGpdUiBHVCw4ajuyUvmVKnzMCftYMiyEdL
stN, Ycd2JVVdA2UNR3WcQEBQvwgJhVsaGnmKqwNoteTNMvriqdhmHRyU4ytbnN1kENXLAiwEBv2raADrdKU9ESpJ9R6, 3dke6cEq6a5Zg2gjeVzw6qzUUEVAYXCzdgeExdof4vdyZj3Xq5pe4FZcypfNh7GSM6w4DjNm1UTQimQ219N4Q9qZ)
this shows that your node is adding new blocks.
Remember, the syncing process might take some (serious) time to finish. The
bigger the blockchain of the waves testnet network will get, the more time it
will take.
I hope that you enjoyed the tutorial. Please feel free to contact me (@hawky) on
slack in #testnet-maintainers or #fullnode if you have any questions, or just
leave a comment with your questions here.

Great job. Too bad I am not a whale but upvoted.
Good work! Hope project gets attention in coming month...
Cool tutorial, gave upvote friend !
Great explanation of how to run a Full Node on Waves Platform.Many thanks Marc
In the configuration wiki it says:
"Decide what api_key you require and call /utils/hash/secure using http method to calculate apiKeyHash."
How do I decide this?
What value should I enter to generate the apiKeyHash ?
With a aleatory string generated hash I get:
"message": "Provided API key is not correct"
I'm stuck here :(
Please explain
Thanks
You can understand the api_key as your password that ensures that only you can execute the endpoints. Therefore, "decide what api_key you require..." means that you have to choose a string as a password. It should be safe enough of course...
Hello @marc.jansen,
Thanks for your response.
Yes, that's what I figured. So I placed a long string I made up in the "message" box and generated de APIKey Hash.
But, now when I run the node I get the warning message:
"message": "Provided API key is not correct"
Why? What did I do wrong?
Thanks for your help.
Another question in regards to node security.
What ports should be open for a waves node to work properly?
Thanks