DRIVELAPSE :: The Art Of The Driving Timelapse (Supersonic GoPro Timelapse Awesomeness Within)
I'd like to preface this buy saying that I'm not suggesting that what I describe in this post is the proper technique to use, but achieves what I personally consider to be the proper result that should be aimed for when filming most timelapse, by whatever method.
As those of you who follow me likely already know from my previous posts, I sometimes like to drive with a GoPro clipped on my car's hood or trunk. Especially on particularly sunny/cloudy days to really lend to the experience of velocity.
When most people shoot timelapses of any kind, they generally set the camera to shoot 1 image per selected unit of time, such as 1 image every 5, 15, 30, or even 60 seconds, sometimes longer. Doing this does definitely creates a perception of time quickly passing...
...but there's usually something missing.
When a timelapse is filmed this way, what you're not capturing is motion blur. That is, unless you have manual control of your shutter speed, which is not available on the GoPros I use for this. The shutter speeds are too fast, and that's actually intentional, as it allows for freeze-framing the footage later and be able to pick out minute details in the picture, which is ideal for a sports action camera like this. But, if you want an experience of velocity - a true feeling of speed...
You must have motion blur.
Drivelapses in particular that are shot in intervals - and thus without motion blur - present more of a "stop-motion animation" effect rather than something that really makes you feel like your head should be pinned back as if in an actual accelerating vehicle.
This is what a drivelapse looks like without motion blur:
It's almost comical, right? It feels almost like it should have the Benny Hill theme playing on top of it.
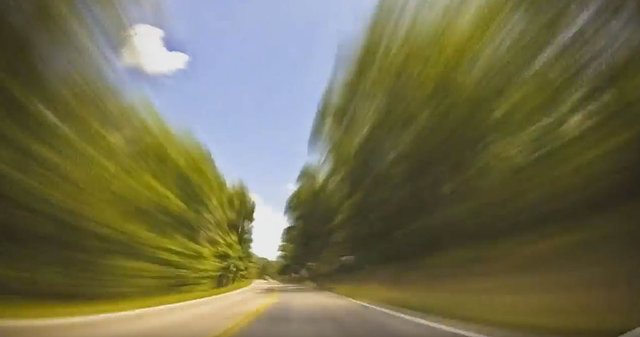
Here is the exact same drivelapse, but with motion blur applied:
To me, this version looks more authentic. It lends to a true experience of speed, because blur is a natural characteristic of the way we see the world with properly functioning human eyes & brain.
It's important to note that not all timelapses will benefit from this effect, while others won't succeed without it.
The ironic thing about the method I use is that the more frames the camera can shoot, the better the resulting blur effect. And I've only found this method possible using one specific program (and anyone who can find the matching feature in other editors, please reply in the comments and let me know what it is, I've been dying for a backup editor to use in the event Vegas is no longer an option. I haven't found it in Adobe Premiere, I'd rather not have to use After Effects if possible, and I don't use a Mac, so Final Cut Pro isn't an option for me.)
This is where Sony Vegas Pro's "Frame Resampling" feature comes in to play.
Resampling in Sony Vegas allows for the frames of your footage to be blended together whenever the playback speed of the footage is altered either faster or slower. It resamples the frames to make them play a fraction of a second longer, allowing adjacent frames to begin to blur together.
You can probably see some of what I'm talking about if you look at the preview images that appear on the Youtube videos in this post. The blur is actually stacked frames, and you can see a kind of repeating pattern as you get closer to the edge of the frame. That is what happens when you do this using video that is shot at 60 frames per second. The highest-end GoPros available as of this post can shoot 1080p footage at 120 frames per second. They can even shoot 720p footage at a whopping 240 frames per second. That would be enough to effectively eliminate that repeating pattern to create a smooth blur.
Now for an example...
If I start with a clip that is 1 minute long and I speed it up so that it plays back faster, the individual frames in the video will begin to blend together due to Vegas's Resampling feature, creating a kind of faux motion blur. Thus, the more frames per second you can shoot, the more detail - or temporal resolution - the blur will have, making it look more natural. This is particularly awesome when doing driving timelapses, where you want a lot of motion blur.
And then there's this thing called the 180º shutter effect.

This is a very simple and subtle thing that can actually be difficult to explain. It earned its name due to the type of shutter used in big-budget movie cameras. To try to sum this up as easily as I can for those who aren't already aware, the 180º shutter effect is simply a means of limiting the amount of motion blur each frame has.
So, for example, if you're shooting 24 frames per second (Hollywood standard), the rule would be to allow the camera's shutter to only be open for half as long as the duration of the frame. So, since each frame of a movie is visible for 1/24th of a second, the camera's shutter speed should be as close to 1/48th of a second as you can get it. This allows for a natural looking motion blur and achieves that motion we all know and love from big films by preventing that "too smooth" feeling you would get by having too much blur, which happens if you allow the frame duration and the shutter speed to be the same - the blur of each frame would meet end-to-end, rather than have evenly-spaced gaps in between as the 180º effect provides.
^^^That was a bit of a mouthful. Sorry.
This is something most people aren't even aware of, so it's very often overlooked. It's definitely a subtle difference, but after decades of it used in big-budget movies, it's so ingrained in our minds.
Having said all this, I will say that it's not suitable for everything shot in a film. Sometimes you want less blur, so you raise the shutter speed to really capture frozen detail in each frame - such as in an action scene, or a battle scene (think opening scene to Saving Private Ryan). Same number of frames per second, so we're not talking fast or slow motion here, just the amount of motion blur.
See what I mean? It's subtle. You barely notice it's there, but there's something about the motion - the blur - just seems...better? Is that the right word? Perhaps warmer? You hear of people saying vinyl has a warmer feel than CDs, so is that the equivalent here? More true to real-life experience? I'm not sure what to call it in any case, it's just an aesthetic. But, it's an aesthetic many filmmakers rely on to achieve as cinematic (<---that's the word I was looking for) a look as they can.
And finally, this is a video of a drivelapse with the 180º effect shown on the left side, and NO blur at all on the right side - same camera/same footage on both sides. There is also detailed information within the video that explains this method more in-depth and how to achieve it in Sony Vegas.
I hope you enjoyed this post.
If anyone has any questions, I'll be happy to answer them. :)
Wow! That was awesome. At some point I thought I was traveling through time. Nice man. XD
Wow, it takes my breath away! I saw the clouds moving in 3D!
Good photos, I am a photographer, it passes for my blog and sees my content, I hope that it should be of your taste :D greetings