[Tutorial]Ionic Tutorials: Making http request and developing a backend for our ionic application

Repository: Ionic App Repository Github
Software Requirements:
Visual Studio Code(Or any preferred code editor)
Chrome(Or any preferred browser)
What you will learn:
In this tutorial you would learn how to live code a real ionic application with practical examples including these major concepts:
- Developing a simple back-end for your application
- Making HTTP requests in ionic
- Managing data with the appropriate database
Difficulty: Intermediate
Tutorial
So in today's tutorial we would be dealing with how we can make a simple back-end for our application and host in on a server so we can collect data across multiple devices.
For this back-end restAPI we would be using express and for our database we would be using MongoDb.
So what is express?
Express is a framework that helps us create a simple back-end API's for our application.
How about MongoDb?
MongoDb is a storage platform that helps you store files in a more concise and accessible form for your database. For this tutorial, you could use a simple free account. Just head to the website here.
So before we make and understand a simple back-end REST API, let's understand how to send HTTP requests through ionic directly. For this we would use something we call the httpclientmodule.
To use this head to your app.module.ts and add this module to your imports and also to your providers. After that this is how our file would look.
import { NgModule, ErrorHandler } from '@angular/core';
import { BrowserModule } from '@angular/platform-browser';
import { IonicApp, IonicModule, IonicErrorHandler } from 'ionic-angular';
import { MyApp } from './app.component';
import { IonicStorageModule } from '@ionic/storage';
import { httpClientModule } from '@angular/common/http';

import { AboutPage } from '../pages/about/about';
import { ContactPage } from '../pages/contact/contact';
import { HomePage } from '../pages/home/home';
import { TabsPage } from '../pages/tabs/tabs';
import { ProductsPage } from '../pages/products/products';
import { NewproductPage } from '../pages/newproduct/newproduct';
import { CheckoutPage } from '../pages/checkout/checkout';
import { ProductdetailPage } from '../pages/productdetail/productdetail';

import { StatusBar } from '@ionic-native/status-bar';
import { SplashScreen } from '@ionic-native/splash-screen';

@NgModule({
  declarations: [
    MyApp,
    AboutPage,
    ContactPage,
    HomePage,
    TabsPage,
    ProductsPage,
    NewproductPage,
    CheckoutPage,
    ProductdetailPage
  ],
  imports: [
    BrowserModule,
    IonicModule.forRoot(MyApp),
    IonicStorageModule.forRoot()
  ],
  bootstrap: [IonicApp],
  entryComponents: [
    MyApp,
    AboutPage,
    ContactPage,
    HomePage,
    TabsPage,
    ProductsPage,
    NewproductPage,
    CheckoutPage,
    ProductdetailPage
  ],
  providers: [
    StatusBar,
    SplashScreen,
    {provide: ErrorHandler, useClass: IonicErrorHandler},
httpClientModile
  ]
})
export class AppModule {}
So after this we would need to create a service for our application.
Why services?
We make http requests through services so that we could easily make the same http request over various pages without having to rewrite code for each page. Through this services we can make functions that make calls to our apis and serve this calls to all our pages.
Lets do this then
Our cli has an inbuilt function to generate a service provider so simply head to your terminal and type
ionic g service store
This would compile and give you a directory which looks just like this.
provider/store/store.ts
So now we go on to setting up a simple backend
Start by running this command
npm install --save express [email protected] body-parser nodemon
After this you can create a file called
ourserver.js
start up by requiring the basic files for this server and creating a port to listen for our app through
const express        = require('express');
const MongoClient    = require('mongodb').MongoClient;
const bodyParser     = require('body-parser');
const app            = express();

const port = 8000;
app.listen(port, () => {
  console.log('We are live on ' + port);
});
Now we would try to seperate the components of our app into folders that would hold routes for the server.
This is not too useful for a small app but would be generally more useful in an application that is larger, so that we would have a more organized view.
So now we create a folder within our directory called app and in it add another folder called routes. In this folder add two files called index.js and node_modules.js
Then open our node_modules file and add the following
module.exports function(app, db) {//setting up one of our routes
and then in our index.js
const noteRoutes = require('./note_routes');
module.exports = function(app, db) {
  noteRoutes(app, db);
  // Other route groups could go here, in the future
};
We can then import these files into our main file
The file should look like this
const express        = require('express');
const MongoClient    = require('mongodb').MongoClient;
const bodyParser     = require('body-parser');
const app            = express();

const port = 8000;
require('./app/routes')(app, {});
app.listen(port, () => {
  console.log('We are live on ' + port);
});
Okay so we've succesfully set up the routes. Time to handle our requests.
We will start with a post request. In ionic to call this request with the client module, we could simply import the httpClientModule and then within our service run
this.http.post(localhost:8000)//Because this is the development port we're running this on
So before we get to that lets see how the server side will deal with that request
In our node_routes.js
Add this
module.exports = function(app, db) {
  app.post('/create', (req, res) => {
    //This is where we create a file to add to our database
    res.send('Hello')
  });
};
The function above deals with post request that are made to localhost:8000/create. This means that if we send a http post request to that exact file, express will run this piece of code.
So we'll test this code out using an app called postman
You can get this application here
This application helps us simulate these request to see how they'll respond if they were hosted in our domain name on a web host.
So for now this is the response we would have
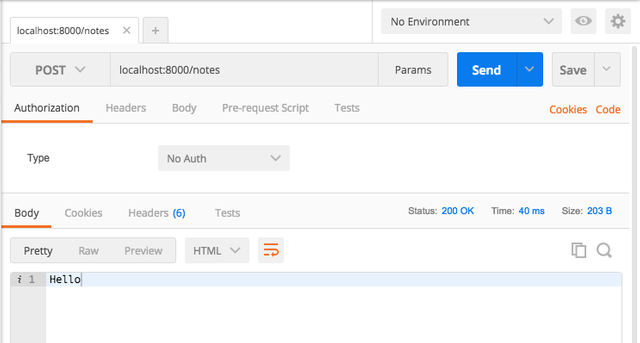
This shows that our backend is ready for requests.
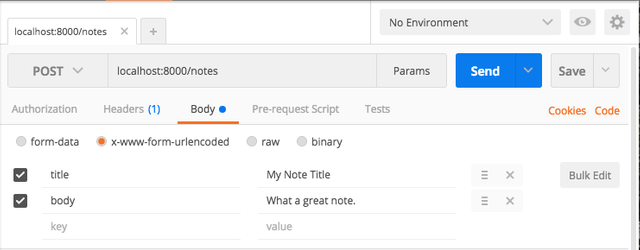
For this backend we wouldn't like to just send raw data over the internet but we would want to encode it. The problem with this is that express cannot read url-encoded data so we would need to use something else.
And that is why we installed body parser to our application and are using it as a dependency.
We would like to add this body parser to our server.js, so after all our require files, add this
app.use(bodyParser.urlencoded({ extended: true }));
We can then send a simple encoded request through postman and see how our console will log it out
So the last thing for this tutorial would be trying this our through our ionic app.
We have a simple test backend running, but we would like to see how our ionic app would interact with it.
Head to the store.js file we created and make a http request to our localhost like this
import { HttpClient } from '@angular/common/http';
import { Injectable } from '@angular/core';

@Injectable()
export class StoreProvider {

  constructor(public http: HttpClient) {
    console.log('Hello StoreProvider Provider');
  }
  sendRequest(){
    this.http.post('localhost:8000/create').then(res){
        console.log(res)
}
}
So try this out and if you're having any problems, leave it in the comment section. We'll continue adding our database in the next tutorial.
Thank you for your contribution @yalzeee.
After analyzing your tutorial we suggest the following points below:
Again, put more comments in your code. Comments are very important for the user to understand your code well.
We suggest that you place at the end of your tutorial the code of your repository that you have developed.
In your code at the time you forget to put the
;in the end. Check before putting in the tutorial your code if everything is correct.Thanks for your work on developing this tutorial on Ionic.
Your contribution has been evaluated according to Utopian policies and guidelines, as well as a predefined set of questions pertaining to the category.
To view those questions and the relevant answers related to your post, click here.
Need help? Write a ticket on https://support.utopian.io/.
Chat with us on Discord.
[utopian-moderator]
Thank you for your review, @portugalcoin!
So far this week you've reviewed 2 contributions. Keep up the good work!
Hello! Your post has been resteemed and upvoted by @ilovecoding because we love coding! Keep up good work! Consider upvoting this comment to support the @ilovecoding and increase your future rewards! ^_^ Steem On!

Reply !stop to disable the comment. Thanks!
Hello! I find your post valuable for the wafrica community! Thanks for the great post! We encourage and support quality contents and projects from the West African region.
Do you have a suggestion, concern or want to appear as a guest author on WAfrica, join our discord server and discuss with a member of our curation team.
Don't forget to join us every Sunday by 20:30GMT for our Sunday WAFRO party on our discord channel. Thank you.
Hi @yalzeee!
Your post was upvoted by @steem-ua, new Steem dApp, using UserAuthority for algorithmic post curation!
Your post is eligible for our upvote, thanks to our collaboration with @utopian-io!
Feel free to join our @steem-ua Discord server
Hey, @yalzeee!
Thanks for contributing on Utopian.
We’re already looking forward to your next contribution!
Get higher incentives and support Utopian.io!
Simply set @utopian.pay as a 5% (or higher) payout beneficiary on your contribution post (via SteemPlus or Steeditor).
Want to chat? Join us on Discord https://discord.gg/h52nFrV.
Vote for Utopian Witness!