[Tutorial]: Ionic App Development: Building the Business app part 6(Events, Modals and Storage)

Repository: Ionic Framework Github Repository
Software Requirements: Visual Studio Code(Or any preferred editor)
A browser(Preferably Chrome)
What you will learn:
In this tutorial you would learn how to live code a real ionic application with practical examples including these major concepts.
Understanding how to apply events to applications
Learning how to create and use modals in live applications
Learning which and how to use storage in an ionic application.
Difficulty: Intermediate
Tutorial
In this tutorial we'll be covering some basic concepts involving using modals, events and storage in a live ionic app, which is useful for upcoming developers and which would include what is not included in the documentation. Before we hop in well make some adjustments in our code due to some feedback i got from @mcfarhat.
- First of a there's a minor spelling error in the spelling of 'business'.
- And for our
balancesection which we had in our home screen, well be changing that toTotal Selling Price
So when done with that we should be looking at this(This has been updated in the repository which you can find below).
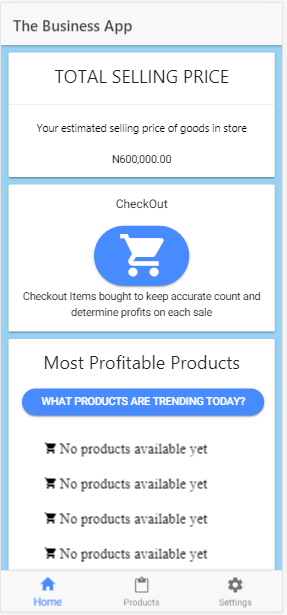.png)
The next thing well be doing is applying the eventsto our program so that the total selling price can be updated real time as products are being added to the store.
Note: This tutorial would cover the concept and not explain or include every part of the code which can be found in the github repository.
So on to coding.
Event
As said in the last tutorials events are used when we want to include something realtime. Something that changes dynamically, such as this selling price.
To begin including this events you would need to import it into your constructor which is ionic's default way of finding out what properties to use on each page.
In this program the balance is updated every time the newproductsPage is dismissed, which adds a new value to the total balance. To make things simpler don't bother changing the variable that holds the balance, but change what is on the template from balance to Total Selling Price.
Head to the product.ts file to see a live example of how we use an event.
import { Component } from '@angular/core';
import { IonicPage, NavController, NavParams, ModalController, Events, AlertController } from 'ionic-angular';
import { NewproductPage } from '../newproduct/newproduct';
import { ProductdetailPage } from '../productdetail/productdetail';
import { Storage } from '@ionic/storage';

@IonicPage()
@Component({
  selector: 'page-products',
  templateUrl: 'products.html',
})
export class ProductsPage {
  public items:any=[];
  public balance: number = 0;


  constructor(public navCtrl: NavController, public navParams: NavParams, public modalCtrl: ModalController, public events: Events, public storage: Storage, public alertCtrl: AlertController) {
  }
  createNewProduct(){
    let newItemModal = this.modalCtrl.create(NewproductPage);
    newItemModal.onDidDismiss((data) => {
      if(data.name,data.sellingprice){
        this.items.unshift(data);
        this.balance = this.balance + parseInt(data.totalsellingprice);
        let balance = this.balance;
        console.log(balance);
        this.storage.set('balance',balance);
        this.events.publish('balance',balance);
        this.storage.set("store",this.items);

      }
      else {
          console.log('no data received')
        }

    })
To simplify this, lets divide this code into its important parts and see why I did what i did.
import { IonicPage, NavController, NavParams, ModalController, Events, AlertController } from 'ionic-angular';
The first thing to do when using Events is to add it to the imports. Without this you'd get a faulty code.
events: Events, public storage: Storage, public alertCtrl: AlertController)
The next relevant thing I did was to add this to our constructor. A constructor determines what parameters go into this page.
Use the public flag to show that it can be used in any function within this page.
Use the events object name to show the name you'd be using to represent it in the code.
createNewProduct(){//The function implemented whenever a new product wants to be added
    let newItemModal = this.modalCtrl.create(NewproductPage);//Setting up the modal
    newItemModal.onDidDismiss((data) => {//This function is called when the modal created is dismissed
      if(data.name,data.sellingprice){
        this.items.unshift(data);
        this.balance = this.balance + parseInt(data.totalsellingprice);
        let balance = this.balance;
        console.log(balance);
        this.storage.set('balance',balance);
        this.events.publish('balance',balance);//Publishing our event;
        this.storage.set("store",this.items);

      }
      else {
          console.log('no data received')
        }

    })
This function is called whenever the user wants to create a new product in which case a modal is used as indicated in the code above.
Knowing how to publish an event is one thing but knowing in what part of code to use it is also essential.
In this program we chose to publish a new instance of the balance whenever a new product is added. This is applied this way so rather than outside this function so it can be passed again and again for reading.
For instance if you published this event outside the function
export@productpage
public balance: any;
constructor(public events: Events){
    this.events.publish(balance, this.balance);
createNewProduct(){
    ...code here
This would be useless because the new instance of the event is not being subscribed whenever new data is collected.
The main point in this is that **you should use events in interactive elements such as buttons or even any other (click) or (scroll) event.
Now on to the receiving end, which is the home.ts.
At what point do we subscribe to this event?
import { Component } from '@angular/core';
import { NavController, Events, LoadingController, AlertController } from 'ionic-angular';
import { Storage } from '@ionic/storage';
import { CheckoutPage } from '../checkout/checkout';

@Component({
  selector: 'page-home',
  templateUrl: 'home.html'
})
export class HomePage {
constructor(public navCtrl: NavController, public events: Events, public storage: Storage, public loadingCtrl: LoadingController, private alertCtrl:  AlertController) {

  }
  ionViewDidLoad() {
    this.storage.get('balance').then((data)=>{
      if(data){
        this.balance = data;
      }
    })
    this.events.subscribe('balance',(balance)=>{
      this.balance = balance;
    })
  }
The first thing you do on the receiving end is to import the Event and add it to your constructor.
Note: On the receiving end you don't need to add the subscription to live events because subscribed events dynamically change whenever the subscribe value is changed.
In the code above you can easily notice the ionviewDidLoad() function. This function can be easily added to any page and will be run whenever the page is loaded successfully.
Use the subscribe event here so it'll be the first thing to load when the page loads successfully.
So at this point we have seen the live application of the modals and the events but one remains.
In the code above you will notice that i also got a value from storage when the ionViewDidLoad(). This is the use of storage.
Storage which comes with the ionic native package helps to store data locally on whatever device your application will run on. The default memory is quite volatile and will clear up when your device is in need of space and is usually limited to a size of about 5mb. The alternative to this is a native storage of higher capacity and even a better resistance to being cleared.
To use this storage, run
ionic cordova plugin add cordova-sqlite-storage
And simply add it to your app.module.ts
like this
import { IonicStorageModule } from '@ionic/storage';//Line added

@NgModule({
  declarations: [
    // ...
  ],
  imports: [
    BrowserModule,
    IonicModule.forRoot(MyApp),
    IonicStorageModule.forRoot()//Line added
  ],
  bootstrap: [IonicApp],
  entryComponents: [
    // ...
  ],
  providers: [
    // ...
  ]
})
export class AppModule {}
When this is done simply import storage into whatever page you would like to use it in like
import { Storage } from { ionic-storage };

//Add it to your constructor for sure
constructor(public storage: Storage){
...code here
Ionic by default will choose the best storage and use it.
Hopefully this tutorial helped. See you in the next.
You can find my code in Github
Thank you for your contribution. Below is our feedback:
Your contribution has been evaluated according to Utopian policies and guidelines, as well as a predefined set of questions pertaining to the category.
To view those questions and the relevant answers related to your post, click here.
Need help? Write a ticket on https://support.utopian.io/.
Chat with us on Discord.
[utopian-moderator]
Thank you for your review, @mcfarhat!
So far this week you've reviewed 1 contributions. Keep up the good work!
Hello! Your post has been resteemed and upvoted by @ilovecoding because we love coding! Keep up good work! Consider upvoting this comment to support the @ilovecoding and increase your future rewards! ^_^ Steem On!

Reply !stop to disable the comment. Thanks!
Hi @yalzeee!
Your post was upvoted by @steem-ua, new Steem dApp, using UserAuthority for algorithmic post curation!
Your post is eligible for our upvote, thanks to our collaboration with @utopian-io!
Feel free to join our @steem-ua Discord server
Hey, @yalzeee!
Thanks for contributing on Utopian.
We’re already looking forward to your next contribution!
Get higher incentives and support Utopian.io!
Simply set @utopian.pay as a 5% (or higher) payout beneficiary on your contribution post (via SteemPlus or Steeditor).
Want to chat? Join us on Discord https://discord.gg/h52nFrV.
Vote for Utopian Witness!