Tutorial: How to build Android Login and Registration API with Object Oriented PHP and MYSQL database.
I am going to be doing series of tutorials but in this particular one i will be discussing each and every aspect of Android Login and Registration API (Application Programming Interface) using Object Oriented PHP and MYSQL database
For an Android Application to communicate with a database server hosted on the cloud, we have to build an API. This API is use to get request from the android login and register screen and respond accordingly.
What Will I learn ?
• You will learn how to create database schemas in MYSQL database using PHPMYADMIN database client
• You will learn how to connect to database using mysqli connector
• You will learn how to receive request from Android login and register screen and process those request accordingly using php code and return json data to be use by the android app to update the user
• You will also learn how to create basic android screen using xml
• You will learn how to write android code
Requirements:
• Xampp Sever
• Text editor like Dreamweaver or NeatBeans IDE
• Android Studio set up
Difficulty:
• Intermediate
Tutorial Contents:
In our last tutorial, I explained to you guys how you can create an android login and registration form in android studio, Today, Am going to tell you guys how you can get the user data and process it and save the information on a database using PHP API. You can also authenticate the user when he login in from the android interface and allow him to access his dashboard if the information he provided matches the one we have in our record in the database
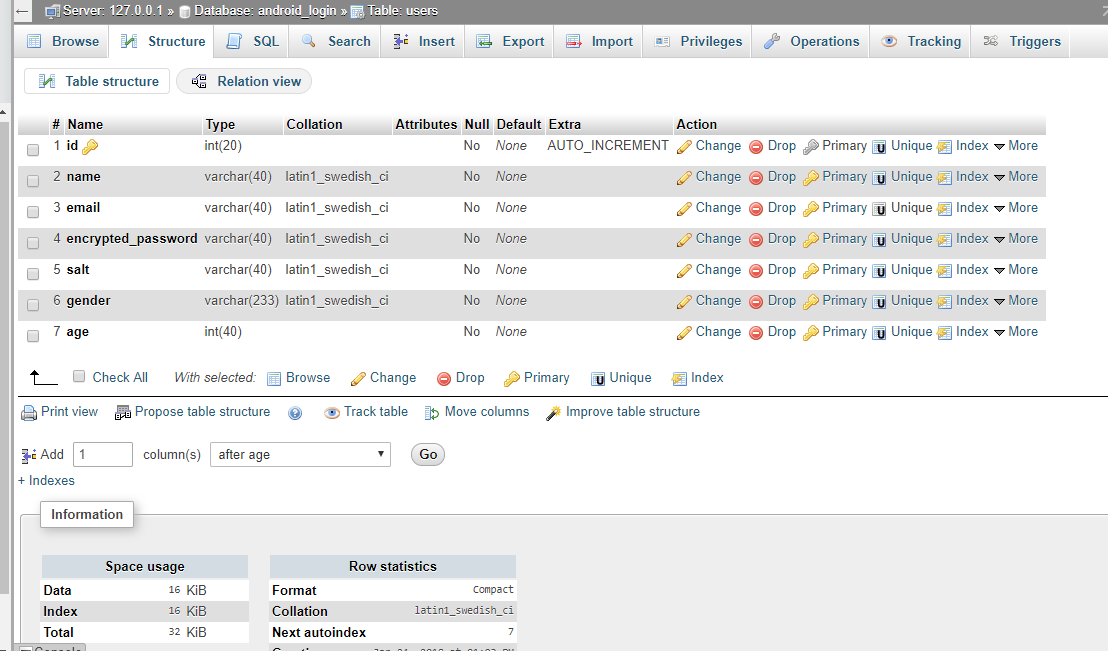
Creating mysl database and table: First we have to create our database and our users table inside the database. If you have your xampp server set up already and is running on port 80. Goto your browser and open the following URL http://localhost/phpmyadmin and execute below queries to create necessary database and tables. You can also do it manually by creating database and tables using phpmyadmin. Here we are creating database named android_login and only one table named users table to store user’s login information. You can also make multiple tables according to your application requirements
Copy and paste the below querry into your phpmyadmin
create database android_login /** Creating Database /
use android_login / Selecting Database *
create table users(
id int(5) primary key auto_increment,
name varchar(40) not null,
email varchar(50) not null unique,
encrypted_password varchar(80) not null,
salt varchar(10) not null,
gender varchar(6) not null,
age int(6) not null
); /** Creating Users Table **/
After creating the database android_login and table users, phpmyadmin will look like this
Creating mysql credentials: Goto the root of your project directory at C:/xampp/htdocs and create a new folder called android_login. Inside the new folder, create a php file called config.php and paste the below code inside the file. Replace the DB_user and DB_password with your own database credentials, but in a newly installed xampp, the default username is root and password is empty
config.php
define("DB_HOST", "localhost");
define("DB_USER", "root");
define("DB_PASSWORD", "");
define("DB_DATABASE", "android_login");
?>
The screenshot for the config.php
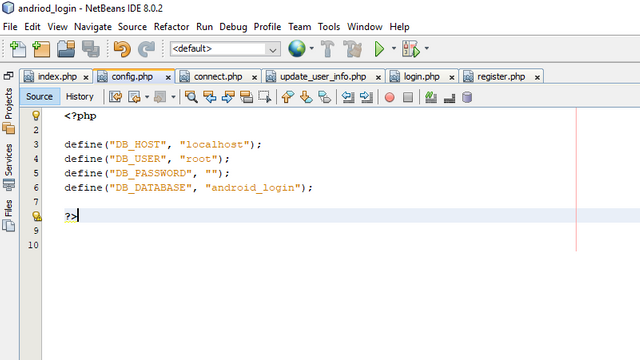
The above code is used to get the xammp server credentials. The file will be included whenever we want to connect to the server
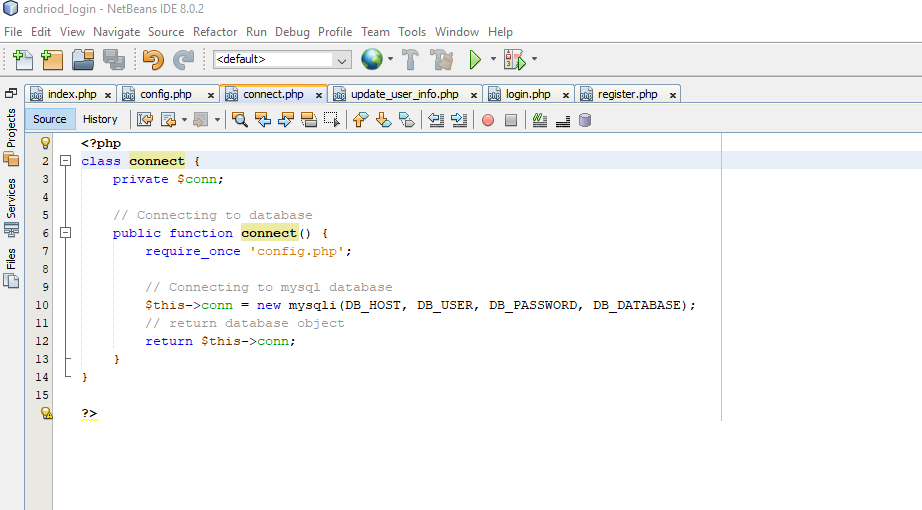
Connection to the server: Our next step of android login app will be to connect to our database. Make a php file inside the folder android_login in the htdocs directory of the xampp, name the file connect.php. this file is used to connect to the server. After connections, we can now make our querries to insert, update and or delete data from our server.
Connect.php
<?php class connect { private $conn;// Connecting to database
public function connect() {
require_once 'config.php';
// Connecting to mysql database
$this->conn = new mysqli(DB_HOST, DB_USER, DB_PASSWORD, DB_DATABASE);
// return database object
return $this->conn;
}
}
?>
Screenshot for connect.php
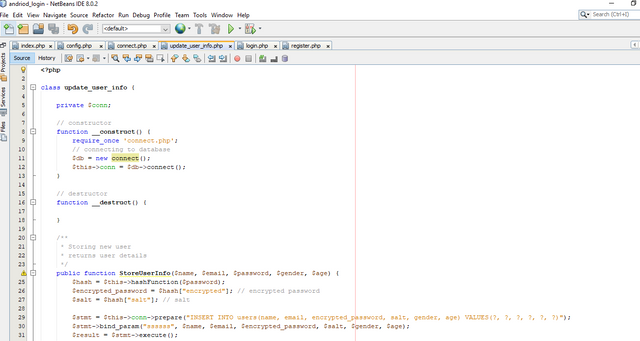
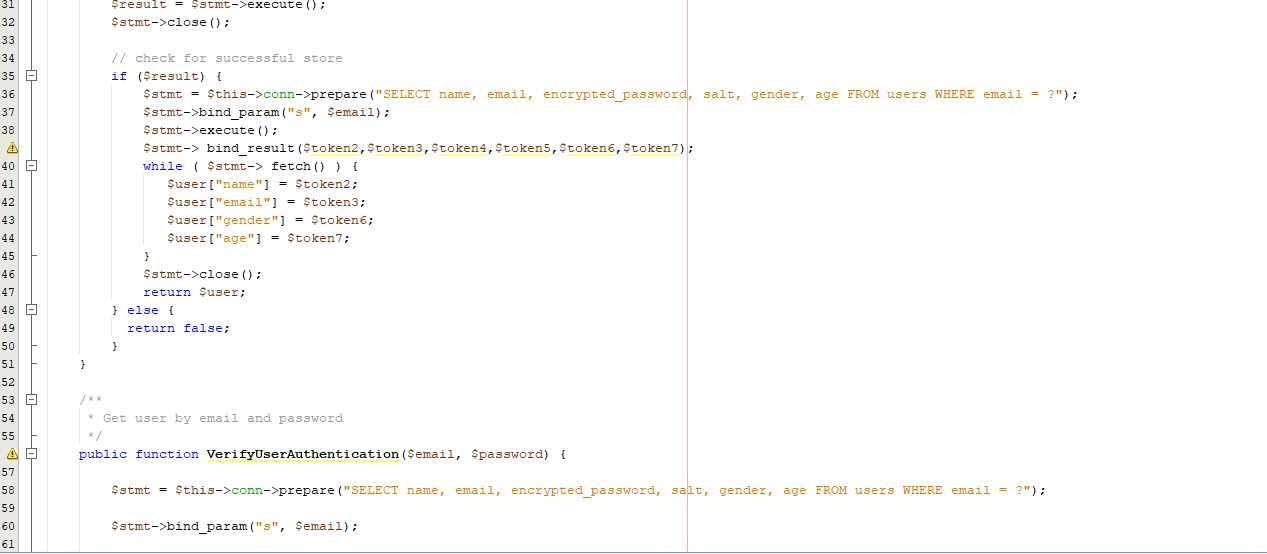
Update users information in our android_login database: The next step of our android login tutorial will be to write different functions which will be used to store and retrieve user information from the database. Here we create a php file in our project directory called update_user_info.php add the following functions one after the order
update_user_info.php
<?phpclass update_user_info {
private $conn;
// constructor
function __construct() {
require_once 'connect.php';
// connecting to database
$db = new connect();
$this->conn = $db->connect();
}
// destructor
function __destruct() {
}
/**
* Storing new user
* returns user details
*/
public function StoreUserInfo($name, $email, $password, $gender, $age) {
$hash = $this->hashFunction($password);
$encrypted_password = $hash["encrypted"]; // encrypted password
$salt = $hash["salt"]; // salt
$stmt = $this->conn->prepare("INSERT INTO users(name, email, encrypted_password, salt, gender, age) VALUES(?, ?, ?, ?, ?, ?)");
$stmt->bind_param("ssssss", $name, $email, $encrypted_password, $salt, $gender, $age);
$result = $stmt->execute();
$stmt->close();
// check for successful store
if ($result) {
$stmt = $this->conn->prepare("SELECT name, email, encrypted_password, salt, gender, age FROM android_php_post WHERE email = ?");
$stmt->bind_param("s", $email);
$stmt->execute();
$stmt-> bind_result($token2,$token3,$token4,$token5,$token6,$token7);
while ( $stmt-> fetch() ) {
$user["name"] = $token2;
$user["email"] = $token3;
$user["gender"] = $token6;
$user["age"] = $token7;
}
$stmt->close();
return $user;
} else {
return false;
}
}
/**
* Get user by email and password
*/
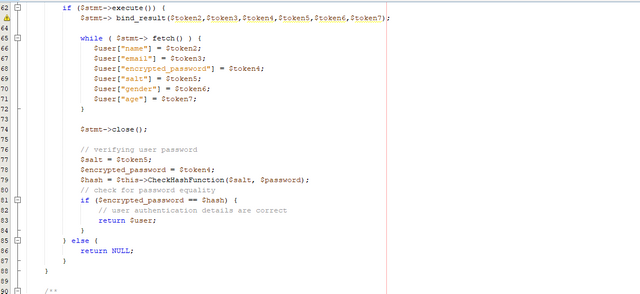
public function VerifyUserAuthentication($email, $password) {
$stmt = $this->conn->prepare("SELECT name, email, encrypted_password, salt, gender, age FROM users WHERE email = ?");
$stmt->bind_param("s", $email);
if ($stmt->execute()) {
$stmt-> bind_result($token2,$token3,$token4,$token5,$token6,$token7);
while ( $stmt-> fetch() ) {
$user["name"] = $token2;
$user["email"] = $token3;
$user["encrypted_password"] = $token4;
$user["salt"] = $token5;
$user["gender"] = $token6;
$user["age"] = $token7;
}
$stmt->close();
// verifying user password
$salt = $token5;
$encrypted_password = $token4;
$hash = $this->CheckHashFunction($salt, $password);
// check for password equality
if ($encrypted_password == $hash) {
// user authentication details are correct
return $user;
}
} else {
return NULL;
}
}
/**
* Check user is existed or not
*/
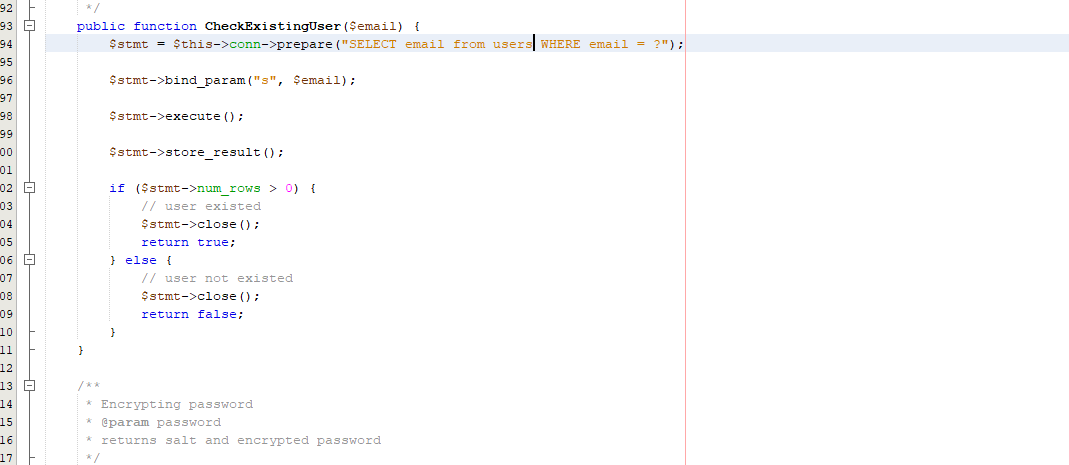
public function CheckExistingUser($email) {
$stmt = $this->conn->prepare("SELECT email from users WHERE email = ?");
$stmt->bind_param("s", $email);
$stmt->execute();
$stmt->store_result();
if ($stmt->num_rows > 0) {
// user existed
$stmt->close();
return true;
} else {
// user not existed
$stmt->close();
return false;
}
}
/**
* Encrypting password
* @param password
* returns salt and encrypted password
*/
public function hashFunction($password) {
$salt = sha1(rand());
$salt = substr($salt, 0, 10);
$encrypted = base64_encode(sha1($password . $salt, true) . $salt);
$hash = array("salt" => $salt, "encrypted" => $encrypted);
return $hash;
}
/**
* Decrypting password
* @param salt, password
* returns hash string
*/
public function checkHashFunction($salt, $password) {
$hash = base64_encode(sha1($password . $salt, true) . $salt);
return $hash;
}
}
?>
Screenshots of the above code
( )
)
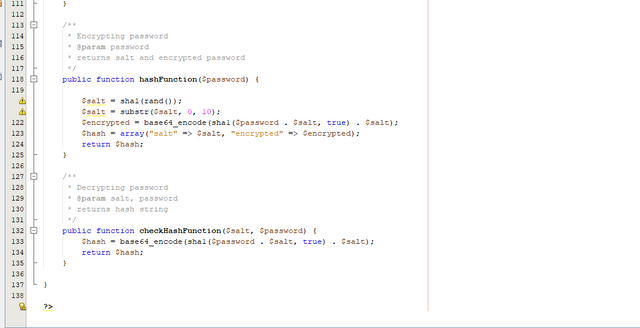
From the above code, first we created a function named StoreUserInfo() which will be used to store user information in the database coming from the client In the above code, password is encrypted using hash function which in turn is encrypted by base64_encode() (https://php.net/manual/en/function.base64-encode.php). It encodes the given data with base64. After this user data is inserted in the database using query “INSERT INTO”. The query we used is known as Prepared Statements in MySQLi . In our SQL, we insert a question mark (?) where we want to substitute in an integer, string, double or Boolean value.
Then, have a look at the bind_param() function:
This function binds the parameters to the SQL query and tells the database what the parameters are. The “ssssss” argument lists the types of data that the parameters are. The s character tells MySQL that the parameter is a string. By telling MySQL what type of data to expect, we minimize the risk of SQL injections. Finally we are checking successful storage using $result. Information returned in the form of $user has the information regarding name, email, gender etc. which will be later used by Android App.
Second function is VerifyUserAuthentication() which will be used to verify correct android login credentials. This functions returns true if username and password is correct otherwise false will be returned. In the above code, entry is selected from table users according to email id provided. If there exist any entry in database then its password is matched against the one provided by user in android login form. Matching is done by decrypting password using checkHashFunction. If password matched then $user is returned otherwise NULL.
Finally we need to add third function CheckExistingUser() which will be used to verify if user already exist or not. So if a user is duplicating an entry then he will be caught. Above code is self explanatory. We are searching table users for the entry according to email provided by user. If it exists then true is returned otherwise false.
Android Login code:
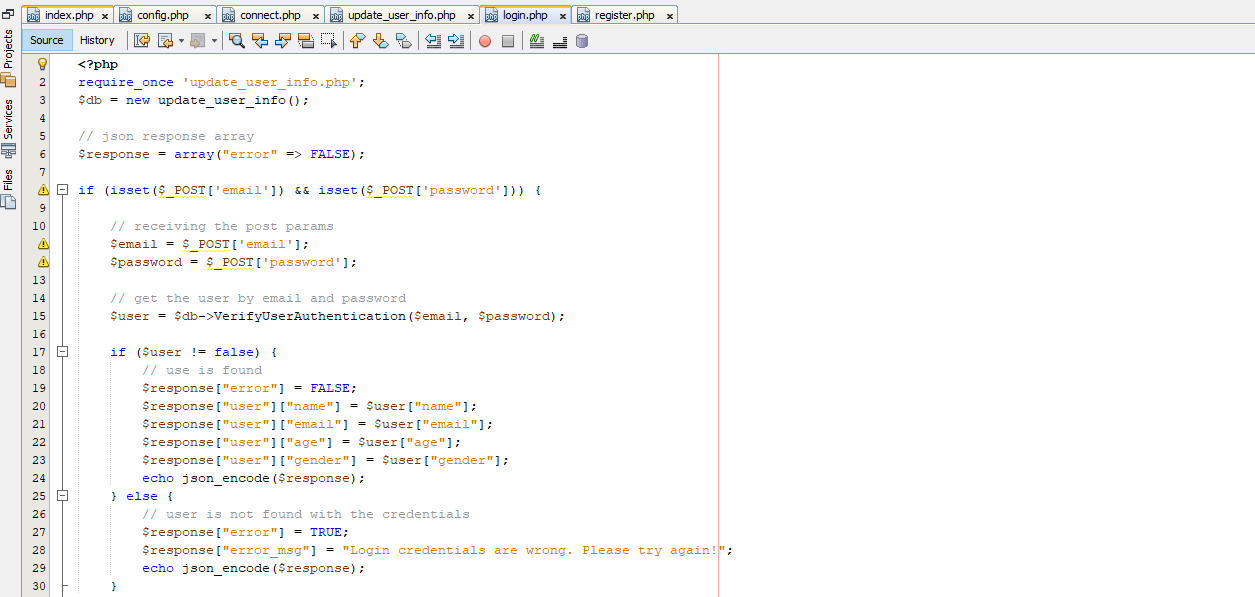
In this step, we make a file named login.php. It will check the email and password provided by user in android login form and accordingly call VerifyUserAuthentication for authentication. If user exists in database then JSON Encoded response will be returned which will later be used in Android App to login. If email or password mismatched then output message will be shown as Login credentials are wrong. Please try again
login.php
require_once 'update_user_info.php';
$db = new update_user_info();
// json response array
$response = array("error" => FALSE);
if (isset($_POST['email']) && isset($_POST['password'])) {
// receiving the post params
$email = $_POST['email'];
$password = $_POST['password'];

// get the user by email and password
$user = $db->VerifyUserAuthentication($email, $password);

if ($user != false) {
    // user is found
    $response["error"] = FALSE;
    $response["user"]["name"] = $user["name"];
    $response["user"]["email"] = $user["email"];
    $response["user"]["age"] = $user["age"];
    $response["user"]["gender"] = $user["gender"];
    echo json_encode($response);
} else {
    // user is not found with the credentials
    $response["error"] = TRUE;
    $response["error_msg"] = "Login credentials are wrong. Please try again!";
    echo json_encode($response);
}
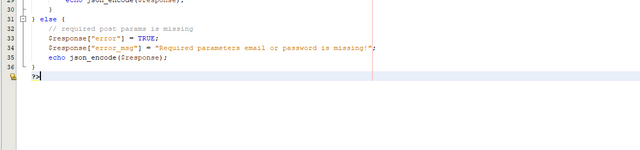
} else {
// required post params is missing
$response["error"] = TRUE;
$response["error_msg"] = "Required parameters email or password is missing!";
echo json_encode($response);
}
?>
The screenshot for the login.php code
As we could see, inputs provided from login form are email and password. Now there could be three type of possible outputs here as follows:
Android Login Success:
Inputs – email: [email protected], password: android_login
URL – http://localhost/android_login/login.php
Output:
{"error":false,"user":{"name":"Peter","email":"[email protected]":24,"gender":"Male"}}Incorrect Email or Password:
Inputs – email: [email protected], password: xyz
URL – http://localhost/android_login/login.php
Output:
1 {"error":true,"error_msg":"Login credentials are wrong. Please try again!"}
Android Register Code:
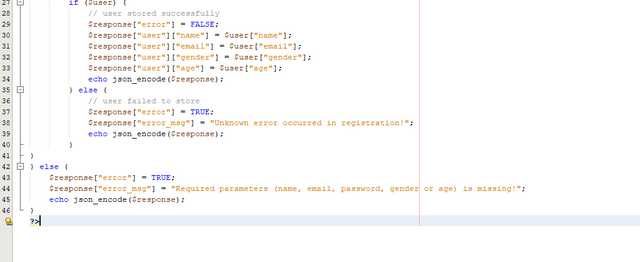
This is the final step of our Android Login and Registration with PHP MySQL App. Make a file named register.php. in the folder directory located at C:/xampp/htdocs/android_login, It will include data in server if email is new i.e if user doesn’t exist in database.
register.php
<?phprequire_once 'update_user_info.php';
$db = new update_user_info();
// json response array
$response = array("error" => FALSE);
if (isset($_POST['name']) && isset($_POST['email']) && isset($_POST['password']) && isset($_POST['gender']) && isset($_POST['age'])) {
// receiving the post params
$name = $_POST['name'];
$email = $_POST['email'];
$password = $_POST['password'];
$gender = $_POST['gender'];
$age = $_POST['age'];

// check if user is already existed with the same email
if ($db->CheckExistingUser($email)) {
    // user already existed
    $response["error"] = TRUE;
    $response["error_msg"] = "User already existed with " . $email;
    echo json_encode($response);
} else {
    // create a new user
    $user = $db->StoreUserInfo($name, $email, $password, $gender, $age);
    if ($user) {
        // user stored successfully
        $response["error"] = FALSE;
        $response["user"]["name"] = $user["name"];
        $response["user"]["email"] = $user["email"];
        $response["user"]["gender"] = $user["gender"];
        $response["user"]["age"] = $user["age"];
        echo json_encode($response);
    } else {
        // user failed to store
        $response["error"] = TRUE;
        $response["error_msg"] = "Unknown error occurred in registration!";
        echo json_encode($response);
    }
}
} else {
$response["error"] = TRUE;
$response["error_msg"] = "Required parameters (name, email, password, gender or age) is missing!";
echo json_encode($response);
}
?>
The screenshot for the register.php

So finally our App Android Login and Registration with PHP MySQL is complete. We have been able to create a full fledged android login and android register API where information coming from login or android register form will be accessed and responded.
Posted on Utopian.io - Rewarding Open Source Contributors
Your contribution cannot be approved because it does not follow the Utopian Rules.
Need help? Write a ticket on https://support.utopian.io.
Chat with us on Discord.
[utopian-moderator]
Hey @portugalcoin, I just gave you a tip for your hard work on moderation. Upvote this comment to support the utopian moderators and increase your future rewards!
those are same topics but different procedures