Java Graphical User Interface With JFrame: Event Handling And Action Listening
What Will I Learn
- The user will learn how to create a concept of Java Graphics User Interface with JFrame.
- The user will learn the concept of Event Handling in Java.
- The user will learn the full concept of ActionListener in Java.
Requirements
- A fully functional computer system is required for this tutorial
- On the computer system, Java Development Kit (JDK) must be installed.
- Also the computer system must have Java IDE installed. Probably Eclipse.
Get JDK here
Get Eclipse IDE here
Difficulty
Intermediate.
Tutorial Contents
Welcome to this tutorial. This happens o be my first ever tutorial and today we are going to look at the concept of Java Graphical User Interface with JFrame and also work on Event Handling and ActionListener. We are going to create a program having multiple classes and this will be used in this tutorial.
Java Graphical User Interface with JFrame
A Graphical User Interface is an interactive display which presents easy-to-use visual to a user. This is made of graphical components such as text labels, text boxes, radio buttons, password fields etc which are helps user in interacting with a program.
A JFrame is a class in java. It is a decorated window with borderlines, buttons that performs tasks such as minimize and close and on which graphical components could be placed.
Event Handling
Event simply means anything a user can do while running a program. Examples are move a mouse, press a button, etc.
Event handler are the codes that are responsible for seeing that an event is done. Event handlers then means codes or routines that process actions. The EventHandler interface is found in java.awt.event package.
Action Listening
ActionListener is a component that is notified whenever an event takes place. Whenever you move the mouse or press a key when running a program, that is whenever you act, the ActionListener is notified. The ActionListener interface is also found in java.awt.event package.
How about we start with some line of codes so we see how these stuffs work. Here is how we are going to do it. I'm going to be explaining each line of code one after the other. This way, we will all understand these concepts really quick.
We will be creating multiple classes. So, let's get to it guys.
Sub-class tee.java
This is the first class we just created for this program. This class will house our codes for implementation of EventHandling and ActionListening in Java. The class is named tee.java
A quick glance on this class below.


The following block of codes is used to import the classes needed in this program.
Block code
import java.awt.FlowLayout;
import java.awt.event.ActionListener;
import java.awt.event.ActionEvent;
import javax.swing.JFrame;
import javax.swing.JTextField;
import javax.swing.JPasswordField;
import javax.swing.JOptionPane;
These classes imported above are going to be used in creating our window frame and also to handle events and actions in the program.
Now, we are going to add something to our tee class and makes it look like it does below.
public class tee extends JFrame {
You could see we extended the class and that pretty much let us use the JFrame window.
That done. Now Inside the tee class, we are going to declare our component variables as needed by the program.
private JTextField firstItem;
private JTextField secondItem;
private JTextField thirdItem;
private JPasswordField passwordField;
We have created three items; firstItem, secondItem and thirdItem and also a password field; passwordField. They are now prepared to be used in the program.
Now we are going to crate a method for the class, tee and inside it, we will create our window and get our stuffs (component) on it. I'm going to be implementing different attributes such as password field, uneditable field, etc so we can learn about them. Let's get on it.
public tee(){

                super("Here is the title");
        setLayout(new FlowLayout());

        firstItem = new JTextField(12);
        add(firstItem);

        secondItem = new JTextField("Enter a text here");
        add(secondItem);

        thirdItem = new JTextField("This is uneditable", 15);
        thirdItem.setEditable(false);
        add(thirdItem);

        passwordField = new JPasswordField("Enter password here");
        add(passwordField);
Now that we have built our window and added some items on it, we are going to add some functionality to this. I mean, we are going to build action listener objects. These action listeners will be waiting for events to take place. To get this done, we are going to create another class, thehandler to execute the code. Before we build the class, we are going to create a method for the class right inside our tee class.
Below is the code for the method of the class which would be created later as we move on.
thehandler handler = new thehandler();
Like I said, we are going to create a new class, thehandler for the above method later on and we will see what the above line of codes does. But before that, right now we need to add these objects and prepare them for ActionListener.
 firstItem.addActionListener(handler);
secondItem.addActionListener(handler);
thirdItem.addActionListener(handler);
passwordField.addActionListener(handler);
Now let's create our new class thehandler right inside tee class. Take note of something here: Whenever you create a new class inside another class, the new class inherit the properties of the class in which it's created.
Now let's create the new class
private class thehandler implements ActionListener{
The above class is created inside our tee class and is what is going to handle the events. Now, we are going o create a method inside this class. This method is going to be called automatically whenever an event take place. In order to handle event in Java, you need an event handling class, and that class needs to implement ActionListener. What AtcionListener does is that it waits for event to happen and once that happens, it's going to do some code.
Next, the ActionListener class will take take one method. This method is going to be called automatically whenever an event occurs. below is the method.
public void actionPerformed(ActionEvent event){
Now, let's go ahead and add some stuffs into our method. Firstly, we will add an empty string
and after that, we will make use of if statement to give conditions to our events. Let me show you the lines of codes for this and I will explain each line afterwards.
String string = "";

            if (event.getSource() == firstItem)
                string = String.format("field 1 is: %s", event.getActionCommand());
            else if (event.getSource() == secondItem)
                string = String.format("field 2 is: %s", event.getActionCommand());
            else if (event.getSource() == thirdItem)
                string = String.format("field 3 is: %s", event.getActionCommand());
            else if (event.getSource() == passwordField)
                string = String.format("password field is: %s", event.getActionCommand());
What we did above is tell the program that when an event occurs on each of the fields in the program, it should show as string. Ie, when a user inputs some texts on a particular field and press the enter button, whatever is inputted should show up. Hence, we have successfully handled the events.
The next line will be used to output our program on the screen. To do this, we make use of JOptionPane class whihc was imported to be used in this program. See it below.
JOptionPane.showMessageDialog(null, string);
That's all about the sub-class tee class. The next thing we need to do now is create our main class. This class will have the main method. How about we name our main class king. But before we go into that, below is the full codes for our tee.java class.
tee.java Full Code
import java.awt.FlowLayout;
import java.awt.event.ActionListener;
import java.awt.event.ActionEvent;
import javax.swing.JFrame;
import javax.swing.JTextField;
import javax.swing.JPasswordField;
import javax.swing.JOptionPane;

public class tee extends JFrame {

    private JTextField firstItem;
    private JTextField secondItem;
    private JTextField thirdItem;
    private JPasswordField passwordField;


    public tee(){

        super("Here is the title");
        setLayout(new FlowLayout());

        firstItem = new JTextField(12);
        add(firstItem);

        secondItem = new JTextField("Enter a text here");
        add(secondItem);

        thirdItem = new JTextField("This is uneditable", 15);
        thirdItem.setEditable(false);
        add(thirdItem);

        passwordField = new JPasswordField("mypassword");
        add(passwordField);


        thehandler handler = new thehandler();

        firstItem.addActionListener(handler);
        secondItem.addActionListener(handler);
        thirdItem.addActionListener(handler);
        passwordField.addActionListener(handler);

}

    private class thehandler implements ActionListener{

        public void actionPerformed(ActionEvent event){

            String string = "";

            if (event.getSource() == firstItem)
                string = String.format("field 1 is: %s", event.getActionCommand());
            else if (event.getSource() == secondItem)
                string = String.format("field 2 is: %s", event.getActionCommand());
            else if (event.getSource() == thirdItem)
                string = String.format("field 3 is: %s", event.getActionCommand());
            else if (event.getSource() == passwordField)
                string = String.format("password field is: %s", event.getActionCommand());

            JOptionPane.showMessageDialog(null, string);

        }
    }
}
That done, let;s get to our main class, king.java
Main class king.java
This class is the main class as it contains the main method which executes our program.

Now that we have created the class, the first thing we are going to do is import the JFrame class which helps us in using window in our program.
import javax.swing.JFrame;
The next thing we need to do is create a new object to call our sub-class, tee.java into the main class.
tee tutor = new tee();
As you can see, I named this object tutor.
The second thing we are going to add is the close operation. We need to manually do this as Java program dosn't do that automatically.
tutor.setDefaultCloseOperation(JFrame.EXIT_ON_CLOSE);
We put the argument EXIT_ON_CLOSE which enables to be able to terminate the program whenever we click on the close icon.
Next thing is set our Frame size (the height and the width) and also set the visibility to true.
tutor.setSize(600,100);
tutor.setVisible(true);
That is it! we have just built our program. Below is the full code for the king.java which happens to be our main class.
king.java full code
import javax.swing.JFrame;

class king {

    public static void main(String[] args) {

        tee tutor = new tee();

        tutor.setDefaultCloseOperation(JFrame.EXIT_ON_CLOSE);
        tutor.setSize(600,100);
        tutor.setVisible(true);

    }
}
Output

Here is the output window of our program

When a user input some texts into the field 1 and an action is taken place (ie the Enter key is pressed), the event is shown with a message box. Same with other fields as well.
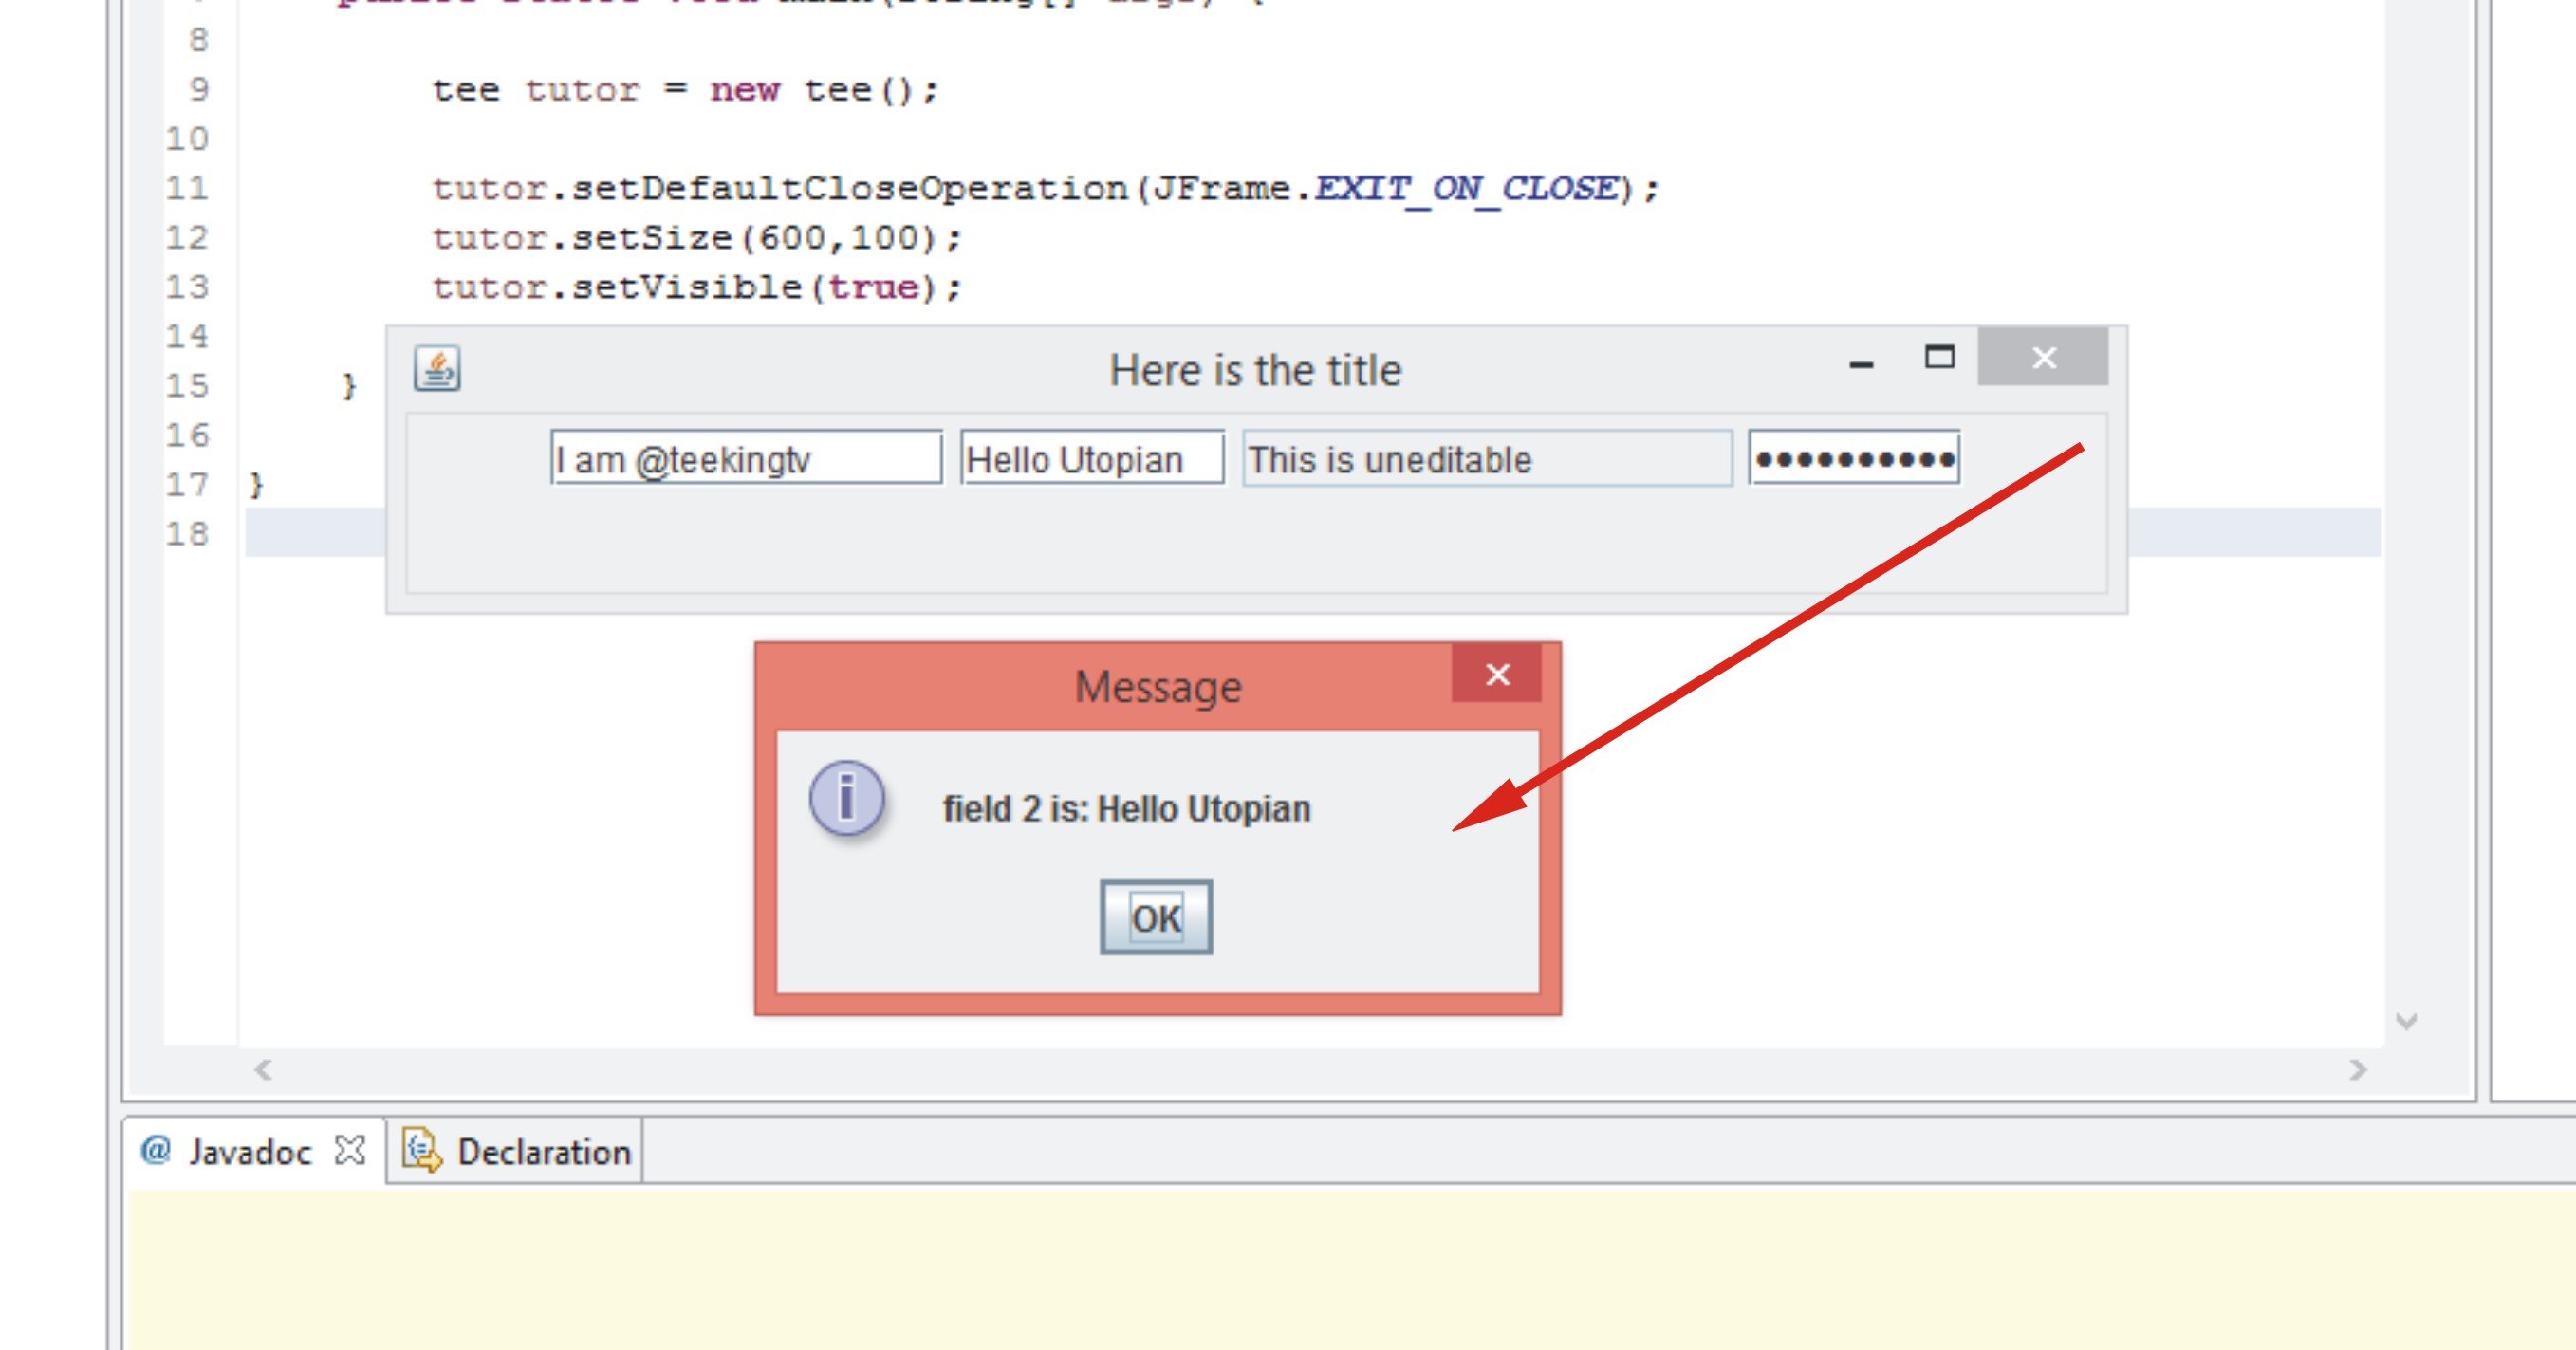

The third field is set to be uneditable, remember? So we can edit the texts in there.

Source code on Github


Download full source code on my GitHub if you need to try it out.
Curriculum
This is the first contribution in this curriculum. It will be succeed with more contributions.
Posted on Utopian.io - Rewarding Open Source Contributors
Thank u for sharing, good post !!!!
Keep it up!!!
@cryptoinvestinfo
Thank you for the contribution. It has been approved.
You can contact us on Discord.
[utopian-moderator]
Hey @teekingtv I am @utopian-io. I have just upvoted you!
Achievements
Community-Driven Witness!
I am the first and only Steem Community-Driven Witness. Participate on Discord. Lets GROW TOGETHER!
Up-vote this comment to grow my power and help Open Source contributions like this one. Want to chat? Join me on Discord https://discord.gg/Pc8HG9x
I am happy to see, read and enjoy your post amazingly innovative. Thanks for sharing.