[Tutorials] Drag and Drop with RxJS
This is a tutorial on showing the power of RxJS by creating our own Drag and Drop (DND) without any dependency. This tutorial used pure JavaScript, so you can also use this into any of your favourite frameworks/ libraries. RxJS is powerful enough to code reactive and asynchronous programming where this DND is written with less than 60 lines of codes which works on both mouse and touch event. Sample code at CodePen.
Final Result
Repository
https://github.com/ReactiveX/rxjs
What Will I Learn?
- Create Drag and Drop (DND) with native javascript and RxJS.
- DND work on both mobile touch and mouse click.
Requirements
- Basic understanding of how HTML DOM and Event work.
- Understanding of JavaScript ES6.
- Basic understanding of RxJS.
- Basic understanding of Babel, CDN.
- RxJS 6 installed via CDN/NPM
Difficulty
Intermediate
Tutorial Contents
In this tutorial, I am using CodePen for creating the drag and drop.
Step 0: Setup workflow
Either using CDN or import with Babel, you can create this DND. I would suggest using CodePen just to try out the code. (I will put in Import function alongside)
CDN method
Get the RxJS 6 CDN from https://cdnjs.cloudflare.com/ajax/libs/rxjs/6.2.2/rxjs.umd.min.js and import necessary functions.
NPM method
Get RxJS via npm install rxjs or yarn add rxjs
Step 1: Create a single DOM element as image.
Create a DOM element with div just to use it as a target for DND in your index.html.
<image class="box" src="any image file" />
Give it a class name or id, just for the ease of using it in JS.
Step 2: Import necessary files and functions from RxJS
CDN method
In CDN method, by including RxJS as source, you will be able to access RxJS via the variable rxjs.
const { fromEvent, interval } = rxjs;
const { takeUntil, mergeMap, flatMap, map, merge } = rxjs.operators;
NPM method
Alternatively, you can use NPM to import it.
import { fromEvent, interval } from 'rxjs';
import { takeUntil, mergeMap, flatMap, map, merge } from 'rxjs/operators';
Step 3: Select Targe DND element
// target element for image
const target = document.querySelector(".box");
Depends on framework/library being used, this is the method that I used to select an element.
Step 4: Create MouseDown/TouchDown, MouseMove/TouchMove, MouseUp/TouchUp event into observable
In RxJS, there is a concept called Observable. You can treat it like a Promise with Async/Await syntax where in promise, you need to call await to get the value out from the promise, samething to Observable, you need to subscribe in order to get the value in the observable.
In this case, we need to create "shared" observable by merging both "mouseup" and "touchup" in order for this DND to work on both Desktop mouse click and also Mobile touch.
// event
// merge mousemove and touchmove event into 1 observable
const mousemove = fromEvent(target, "mousemove").pipe(
  merge(fromEvent(document, "touchmove"))
);
// merge mouseup and touchup event into 1 observable
const mouseup = fromEvent(target, "mouseup").pipe(
  merge(fromEvent(target, "touchend"))
);
// merge mousedownand touchdown event into 1 observable
const mousedown = fromEvent(target, "mousedown").pipe(
  merge(fromEvent(target, "touchstart"))
);
Since all MouseDown/TouchDown, MouseMove/TouchMove, MouseUp/TouchUp used almost the same syntax, we just merged them into a single observable.
fromEventis a way to create observable by passing in your element as first argument and DOM Event name as the second element.pipejust an operator available for Observable in order to pipe from one function to another. This is one of the concepts from Functional Programming where they use pipe operator|>, but this is not available in JS, therefore,pipeis used.mergeis a function that you can pass via pipe where what it does is that it merged both events from mouse and touch into a single one.
Step 5: Create drag observable.
So, the way how drag and drop works is that we look for mousedown event, then mousemove and finally mouseup.
// create drag observerble
const drag = mousedown.pipe(
  flatMap(md => {
    let startX, startY, startLeft, startTop;
    // if it is mouse event
    if (md.type.startsWith("mouse")) {
      startX = md.clientX + window.scrollX;
      startY = md.clientY + window.scrollY;
      startLeft = parseInt(md.target.style.left, 10) || 0;
      startTop = parseInt(md.target.style.top, 10) || 0;
    } else {
    // if it is touch event
      startX = md.touches[0].clientX + window.scrollX;
      startY = md.touches[0].clientY + window.scrollY;
      startLeft = parseInt(md.target.style.left, 10) || 0;
      startTop = parseInt(md.target.style.top, 10) || 0;
    }
    return mousemove.pipe(
      // create new observable based on data passed by mousemove event
      map(mm => {
        if (mm.type.startsWith("mouse")) {
          return {
            left: startLeft + mm.x - startX,
            top: startTop + mm.y - startY
          };
        } else {
          // new observable returns left and top variables.
          return {
            left: startLeft + mm.touches[0].clientX - startX,
            top: startTop + mm.touches[0].clientY - startY
          };
        }
      }),
      takeUntil(mouseup)
    );
  })
);
Drag Observable
I will break down this code into smaller pieces.
// create drag observerble
const drag = mousedown.pipe(
So first, we start the observable by looking for mousedown. Meaning that this code would work whenever a user mousedown/touchdown on the image. Then, we start piping into all the functions that we needed to carry out drag and drop.
flatMap(md => {
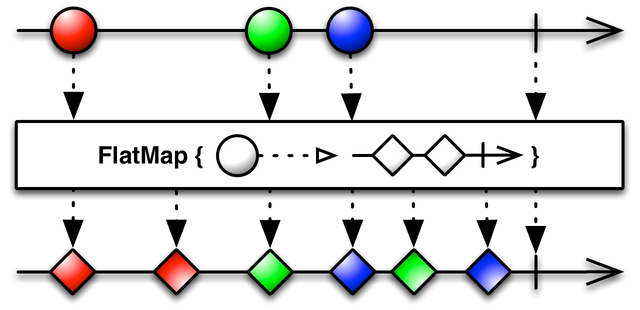
flatMap is that you map over an observable and then flatten it with concat method, which will result in 1 dimension less in your observable. This is because we need to return another observable called mousemove, and we want to make it into same dimension with mousedown. By flatten it the stream would look like this:
{mousedown.......mousemove........................mouseup}
How stream works in Drag and Drop
let startX, startY, startLeft, startTop;
if (md.type.startsWith("mouse")) {
      startX = md.clientX + window.scrollX;
      startY = md.clientY + window.scrollY;
      startLeft = parseInt(md.target.style.left, 10) || 0;
      startTop = parseInt(md.target.style.top, 10) || 0;
    } else {
      startX = md.touches[0].clientX + window.scrollX;
      startY = md.touches[0].clientY + window.scrollY;
      startLeft = parseInt(md.target.style.left, 10) || 0;
      startTop = parseInt(md.target.style.top, 10) || 0;
    }
Since both mouse and touch used different API, therefore a hacky way to do it is to check the type name whether it starts with mouse or not in order to extract out the data required for startX, startY, startLeft, and startTop.
startX: x-axis on the mouse click on the image.startY: y-axis on the mouse click on the image.startTop: y-axis on the top-leftmost location of the image.startLeft: x-axis on the top-leftmost location of the image.
return mousemove.pipe(
As I stated previously, the observable returns mousemove observable, therefore we need to flattened it with switchMap.
map(mm => {
        if (mm.type.startsWith("mouse")) {
          return {
            left: startLeft + mm.x - startX,
            top: startTop + mm.y - startY
          };
        } else {
          return {
            left: startLeft + mm.touches[0].clientX - startX,
            top: startTop + mm.touches[0].clientY - startY
          };
        }
      }),
Then, we map over the result of the observable of mousemove, we calculate the left and top position as the mousemove event occur. The observable return and object with left and top in it which we can use it when we subscribe to it.
takeUntil(mouseup)
takeUntil means that we will take the value of mousemove until mouseUp event happens. In this case, takeUntil will end the observable.
Step 6: Subscribe to Drag Event
// subscription
const subscription = drag.subscribe(pos => {
  target.style.top = pos.top + "px";
  target.style.left = pos.left + "px";
});
As I stated previously, an observable would not work until subscribe is being called. In this tutorial, we will subscribe to it and we expect the pos to return left and top in it so we can update the DOM element target with top and left style.
Then, our DND on the image target is done!
Curriculum
This is going to be a standalone tutorial on showing how RxJS works.
Proof of Work Done
Sample code at https://codepen.io/superoo7/pen/OwZWZV
Thank you for your contribution.
Looking forward to your upcoming tutorials.
Your contribution has been evaluated according to Utopian policies and guidelines, as well as a predefined set of questions pertaining to the category.
To view those questions and the relevant answers related to your post, click here.
Need help? Write a ticket on https://support.utopian.io/.
Chat with us on Discord.
[utopian-moderator]
Thanks for the moderation, I just done updating it.
Thank you for your review, @portugalcoin!
So far this week you've reviewed 13 contributions. Keep up the good work!
Hey @superoo7
Thanks for contributing on Utopian.
We’re already looking forward to your next contribution!
Want to chat? Join us on Discord https://discord.gg/h52nFrV.
Vote for Utopian Witness!
你好吗?新人吗?《steemit指南》拿一份吧,以免迷路; 另外一定要去 @team-cn 的新手村看看,超级热闹的大家庭。如果不想再收到我的留言,请回复“取消”。
Hi @superoo7! We are @steem-ua, a new Steem dApp, computing UserAuthority for all accounts on Steem. We are currently in test modus upvoting quality Utopian-io contributions! Nice work!
Thank you for sharing your posts with us. This post was curated by TeamMalaysia as part of our community support. Looking forward for more posts from you.
To support the growth of TeamMalaysia Follow our upvotes by using steemauto.com and follow trail of @myach
Vote TeamMalaysia witness bitrocker2020 using this link vote bitrocker2020 witness
Congratulations @superoo7! You have completed the following achievement on Steemit and have been rewarded with new badge(s) :
Click on the badge to view your Board of Honor.
If you no longer want to receive notifications, reply to this comment with the word
STOP