How to Use Volley in Android to Make Network Call
Hi, in this tutorial I will show you how to use Volley to make a network call.
What Will I Learn?
- Implement Volley on an Android project.
- Use Volley to make a network call.
Requirements
- Android Studio
- Basic knowledge of Java
Difficulty
- Basic
Overwiew
Most of the time when you develop an Android apps, you will need to request data from or to a server. In Android, there is something called Async Task which you can use to request data from the network. But Async Task is kinda complicated to implement and work with. Luckily there are two popular third party library that can do the same but in a much simple way, and they are Volley and Retrofit. This tutorial will be focusing on Volley, though I do plan to make another tutorial with Retrofit in the future.
Tutorial Contents
1. Add Volley Dependency in Gradle
To add volley dependency, you can simply add this code in the project build gradle file.
implementation 'com.android.volley:volley:1.1.0'
This is my whole build.gradle file:
apply plugin: 'com.android.application'
android {
    compileSdkVersion 27
    buildToolsVersion '27.0.3'
    defaultConfig {
        applicationId "com.steven.example.volleyexample"
        minSdkVersion 21
        targetSdkVersion 27
        versionCode 1
        versionName "1.0"
        testInstrumentationRunner "android.support.test.runner.AndroidJUnitRunner"
    }
    buildTypes {
        release {
            minifyEnabled false
            proguardFiles getDefaultProguardFile('proguard-android.txt'), 'proguard-rules.pro'
        }
    }
    compileOptions {
        sourceCompatibility JavaVersion.VERSION_1_8
        targetCompatibility JavaVersion.VERSION_1_8
    }
}
dependencies {
    implementation fileTree(include: ['*.jar'], dir: 'libs')
    implementation 'com.android.support:appcompat-v7:27.0.2'
    implementation 'com.android.support:design:27.0.2'
    implementation 'com.android.support:recyclerview-v7:27.0.2'
    implementation 'com.android.volley:volley:1.1.0'
    implementation 'com.squareup.picasso:picasso:2.5.2'
    testImplementation 'junit:junit:4.12'
    androidTestImplementation 'com.android.support.test:runner:1.0.1'
    androidTestImplementation 'com.android.support.test.espresso:espresso-core:3.0.1'
}
2. Add Permission to connect to the internet
Now, in order to make a network call, the application need access or in Android it is called permission to connect to the internet. To do that simply add this line of code in your AndroidManifest.xml.
<uses-permission android:name="android.permission.INTERNET" />
And this is the code in my AndroidManifest.xml.
<?xml version="1.0" encoding="utf-8"?>
<manifest xmlns:android="http://schemas.android.com/apk/res/android"
    package="com.steven.example.volleyexample">
    <uses-permission android:name="android.permission.INTERNET" />
    <application
        android:allowBackup="true"
        android:fullBackupContent="false"
        android:icon="@mipmap/ic_launcher"
        android:label="@string/app_name"
        android:roundIcon="@mipmap/ic_launcher_round"
        android:supportsRtl="true"
        android:theme="@style/AppTheme">
        <activity android:name=".MainActivity">
            <intent-filter>
                <action android:name="android.intent.action.MAIN" />
                <action android:name="android.intent.action.VIEW" />
                <category android:name="android.intent.category.LAUNCHER" />
            </intent-filter>
        </activity>
        <activity android:name=".MemberActivity" />
    </application>
</manifest>
3. Create Volley Singleton
Now lets create a singleton class, so each time when you need to request to a network, you simply call this singleton class.
This is my VolleySingleton.java class code:
public class VolleySingleton {
    private static VolleySingleton mInstance;
    private static Context mContext;
    private RequestQueue mRequestQueue;
    private ImageLoader mImageLoader;
    private VolleySingleton(Context context) {
        mContext = context;
        mRequestQueue = getRequestQueue();
        mImageLoader = new ImageLoader(mRequestQueue, new ImageLoader.ImageCache() {
            private final LruCache<String, Bitmap> cache = new LruCache<>(20);
            @Override
            public Bitmap getBitmap(String url) {
                return cache.get(url);
            }
            @Override
            public void putBitmap(String url, Bitmap bitmap) {
                cache.put(url, bitmap);
            }
        });
    }
    public static synchronized VolleySingleton getInstance(Context context) {
        if (mInstance == null) {
            mInstance = new VolleySingleton(context);
        }
        return mInstance;
    }
    public RequestQueue getRequestQueue() {
        if (mRequestQueue == null) {
            mRequestQueue = Volley.newRequestQueue(mContext.getApplicationContext());
        }
        return mRequestQueue;
    }
    public <T> void addToRequestQueue(Request<T> request, String tag) {
        request.setTag(tag);
        getRequestQueue().add(request);
    }
    public void cancelRequest(String tag) {
        if (mRequestQueue != null) {
            mRequestQueue.cancelAll(tag);
        }
    }
    public ImageLoader getImageLoader() {
        return mImageLoader;
    }
}
4. Create Data Model
Okay, in this tutorial I will make a network call that request data from https://api.github.com/users. That API will return example data of Github user. So create a class for the data model and create getter and setter for each field.
public class DataModel {
    private String login;
    private int id;
    private String avatar_url;
    private String gravatar_id;
    private String url;
    private String html_url;
    private String followers_url;
    private String following_url;
    private String gists_url;
    private String starred_url;
    private String subscriptions_url;
    private String organizations_url;
    private String repos_url;
    private String events_url;
    private String recieved_events_url;
    private String type;
    private boolean site_admin;

    public DataModel(String login, int id, String avatar_url, String gravatar_id, String url, String html_url,
                     String followers_url, String following_url, String gists_url, String starred_url, String subscriptions_url,
                     String organizations_url, String repos_url, String events_url, String received_events_url, String type, boolean site_admin) {
        this.login = login;
        this.id = id;
        this.avatar_url = avatar_url;
        this.gravatar_id = gravatar_id;
        this.url = url;
        this.html_url = html_url;
        this.followers_url = followers_url;
        this.following_url = following_url;
        this.gists_url = gists_url;
        this.starred_url = starred_url;
        this.subscriptions_url = subscriptions_url;
        this.organizations_url = organizations_url;
        this.repos_url = repos_url;
        this.events_url = events_url;
        this.recieved_events_url = received_events_url;
        this.type = type;
        this.site_admin = site_admin;
    }
    public String getLogin() {
        return login;
    }
    public void setLogin(String login) {
        this.login = login;
    }
    public int getId() {
        return id;
    }
    public void setId(int id) {
        this.id = id;
    }
    public String getAvatar_url() {
        return avatar_url;
    }
    public void setAvatar_url(String avatar_url) {
        this.avatar_url = avatar_url;
    }
    public String getGravatar_id() {
        return gravatar_id;
    }
    public void setGravatar_id(String gravatar_id) {
        this.gravatar_id = gravatar_id;
    }
    public String getUrl() {
        return url;
    }
    public void setUrl(String url) {
        this.url = url;
    }
    public String getHtml_url() {
        return html_url;
    }
    public void setHtml_url(String html_url) {
        this.html_url = html_url;
    }
    public String getFollowers_url() {
        return followers_url;
    }
    public void setFollowers_url(String followers_url) {
        this.followers_url = followers_url;
    }
    public String getFollowing_url() {
        return following_url;
    }
    public void setFollowing_url(String following_url) {
        this.following_url = following_url;
    }
    public String getGists_url() {
        return gists_url;
    }
    public void setGists_url(String gists_url) {
        this.gists_url = gists_url;
    }
    public String getStarred_url() {
        return starred_url;
    }
    public void setStarred_url(String starred_url) {
        this.starred_url = starred_url;
    }
    public String getSubscriptions_url() {
        return subscriptions_url;
    }
    public void setSubscriptions_url(String subscriptions_url) {
        this.subscriptions_url = subscriptions_url;
    }
    public String getOrganizations_url() {
        return organizations_url;
    }
    public void setOrganizations_url(String organizations_url) {
        this.organizations_url = organizations_url;
    }
    public String getRepos_url() {
        return repos_url;
    }
    public void setRepos_url(String repos_url) {
        this.repos_url = repos_url;
    }
    public String getEvents_url() {
        return events_url;
    }
    public void setEvents_url(String events_url) {
        this.events_url = events_url;
    }
    public String getRecieved_events_url() {
        return recieved_events_url;
    }
    public void setRecieved_events_url(String recieved_events_url) {
        this.recieved_events_url = recieved_events_url;
    }
    public String getType() {
        return type;
    }
    public void setType(String type) {
        this.type = type;
    }
    public boolean isSite_admin() {
        return site_admin;
    }
    public void setSite_admin(boolean site_admin) {
        this.site_admin = site_admin;
    }
5. Make Network Call
Now its time to make a network call. Since the data we get from API is an array of object, we will use JsonArrayRequest. If the data returned is an object, then you can use JsonObjectRequest. In the example code below. After the request is successful, we need to loop and insert each field of the object into an List, then we can pass the List into a RecyclerViewAdapter and show the result in a RecyclerView. After creating a request, add it to the queue by calling VolleySingleton instance.
JsonArrayRequest request = new JsonArrayRequest(Request.Method.GET, REQUEST_URL, null, response -> {
            List<DataModel> data = new ArrayList<>();
            for (int i = 0; i < response.length(); i++) {
                try {
                    JSONObject object = response.getJSONObject(i);
                    DataModel model = new DataModel(object.getString("login"),
                            object.getInt("id"), object.getString("avatar_url"),
                            object.getString("gravatar_id"), object.getString("url"),
                            object.getString("html_url"), object.getString("followers_url"),
                            object.getString("following_url"), object.getString("gists_url"),
                            object.getString("starred_url"), object.getString("subscriptions_url"),
                            object.getString("organizations_url"), object.getString("repos_url"),
                            object.getString("events_url"), object.getString("received_events_url"),
                            object.getString("type"), object.getBoolean("site_admin"));
                    data.add(model);
                } catch (Exception e) {
                    Log.d(TAG, e.toString());
                } finally {
                    mAdapter.clearItems();
                    mAdapter.addItems(data);
                    mAdapter.notifyDataSetChanged();
                }
            }
        }, error -> {
            Log.d(TAG, error.toString());
 });
VolleySingleton.getInstance(this.getApplicationContext()).addToRequestQueue(request, NETWORK_CALL);
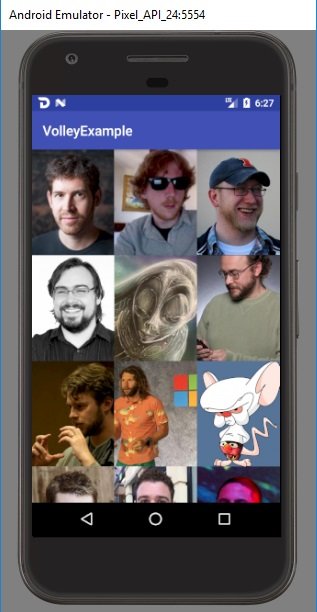
6. Display Data in Recycler View
Now it is time to show data from the API in a RecyclerView. First we need to create a layout for the recycler view holder. In this example I name it item_user.xml with the following code:
<?xml version="1.0" encoding="utf-8"?>
<android.support.v7.widget.AppCompatImageView xmlns:android="http://schemas.android.com/apk/res/android"
    android:id="@+id/user_avatar"
    android:layout_width="match_parent"
    android:layout_height="wrap_content"
    android:scaleType="centerCrop" />
The next step is to bind item_user.xml to an adapter by overriding the onCreateViewHolder method. Then set the data that we get from API to RecyclerView in the onBindView method. The example code below is an RecyclerViewAdapter.
public class RecyclerViewAdapter extends RecyclerView.Adapter<RecyclerView.ViewHolder> {
    private Context mContext;
    private List<DataModel> mUserData = new ArrayList<>();
    RecyclerViewAdapter(Context context) {
        mContext = context;
    }
    @Override
    public RecyclerView.ViewHolder onCreateViewHolder(ViewGroup parent, int viewType) {
        return new UserDataViewHolder(LayoutInflater.from(mContext).inflate(R.layout.item_user, parent, false));
    }
    @Override
    public void onBindViewHolder(RecyclerView.ViewHolder holder, int position) {
        UserDataViewHolder userDataViewHolder = (UserDataViewHolder) holder;   VolleySingleton.getInstance(mContext).getImageLoader().get(mUserData.get(position).getAvatar_url(), new ImageLoader.ImageListener() {
            @Override
            public void onResponse(ImageLoader.ImageContainer response, boolean isImmediate) {
                userDataViewHolder.mUserAvatar.setImageBitmap(response.getBitmap());
            }
            @Override
            public void onErrorResponse(VolleyError error) {
            }
        });
        userDataViewHolder.mUserAvatar.setOnClickListener(v -> mContext.startActivity(new Intent(mContext, MemberActivity.class).
                putExtra(MemberActivity.ARG_LOGIN, mUserData.get(position).getLogin()).
                putExtra(MemberActivity.ARG_ID, mUserData.get(position).getId()).
                putExtra(MemberActivity.ARG_AVATAR_URL, mUserData.get(position).getAvatar_url()).
                putExtra(MemberActivity.ARG_GRAVATAR_ID, mUserData.get(position).getGravatar_id()).
                putExtra(MemberActivity.ARG_URL, mUserData.get(position).getUrl()).
                putExtra(MemberActivity.ARG_HTML_URL, mUserData.get(position).getHtml_url()).
                putExtra(MemberActivity.ARG_FOLLOWERS_URL, mUserData.get(position).getFollowers_url()).
                putExtra(MemberActivity.ARG_FOLLOWING_URL, mUserData.get(position).getFollowing_url()).
                putExtra(MemberActivity.ARG_GISTS_URL, mUserData.get(position).getGists_url()).
                putExtra(MemberActivity.ARG_STARRED_URL, mUserData.get(position).getStarred_url()).
                putExtra(MemberActivity.ARG_SUBSCRIPTIONS_URL, mUserData.get(position).getSubscriptions_url()).
                putExtra(MemberActivity.ARG_ORGANIZATIONS_URL, mUserData.get(position).getOrganizations_url()).
                putExtra(MemberActivity.ARG_REPOS_URL, mUserData.get(position).getRepos_url()).
                putExtra(MemberActivity.ARG_EVENTS_URL, mUserData.get(position).getEvents_url()).
                putExtra(MemberActivity.ARG_RECIEVED_EVENTS_URL, mUserData.get(position).getRecieved_events_url()).
                putExtra(MemberActivity.ARG_TYPE, mUserData.get(position).getType()).
                putExtra(MemberActivity.ARG_SITE_ADMIN, mUserData.get(position).isSite_admin())));
    }
    @Override
    public int getItemCount() {
        return mUserData.size();
    }
    public void addItems(List<DataModel> data) {
        mUserData.addAll(data);
    }
    public void clearItems() {
        mUserData.clear();
    }
    public class UserDataViewHolder extends RecyclerView.ViewHolder {
        private AppCompatImageView mUserAvatar;
        UserDataViewHolder(View itemView) {
            super(itemView);
            mUserAvatar = itemView.findViewById(R.id.user_avatar);
        }
    }
}
The result will look like this:
For further usage, you can check out volley repository here: https://github.com/google/volley.
You can also check out the example project I made in this tutorial here: https://github.com/steven-tjg/volley-example.
Posted on Utopian.io - Rewarding Open Source Contributors
Thank you for the contribution. It has been approved.
You can contact us on Discord.
[utopian-moderator]
@steven.tjg, Approve is not my ability, but I can upvote you.
Hey @steven.tjg I am @utopian-io. I have just upvoted you!
Achievements
Suggestions
Get Noticed!
Community-Driven Witness!
I am the first and only Steem Community-Driven Witness. Participate on Discord. Lets GROW TOGETHER!
Up-vote this comment to grow my power and help Open Source contributions like this one. Want to chat? Join me on Discord https://discord.gg/Pc8HG9x