How to zoom image with Magnifying Glass using jQuery
What Will I Learn?
- You will learn how to build magnifying glass
- You will learn how to zoom an image
- You will learn how to add magnigfying effect
Requirements
- Basic knowledges about HTML
- Basic knowledges about JavaScript
- Basic knowledges about CSS
- Install or host jQuery. You can add jQuery CDN if you don't want to install or host it
Difficulty
- Intermediate
Tutorial Contents
Zooming image with magnifying glass usually use in e-comerce web for zooming and get the detail of the product. Beside of that, it often use in other web that contain the images, like web for image galery. In this tutorial, sogata will explain you all how to build the glass for zooming an image. Lets pay attention on following steps :
[Creating HTML element]
- Open your Text editor and create new file. Save as
magnify.html - Add the HTML element as usual.
- <html>
<head>
<title>Magnify Glass</title>
</head>
<body>
</body>
</html>
- Open a div to contain all element
<div class="zoom">
</div>
- Create an image element. put it in previous div element
<img class="img" src="canon.png" width="400"/>
- Open a div to create glass and put it on image element
<div class="glass"></div>
[Adding CSS for Style.]
- For adding the css you can add it on other css file then include it in this html file. Or you can also add it in HTML file in
<style>element. Open<style>element in<head>element :
<style>
</style>
- Add css for
.zoomclass
.zoom {width: 500px; margin: 50px auto; position: relative;};
- Add some css to create the GLASS
.glass {
            position: absolute;
            width: 150px; height: 150px;
            -webkit-border-radius: 100%;
            -moz-border-radius: 100%;
            border-radius: 100%;
            -webkit-box-shadow: 0 0 0 7px rgba(255, 255, 255, 0.85),
            0 0 7px 7px rgba(0, 0, 0, 0.25),
            inset 0 0 40px 2px rgba(0, 0, 0, 0.25);
                -moz-box-shadow: 0 0 0 7px rgba(255, 255, 255, 0.85),
            0 0 7px 7px rgba(0, 0, 0, 0.25),
            inset 0 0 40px 2px rgba(0, 0, 0, 0.25);
                box-shadow: 0 0 0 7px rgba(255, 255, 255, 0.85),
            0 0 7px 7px rgba(0, 0, 0, 0.25),
            inset 0 0 40px 2px rgba(0, 0, 0, 0.25);
            background: url('canon.png') no-repeat;
            display: none;
        };
Explained code :
radiusto make the glass round.shadowadding shadow to achieve the glass effect.backgroundadding same image for the backgruond of glass.display: none;to hide the glass before hover.
[Adding jQuery Script to get the effect]
- To use jQuery we need to install or host it. Or we can also add jQuery CDN if we don't want to install or host it. we also have many choices CDN that we can use, either Google CDN or Microsoft CDN. For more Detail you can visit jquery official web. In this tutorial I use Google CDN. Add the CDN in
<head>element.
<script src="https://ajax.googleapis.com/ajax/libs/jquery/3.2.1/jquery.min.js"></script>
- To write the jQuery Script we should open
<script>tag. You can put it in<head>element or in<body>element.
<script></script>
- Before add more event in jQuery. There is an event that we should add for the first. It is ready() event. this event to make sure that all html elements are loaded. if it is, then it will load jQuery script. So, all jQuery Script must write in this function event.
$(document).ready(function(){
});
- Add mouse move funtion on
.zoomclass
$(".zoom").mousemove(function(e){
});
- To create the zoom Only after the native dimension are available, we nee create the an condition
if(!native_width && !native_height){
}
- create a new image object in the previous conditons with the same image
var image_object = new Image();
 image_object.src = $(".img").attr("src");
- Retrive image height and width to the native
        native_width = image_object.width;
        native_height = image_object.height;
- Create the else conditon
else{
}
- Get the mouse coordinate
 var coord = $(this).offset();
var mx = e.pageX - coord.left;
var my = e.pageY - coord.top;
- fade out the glass if the mouse is outside the image and fade in if the the mouse on image
if(mx < $(this).width() && my < $(this).height() && mx > 0 && my > 0)
                {
                    $(".glass").fadeIn(100);
                }
                else
                {
                    $(".glass").fadeOut(100);
                }
- The last zoom image with the glass
if($(".glass").is(":visible"))
                {
                    var rx = Math.round(mx/$(".img").width()*native_width - $(".glass").width()/2)*-1;
                    var ry = Math.round(my/$(".img").height()*native_height - $(".glass").height()/2)*-1;
                    var bgp = rx + "px " + ry + "px";
                        // to get ratio of the image under the mouse hover
                    var px = mx - $(".glass").width()/2;
                    var py = my - $(".glass").height()/2;
                        // Move the glass when the mouse move
                    $(".glass").css({left: px, top: py, backgroundPosition: bgp});
                        //to place the  mouse pointer in cnter of glass
                }
[Testing]
- save the file and run it on your browser. Then try to hover the image by the the pointer
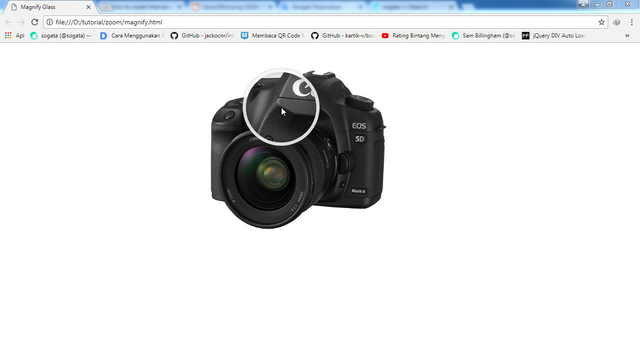
LIVE DEMO
[Full Code]
<html>
        <head>
       <script src="https://ajax.googleapis.com/ajax/libs/jquery/3.2.1/jquery.min.js"></script>
        <title>Magnify Glass</title>
        <style>
       .zoom {width: 500px; margin: 50px auto; position: relative;}
        .glass {
            width: 150px; height: 150px;
            position: absolute;
            -webkit-border-radius: 100%;
            -moz-border-radius: 100%;
            border-radius: 100%;
            -webkit-box-shadow: 0 0 0 7px rgba(255, 255, 255, 0.85),
            0 0 7px 7px rgba(0, 0, 0, 0.25),
            inset 0 0 40px 2px rgba(0, 0, 0, 0.25);
                -moz-box-shadow: 0 0 0 7px rgba(255, 255, 255, 0.85),
            0 0 7px 7px rgba(0, 0, 0, 0.25),
            inset 0 0 40px 2px rgba(0, 0, 0, 0.25);
                box-shadow: 0 0 0 7px rgba(255, 255, 255, 0.85),
            0 0 7px 7px rgba(0, 0, 0, 0.25),
            inset 0 0 40px 2px rgba(0, 0, 0, 0.25);
            background: url('canon.png') no-repeat;
            display: none;
        }
        </style>
        </head>
        <body>
        <div class="zoom">
            <div class="glass"></div>
            <img class="img" src="canon.png" width="400"/>
        </div>
        <script>
            $(document).ready(function(){
        var native_width = 0;
        var native_height = 0;
        $(".zoom").mousemove(function(e){
            if(!native_width && !native_height)
            {
                var image_object = new Image();
                image_object.src = $(".img").attr("src");
                native_width = image_object.width;
                native_height = image_object.height;
            }
            else
            {
                var coord = $(this).offset();
                var mx = e.pageX - coord.left;
                var my = e.pageY - coord.top;
                if(mx < $(this).width() && my < $(this).height() && mx > 0 && my > 0)
                {
                    $(".glass").fadeIn(100);
                }
                else
                {
                    $(".glass").fadeOut(100);
                }
                if($(".glass").is(":visible"))
                {
                    var rx = Math.round(mx/$(".img").width()*native_width - $(".glass").width()/2)*-1;
                    var ry = Math.round(my/$(".img").height()*native_height - $(".glass").height()/2)*-1;
                    var bgp = rx + "px " + ry + "px";
                    var px = mx - $(".glass").width()/2;
                    var py = my - $(".glass").height()/2;
                    $(".glass").css({left: px, top: py, backgroundPosition: bgp});
                }
            }
        });
        });
        </script>
        </body>
        </html>
Curriculum
- How to create International Phone Input using intl-tel-input jQuery Plugin
- How to pop-up image galery on modal using bootstrap and jQuery
- How to check already exist username when user input on Sig Up Form
- How to add Rows in Table element using jQuery
- How to insert data to MySql from PHP using jQuery AJAX
- Auto-Refresh Specific HTML element Without Reloading page Using jQuery
- How to create a toggle button to show and hide an element
- How to Create Filter Lists using jQuery
- How to Create Filter Tables using jQuery
Posted on Utopian.io - Rewarding Open Source Contributors
Thank you for the contribution. It has been approved.
You can contact us on Discord.
[utopian-moderator]
Alah na droneh bang far hai. Mehan kajadeh melangeng postingan nyo hana jireview- review. Gethat hek ka kupreh moderator laen, Mesidro hana troh. Leh kabeh ijak holiday mandum ih
hahaha nyo so le hahaa.sang get katuri long kakahey bangfar hahahaq
Hey @isfar, I just gave you a tip for your hard work on moderation. Upvote this comment to support the utopian moderators and increase your future rewards!
Bereh, tameulakei beu jeut keu breuh lom.
amin ya rabbal alamin
That's right, good luck
Kop mantap ule neuh,,neubi keu2 lon bacut😅
Beu vote lon beh
Hey @sogata I am @utopian-io. I have just upvoted you!
Achievements
Suggestions
Get Noticed!
Community-Driven Witness!
I am the first and only Steem Community-Driven Witness. Participate on Discord. Lets GROW TOGETHER!
Up-vote this comment to grow my power and help Open Source contributions like this one. Want to chat? Join me on Discord https://discord.gg/Pc8HG9x