Materialize Education Series Part #6: How to Create Parallax (Scrolling Image) Website using Materialize CSS and jQuery Library with using XAMPP Localhost Server
Welcome to the sixth Video Tutorial of the Materialize CSS! This tutorial video about "Creating Parallax Website using Materialize CSS Library and jQuery JavaScript Library with XAMPP Localhost Server From Scratch" I hope you enjoy this tutorial video!
What Will I Learn?
- You will learn how to create Parallax Website using with Materialize CSS (full package), jQuery Javascript Ajax Library, Materialize CSS Minified Library and jQuery 3.3.1 (minified) from scratch.
- You will learn a few special codes and division classes about creating Parallax Website.
- You will learn how to create Parallax Website with NavBar codes for Parallax Website without using Bootstrap CDN.
- You will learn how to create Parallax Website in the same line with Navigation Menu Bar (NavBar).
Requirements
- Materialize Full Package 1.0.0-beta version (CSS and JS [minified and unminified]).
- Materialize JavaScript Ajax Library (1.0.0-beta version).
- Microsoft Visual Studio Code. (or another text editor).
- jQuery 3.3.1 Compressed (minified version).
- jQuery Ajax Library (with CDNjs).
- A Standard Computer.
- A Standard Browser.
- XAMPP Control Panel Server.
- A few images.
Difficulty
- Intermediate
Description
Hello everyone, welcome to the sixth episode of the Materialize CSS Education Series. In this tutorial video I showed you how to create Parallax Website with using Materialize CSS Full Package, jQuery JavaScript Ajax Library, Materialize Minified CSS Library and Materialize Minified JavaScript Library. Also I used XAMPP Control Panel Server in this video for work with a localhost server. I showed and I explained you how to define parallax-container with using div command. And also I explained you how to and why we use parallax, parallax-container, Materialize Ajax CSS (full package), jQuery 3.3.1 Minified Library, Materialize Minified CSS, Materialize JS Ajax Library for example; "row container", parallax, "parallax section", "section", "header" and more for creating Parallax Website with using $('.parallax').parallax(); script (jQuery). Also I explained in detail all the commands used when creating Parallax Website. In this tutorial video, we used Materialize package instead of CDN Bootstrap.
Also I gave technical information about codes, classes, script, about Materialize and jQuery libraries and all operations. Our Materialize education series will progress from basic - intermediate to advanced. All the programs described in the video Materialize Full CSS Package (1.0.0-beta version), Visual Studio Code, Materialize Minified JavaScript Library, jQuery 3.3.1 Minified Library,XAMPP Control Panel Server, jQuery Ajax JS Minified Library) are open source and are all included in the links section of the GitHub repositories (Except XAMPP Control Panel Server). If you wish, you can access the web pages of these programs and download links for Windows from the links section.
Some Additional Steps About Paralllax Website Tutorial
STEP 1:
Firstly we entered the addresses of the libraries we need between the headcommands. Materialize Full Package CSS, Materialize Minified CSS, jQuery JS Ajax libraries, jQuery 3.3.1 Minified, Materialize Minified JavaScript and Materialize Icons Family (via Google Fonts) used in this video.
STEP 2:
In this section, we entered navigation menu for a look better. We took advantage the past video tutorial (Navigation Menu Bar [NavBar]). We used of these codes but it is not very important.
STEP 3:
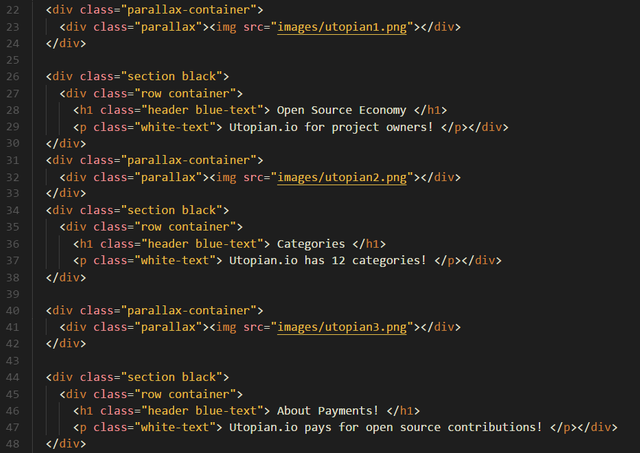
First of all, we defined the div class as parallax-container, this means, the images defined for parallax will appear in full screen.On the bottom line we defined another division class for first parallax image with <div class="parallax"><img src="images/utopian1.png"></div>this command.
In this step, we entered div class as section this means, section div class allows us area for Parallax Images. And then we defined the color of Parallax First Images text area with div class as section black . On the bottom line we wrote a header for our first text under the parallax image with h1 class, we used h1 class because we want header to appear as blue. Lastly we defined p class for our text under the header. We defined p class as white-text because we want our text to appear as white and we wrote our text as Utopian io for project owners!
We followed the same ways for other headers and texts.
STEP 4:
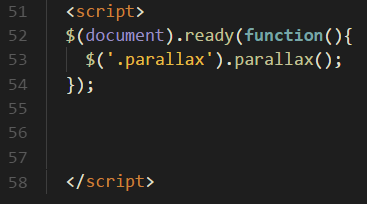
This step about writing parallax script, we started with $(document).ready(function(){ command as usual and we used $('.parallax').parallax(); script function to run parallax properly and we wrote this script to scrolling the images while scrolling the mouse manually.
Codes Used in This Video
<head>

  <link href="https://fonts.googleapis.com/icon?family=Material+Icons" rel="stylesheet">
  <link rel="stylesheet" href="https://cdnjs.cloudflare.com/ajax/libs/materialize/1.0.0-beta/css/materialize.min.css">
  <link type="text/css" rel="stylesheet" href="css/materialize.min.css">
  <script src="https://ajax.googleapis.com/ajax/libs/jquery/3.3.1/jquery.min.js"></script>
  <script type="text/javascript" src="https://cdnjs.cloudflare.com/ajax/libs/materialize/1.0.0-beta/js/materialize.min.js"></script>
  </head>

  <nav>

      <div class="nav-wrapper grey">
          <a href="https://utopian.io" class="brand-logo">
          <object id="logo" type="image" data="images/utopianlogo.png"></object></a>


  </nav>

  <div class="parallax-container">
    <div class="parallax"><img src="images/utopian1.png"></div>
  </div>

  <div class="section black">
    <div class="row container">
      <h1 class="header blue-text"> Open Source Economy </h1>
      <p class="white-text"> Utopian.io for project owners! </p></div>
  </div>
  <div class="parallax-container">
    <div class="parallax"><img src="images/utopian2.png"></div>
  </div>
  <div class="section black">
    <div class="row container">
      <h1 class="header blue-text"> Categories </h1>
      <p class="white-text"> Utopian.io has 12 categories! </p></div>
  </div>

  <div class="parallax-container">
    <div class="parallax"><img src="images/utopian3.png"></div>
  </div>

  <div class="section black">
    <div class="row container">
      <h1 class="header blue-text"> About Payments! </h1>
      <p class="white-text"> Utopian.io pays for open source contributions! </p></div>
  </div>
  <script>
  $(document).ready(function(){
    $('.parallax').parallax();
  });


  </script>
My Operating System
Video Tutorial
Links
- Materialize Github Repo
- Materialize Web Site
- Materialize Package Download for Windows
- Materialize Minified Ajax CSS Library
- Materialize Minified Ajax JavaScript Library
- jQuery GitHub Repo
- jQuery Minified Ajax Library (version 3.3.1)
- Visual Studio Code (VSCode) GitHub Repo
- Visual Studio Code Web Site
- Visual Studio Code Download Link for Win x64
- XAMPP Server Web Site
- XAMPP Server(For Windows) Download Link
Curriculum
You can follow the other parts of the materialize education series here! :)
- PART 1: Materialize Education Series Part #1: How to Create a Simple Contact Form Without Using Server and Bootstrap CDN
- PART 2: Materialize Education Series Part #2: How to Create a Full Screen Image Slider Using Carousel with XAMPP Localhost Server From Scratch
- PART 3: Materialize Education Series Part #3: How to Create Side Navigation Bar using Materialize and jQuery Libraries with XAMPP Localhost Server From Scratch
- PART 4: Materialize Education Series Part #4: How to Create Top Navigation Menu (Navbar) using Materialize CSS with XAMPP Localhost Server
- PART 5: Materialize Education Series Part #5: How to Create a Scrollspy Menu using Materialize CSS and jQuery Library with using XAMPP Localhost Server
Posted on Utopian.io - Rewarding Open Source Contributors


Thank you for your contribution.
It has been reviewed and scored.
Need help? Write a ticket on https://support.utopian.io.
Chat with us on Discord.
[utopian-moderator]
Thank you for moderating my contribution again.
Hey @sargoon! Thank you for the great work you've done!
We're already looking forward to your next contribution!
Fully Decentralized Rewards
We hope you will take the time to share your expertise and knowledge by rating contributions made by others on Utopian.io to help us reward the best contributions together.
Utopian Witness!
Vote for Utopian Witness! We are made of developers, system administrators, entrepreneurs, artists, content creators, thinkers. We embrace every nationality, mindset and belief.
Want to chat? Join us on Discord https://discord.me/utopian-io