Using Intro.js for website feature introduction
Source
You can use intro.js for new feature introduction on your website. Intro.js is library javascript to demonstrate your product feature even when you develop and add some feature. you should be demonstrate to users visit on your website. Intro.js is the easiest way to setup your step-by-step guide.
In this tutorial I will show you how to use intro.js to demonstrate step-by-step guide and introduction your website.
Requirement
Before we use and install intro.js we need a completed project website. So, in this tutorial I have simple web project as design to demonstrate the website features with intro.js. You can use this simple template or you can create or modify as you prefer.
First, we create a file project I called intro.html and I put on my drive D:\Tutorial\Tour
It's look like
Now we need insert some code to project file intro.html to make simple website design.
Here's the fully structure code for design template.
<!DOCTYPE html>
<html>
<head>
<title>Step-by-step introduction Using Intro.JS</title>
(html comment removed: Add Bootstrap Styles )
<link rel="stylesheet" href="https://maxcdn.bootstrapcdn.com/bootstrap/4.0.0-beta.3/css/bootstrap.min.css" integrity="sha384-Zug+QiDoJOrZ5t4lssLdxGhVrurbmBWopoEl+M6BdEfwnCJZtKxi1KgxUyJq13dy" crossorigin="anonymous">
</head>
<body>
<nav class="navbar navbar-expand-md navbar-dark fixed-top bg-info">
<div class="container">
<a class="navbar-brand" href="#">LOGO</a>
<button class="navbar-toggler" type="button" data-toggle="collapse" data-target="#navbarsExampleDefault" aria-controls="navbarsExampleDefault" aria-expanded="false" aria-label="Toggle navigation">
<span class="navbar-toggler-icon"></span>
</button>
<div class="nav justify-content-center" id="navbarsExampleDefault">
<ul class="navbar-nav mr-auto">
<li class="nav-item active">
<a class="nav-link" href="#">Home <span class="sr-only">(current)</span></a>
</li>
<li class="nav-item">
<a class="nav-link" href="#">Feature</a>
</li>
<li class="nav-item dropdown">
<a class="nav-link" href="#">Tour</a>
</li>
</ul>
</div>
</div>
</nav>
<div class="jumbotron">
<div class="container">
<h1 class="display-3">Tour Guide!</h1>
<p>This is demo of step-by-step guide and feature introduction. This tour made with Introjs. Here is some tour sample. To start the tour you can click tour on header navigation or can click the button below.</p>
<p><a class="btn btn-primary btn-lg" role="button" href="">Start Tour »</a></p>
</div>
</div>
<div class="container">
(html comment removed: Example row of columns )
<div class="row text-center">
<div class="col-md-4">
<h2>Feature 1</h2>
<p>This is example of feature 1. For more detail please click the button below...</p>
<p><a class="btn btn-secondary" href="#" role="button">View details »</a></p>
</div>
<div class="col-md-4">
<h2>Feature 2</h2>
<p>This is example of feature 2. For more detail please click the button below...</p>
<p><a class="btn btn-secondary" href="#" role="button">View details »</a></p>
</div>
<div class="col-md-4">
<h2>Feature 3</h2>
<p>This is example of feature 3. For more detail please click the button below...</p>
<p><a class="btn btn-secondary" href="#" role="button">View details »</a></p>
</div>
</div>
<hr>
</div>
<div class="container">
<blockquote class="blockquote text-center">
<p class="mb-0">The end of content.</p>
<footer class="blockquote-footer">© 2018 <cite title="Source Title">Rio Dwi Prabowo</cite></footer>
</blockquote>
</div>
</body>
</html>
Short, that's code define the design of completed project site. With bootstrap as css template design. So, it's simple design project with basic html and bootstrap component. and the design looks like:
Installing
Now, we have a completed website, and we can start installing intro.js. To install intro.js we have a few method:
first, we can download intro.js from official site Intro.js
download it from CDN :
You can install using NPM
npm install intro.js --save
Or, you can install it using Bower
bower install intro.js --save
But, in this case I install using CDN. To install intro.js you need add the
CSS cdn link to the header and adding the JS cdn link before closing the body tag (</body>)
<link rel="stylesheet" type="text/css" href="https://cdnjs.cloudflare.com/ajax/libs/intro.js/2.7.0/introjs.min.css">

<script type="text/javascript" src="https://cdnjs.cloudflare.com/ajax/libs/intro.js/2.7.0/intro.min.js"></script>Usage
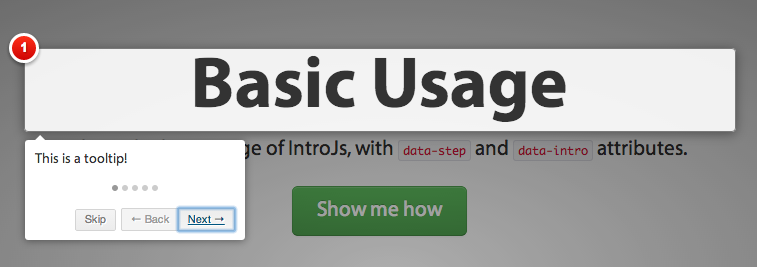
To use Intro.js is very simple we just insert data-step and data-intro into tag you want to introduction the feature. short, data-step is value for define the sequence of tour guide and data-intro define for the information about the feature. But we need a function to trigger and start the tour guide. We can put trigger on the button or when website first load. In this tutorial we have 5 data-step and the trigger to start the tour guide I put on navigation link and button. Here's the code: <li class="nav-item dropdown">
<a class="nav-link" href="javascript:void(0);" onclick="javascript:introJs().setOption('showProgress', true).start();">Tour</a>
</li> <p><a class="btn btn-primary btn-lg" role="button" href="javascript:void(0);" onclick="javascript:introJs().setOption('showProgress', true).start();">Start Tour »</a></p>Now, to show step tour guide we need insert data-step and data-intro to tag, in this tutorial i put on header, logo, container, feature container, and footer tags. For step 1, I put on the container. Here is the code:
<div class="container" data-step="1" data-intro="Hello, I'm Introjs will guide you feature introduction">
<h1 class="display-3">Tour Guide!</h1>
<p>This is demo of step-by-step guide and feature introduction. This tour made with Introjs. Here is some tour sample. To start the tour you can click tour on header navigation or can click the button below.</p>
<p><a class="btn btn-primary btn-lg" role="button" href="javascript:void(0);" onclick="javascript:introJs().setOption('showProgress', true).start();">Start Tour »</a></p>
</div>
<nav class="navbar navbar-expand-md navbar-dark fixed-top bg-info">
<div class="container" data-step="2" data-intro="This is a Header!">
<a class="navbar-brand" href="#" data-step="3" data-intro="This is our Logo.">LOGO</a>
<button class="navbar-toggler" type="button" data-toggle="collapse" data-target="#navbarsExampleDefault" aria-controls="navbarsExampleDefault" aria-expanded="false" aria-label="Toggle navigation">
<span class="navbar-toggler-icon"></span>
</button>
<div class="nav justify-content-center" id="navbarsExampleDefault" data-step="3" data-intro="Here's the navigation">
<ul class="navbar-nav mr-auto">
<li class="nav-item active">
<a class="nav-link" href="#">Home <span class="sr-only">(current)</span></a>
</li>
<li class="nav-item">
<a class="nav-link" href="#">Feature</a>
</li>
                 <li class="nav-item dropdown">
                        <a class="nav-link" href="javascript:void(0);" onclick="javascript:introJs().setOption('showProgress', true).start();">Tour</a>
                    </li>
</ul>
</div>
</div>
</nav>

Now, for the fourth step I put on the feature container, its looks like:
 <div class="container" data-step="4" data-intro="Here's all feature of this site">
        <div class="row text-center">
            <div class="col-md-4">
                <h2>Feature 1</h2>
                <p>This is example of feature 1. For more detail please click the button below...</p>
                <p><a class="btn btn-secondary" href="#" role="button">View details »</a></p>
            </div>
            <div class="col-md-4">
                <h2>Feature 2</h2>
                <p>This is example of feature 2. For more detail please click the button below...</p>
                <p><a class="btn btn-secondary" href="#" role="button">View details »</a></p>
            </div>
            <div class="col-md-4">
                <h2>Feature 3</h2>
                <p>This is example of feature 3. For more detail please click the button below...</p>
                <p><a class="btn btn-secondary" href="#" role="button">View details »</a></p>
            </div>
        </div>
        <hr>
    </div>
 <div class="container">
        <blockquote class="blockquote text-center" data-step="5" data-intro="The last is our footer. <br> Thank you">
            <p class="mb-0">The end of content.</p>
            <footer class="blockquote-footer">© 2018 <cite title="Source Title">Rio Dwi Prabowo</cite></footer>
        </blockquote>
    </div>
Final word
This tutorial is just to show about the website feature and can help new users how to use and interact with our website. I have this tutorial can help you to develop your website project to make tour guide on your website. You can explore intro.js to modify tour guide like you prefer.For more option and documentation about intro.js you can find on the official site Here
If you want see the fully code of this tutorial you can find Here
Thank you
Posted on Utopian.io - Rewarding Open Source Contributors
Thank you for the contribution. It has been approved.
You can contact us on Discord.
[utopian-moderator]
Hey @riyo.s94 I am @utopian-io. I have just upvoted you!
Achievements
Suggestions
Get Noticed!
Community-Driven Witness!
I am the first and only Steem Community-Driven Witness. Participate on Discord. Lets GROW TOGETHER!
Up-vote this comment to grow my power and help Open Source contributions like this one. Want to chat? Join me on Discord https://discord.gg/Pc8HG9x