Create web application with Django and Python : Part I
Along with Python tutorial series, I will also share Django tutorials from now on. At the end of this series, you will be able to make a working web application in Django.
What will I learn?
This tutorial covers following topics:
- Initial setup
- Creating app
- Using Django admin interface
- Creating url
Difficulty
Intermediate.
Requirements
- A PC/laptop with any Operating system such as Linux, Mac OSX, Windows OS
- Preinstalled Python
- Preinstalled Code Editors such as Atom, Sublime text or Pycharm IDE
Note: This tutorial is performed in Pycharm IDE in laptop with Ubuntu 17.1, 64 bit OS
Tutorial Contents
Setting Up Environment:
Using pip we will install Django.
pip install django
This will install the Django. To verify if it is installed or not run the following command:
django-admin.py --version
OR
Enter the following command one by one in your command prompt/terminal :
python
import django
django.VERSION
If everything is fine it will show you the django version installed in your computer else retry.
Virtual Environment Setup
Virtual Environment allows you to mangae your each project separately. Suppose if you are working on multiple projects with different version of python or using different web frame work
like flask , django then you can manage them separately using virtual environment.
To setup virtual environment, open your command prompt/terminal an enter the following command:
pip install virtualenv
Now we will make a new directory to make virtual environment for our project:
mkdir Djangoprojects
move to newly created directory from command line
cd Djangoprojects
and setup virtual environment there for your new django project
virtualenv Mydjangoproject
To activate your virtual environment enter the following command:
source Mydjangoproject/bin/activate
Now, you are on your new virtual environment django project. It will be sshown as (Mydjangoproject) in your command line/terminal.
To get out of your virtual environment just enter
deactivate
in your command prompt.
Now install required django version in your virtual environment by using pip.
To look up what has been installed in virtual environment run the following command:
pip freeze
All installed packages will be listed out.
Making Django webapplication
To create your django project activate your virtualenv and then run following command:
django-admin startproject mywebapplication
django-admin utility comes automatically when we install django. After running above code our new django project is ready.
It is created with base directory mywebapplication.
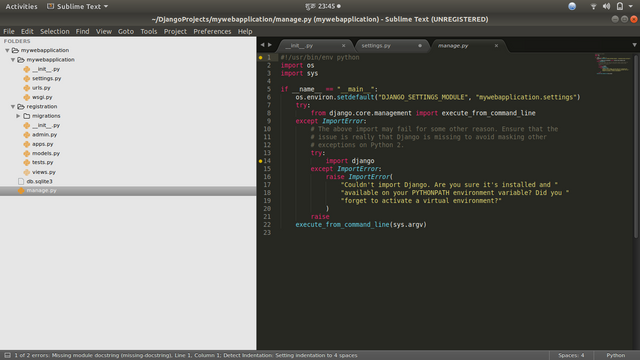
Inside that base directory another sub-directory mywebapplication and python file manage.py.
- manage.py
It is used to manage our project. We will use to run our project, test our project and works as django-admin command line utility.
The sub-directory contains following files:
_ init _.py
This file makes the folder python package. It tells python interpreter that it is python package.settings.py
All our project configurations are setup in this file.urls.py
We map paths of our project here. For example, to visit contact page of our web application we map path to mywebapplication/contact.wsgi.py
This file is needed while deploying our project.
Now that we created our project, we will check if it's working. Django comes with simple lite server which will be activated by entering following command.
python manage.py runserver
In command prompt it will appear process message like:
Performing system checks...

System check identified no issues (0 silenced).

You have 13 unapplied migration(s). Your project may not work properly until you apply the migrations for app(s): admin, auth, contenttypes, sessions.
Run 'python manage.py migrate' to apply them.

February 23, 2018 - 16:36:59
Django version 1.11.10, using settings 'mywebapplication.settings'
Starting development server at http://127.0.0.1:8000/
Cntrl + C quits the server. We can view our project success message at http://127.0.0.1:8000/ . But to apply migration or creating and making effectiveness in
database we need to run:
python manage.py migrate
Then this will be shown:
Operations to perform:
  Apply all migrations: admin, auth, contenttypes, sessions
Running migrations:
  Applying contenttypes.0001_initial... OK
  Applying auth.0001_initial... OK
  Applying admin.0001_initial... OK
  Applying admin.0002_logentry_remove_auto_add... OK
  Applying contenttypes.0002_remove_content_type_name... OK
  Applying auth.0002_alter_permission_name_max_length... OK
  Applying auth.0003_alter_user_email_max_length... OK
  Applying auth.0004_alter_user_username_opts... OK
  Applying auth.0005_alter_user_last_login_null... OK
  Applying auth.0006_require_contenttypes_0002... OK
  Applying auth.0007_alter_validators_add_error_messages... OK
  Applying auth.0008_alter_user_username_max_length... OK
  Applying sessions.0001_initial... OK
and database file named db.sqllite3 is created under our base directory.
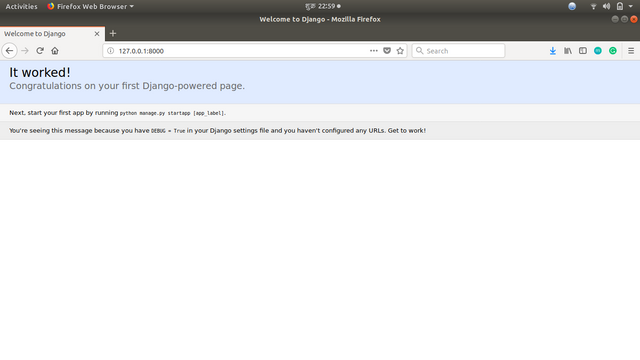
Sqlite3 is the default database system used by django. Now run your server and open http://127.0.0.1:8000/. You will see success message.
Creating an app
A django project may have many app inside it. App can be reused in projects. For regitration we may have one application, for contact we may have another.
Let us create our new app by entering following command. Note that we should be in our project directory.
python manage.py startapp registration
After running above command, new su-bdirectory registration is created inside of base directory and python files _ init _.py, admin.py, apps.py, models.py,
tests.py and views.py are created along with subdirectory migrations which further consists init.py.
admin.py
Helps us to modify our app in admin interface.models.py
Application models are written here. It helps us to manipulate database.views.py
Our projects views are stored here.tests.py
Unit tests are written here.
Now our app is created we need top introduce our app to our project. Thus inside mywebapplication/mywebapplication/settings.py , in INSTALLED_APPS we will ad our
app as below:
INSTALLED_APPS = [
    'django.contrib.admin',
    'django.contrib.auth',
    'django.contrib.contenttypes',
    'django.contrib.sessions',
    'django.contrib.messages',
    'django.contrib.staticfiles',
    'registration'
]
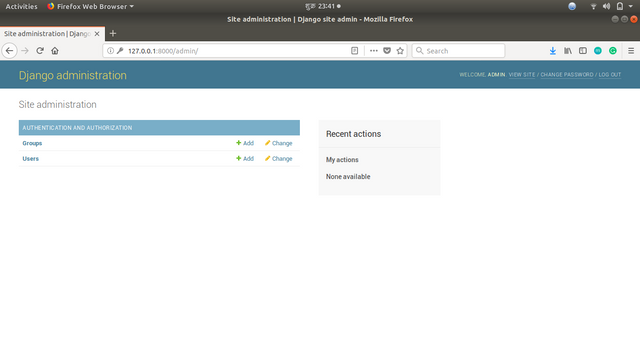
Using admin interface
This is a great feature provided by django that it gives inbuilt admin interface to manage our project. We need to log in as super user to use admin interface. As admin interface depends
upon django.contrib module make sure your INSTALLED_APPS and MIDDLEWARE inside mywebapplication/mywebapplication/settings.py looks like
INSTALLED_APPS = [
    'django.contrib.admin',
    'django.contrib.auth',
    'django.contrib.contenttypes',
    'django.contrib.sessions',
    'django.contrib.messages',
    'django.contrib.staticfiles',
    'registration'
]

MIDDLEWARE = [
    'django.middleware.security.SecurityMiddleware',
    'django.contrib.sessions.middleware.SessionMiddleware',
    'django.middleware.common.CommonMiddleware',
    'django.middleware.csrf.CsrfViewMiddleware',
    'django.contrib.auth.middleware.AuthenticationMiddleware',
    'django.contrib.messages.middleware.MessageMiddleware',
    'django.middleware.clickjacking.XFrameOptionsMiddleware',
]
To create a superuser enter the following command:
python manage.py createsuperuser
Enter username, email and password then superuser will be created and this message will be shown in command prompt.
Superuser created successfully.
Now when we open our mywebapplication/mywebapplication/urls.py we will see like this:
from django.conf.urls import url
from django.contrib import admin

urlpatterns = [
    url(r'^admin/', admin.site.urls),
]
In above code statement starting from from is imports and urlpatterns holds the mapped values which is mapped using regex. Django uses regex to map
urls to views.
To understand how regex work please visit my previous tutorial.
We can see under urlpatterns our admin interface is mapped to /admin which means that if any url starts with /admin then django will find it's corresponding views
and is accessible from http://127.0.0.1:8000/admin .Now, we will run server and go through it.
Enter username and password to log in and we will see like this:
Creating url
Now we will create our first url. Keep in mind that we can define our urls in our project urls.py or mywebapplication/urls.py for here but if we have large apps than it looks messy.
So to keep it clean, we will create our urls in respective app inside project. Before creating our url in application's urls.py we need to include that in our project's urls.py.
So, we will add these code in mywebapplication/urls.py under urlpatterns:
url(r'', include('registration.urls')),
As we used include function to create that url so we need to import it before defining urlpatterns.
from django.conf.urls import include
or as we already imported url from django.conf.urls we can add it after by separating with commas.
from django.conf.urls import url,include
Our final code of mywebapplication/urls.py will look like:
from django.conf.urls import url,include
from django.contrib import admin

urlpatterns = [
    url(r'^admin/', admin.site.urls),
    url(r'', include('registration.urls')),
]
After this django will now redirect http://127.0.0.1:8000/ to registration.urls
Now we will create url on registration app. At first we will cretae urls.py file under registration directory.
And in registration/urls.py we will start by importing url from django.conf.urls and all our views of registration app.
from django.conf.urls import url
from . import views
And under urlpatterns we will create our url named sign_up
urlpatterns=[
     url(r'^$', views.sign_up, name='sign_up'),
]
Above url will redirect http://127.0.0.1:8000/ to view sign_up which we haven't created yet ,thus running server will give following error in terminal:
url(r'^$', views.sign_up, name='sign_up'),
AttributeError: 'module' object has no attribute 'sign_up'
Now we have created our first url on our own.
All above codes can be found on my github link. Click here to download.
In next tutorial, we will create views to solve this error and move forward.
Posted on Utopian.io - Rewarding Open Source Contributors
WOW. You put so much work in it. Good post. Here is an upvote for You. Your content is also good, so I will follow You. If You want to have more upovetes, please follow me @szudaj as well and check my posts. I'm pretty sure You will like it!
Thank you for the contribution. It has been approved.
You can contact us on Discord.
[utopian-moderator]
@cha0s0000 Thanks... I will keep your suggestions in mind.
Hey @programminghub I am @utopian-io. I have just upvoted you!
Achievements
Suggestions
Get Noticed!
Community-Driven Witness!
I am the first and only Steem Community-Driven Witness. Participate on Discord. Lets GROW TOGETHER!
Up-vote this comment to grow my power and help Open Source contributions like this one. Want to chat? Join me on Discord https://discord.gg/Pc8HG9x