Routing Operations in Electron Application
Repository
Electron GitHub Address
https://github.com/electron/electron
My GitHub Address
https://github.com/pckurdu
This Project GitHub Address
https://github.com/pckurdu/routing-operations-in-electron-application
What Will I Learn?
- You will learn how to do the electronda ui-router routing process.
- You will learn $ stateProvider and state.
- You will learn how to read and write files in electron.
- You will learn how to use the forEach () function.
- You will learn how to access html elements with AngularJS.
Requirements
Difficulty
- Intermediate
Tutorial Contents
In this tutorial I'll show you an example of routing applications using the angular ui-router in desktop applications.
I thought by example, an electron application that writes book properties to a file on the first page and lists book samples in that file on the other page.
When I complete this example I will show the routing process with ui-router, reading and writing files in electron, accessing html elements with angularjs and forEach() function.
Let’s start coding and enjoying!
First I will explain the list of files that will be created during the tutorial.
Table of Content:
- package.json // setting file for electron application
- main.js // electron application main folder
- script.js // I will write angular codes file
- index.html // electron application end user welcome screen
- add-book.html // book insert page
- list-books.html // books listing page
- books // file holding information about books
Step 1
- Coding main.js file and index.html
The file we do config the electron application is the package.json file.
The file we set as the main property in the package.json file becomes the main file of the electron application.
We can make the window settings of the electron application in the main file.
After performing the window settings with the help of a function, we are ready to run the electron application, which we do define in the app module's ready property.
Let's code main.js
const {app,BrowserWindow}=require('electron')
const url=require('url')
const path=require('path')

let win;

function createWindow(){
  win=new BrowserWindow({
    width:900,
    height:700,
  })

  win.loadURL(url.format({
    pathname:path.join(__dirname,'index.html'),
    protocol:'file:',
    slashes:true
  }))

  win.openDevTools()
}

app.on('ready',createWindow)
I set index.html to pathname here. The renderer process of the application has been index.html.
Let’ code index.html
<!DOCTYPE html>
<html>
<head>
    <meta charset="utf-8" />
    <meta http-equiv="X-UA-Compatible" content="IE=edge">
    <title>pckurdu</title>
    <meta name="viewport" content="width=device-width, initial-scale=1">
    <link href="https://stackpath.bootstrapcdn.com/bootstrap/4.1.1/css/bootstrap.min.css" rel="stylesheet"
    integrity="sha384-WskhaSGFgHYWDcbwN70/dfYBj47jz9qbsMId/iRN3ewGhXQFZCSftd1LZCfmhktB" crossorigin="anonymous">
    <script src="https://cdnjs.cloudflare.com/ajax/libs/angular.js/1.3.15/angular.min.js"></script>
    <script src="https://cdnjs.cloudflare.com/ajax/libs/angular-ui-router/0.3.2/angular-ui-router.min.js"></script>
    <script type="text/javascript" src="script.js"></script>
</head>
<body>
    <div class="container">
        <div class="jumbotron">
            <a href="#" class="btn btn-primary">Add Book</a>
            <a href="#" class="btn btn-primary">List Books</a>
        </div>
        <div class="row">
            <div class="col-md-12">

            </div>
        </div>
    </div>
</body>
</html>
I installed bootstrap because I can use bootstrap in screen designs and I installed the angular and angular ui-router because I would perform the routing process with the angular ui-router.
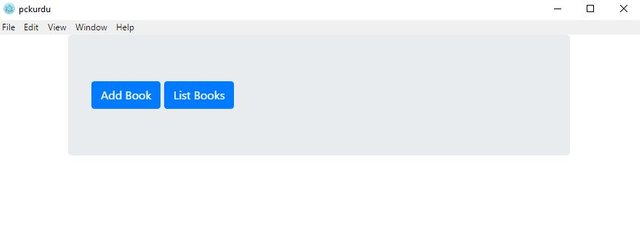
When we run the application, we get the following image.
We can now read and write to the file by routing the buttons to the page.
Step 2
- Routing with ui-router.
To be able to do routing with ui-router, we need to add it as a module.
In script.js
var app=angular.module('myApp',['ui.router']);
We perform routing operations with the help of the $ stateProvider object. The state derived from the $ stateProvider object and the url, templateUrl, and controller of the page to be routed can be defined.
As I want to redirect to add-book.html and list-books.html, I need to configure the routing settings of these pages in config.
In script.js
app.config(['$stateProvider',function($stateProvider){

    $stateProvider
    .state('addBook',{
      url:'/add-book',
      templateUrl:'add-book.html',
      controller:'addCtrl'
    })
    .state('listBooks',{
        url:'/list-books',
        templateUrl:'list-books.html',
        controller:'listCtrl'
      });

  }]);
The angular codes need to be set to ng-app attribute myApp in order to work on index.html page.
In index.html
<body ng-app="myApp">
To be able to do routing, we need to define the state's url properties in the href properties of the buttons we created.
In index.html
<div class="jumbotron">
            <a href="#/add-book" class="btn btn-primary">Add Book</a>
            <a href="#/list-books" class="btn btn-primary">List Books</a>
</div>
Finally, in order to extract the pages we created for routing to the index.html page, we need to write where we want to display the ui-view attribute pages.
In index.html
<div class="col-md-12">
                <div ui-view>

                </div>
</div>
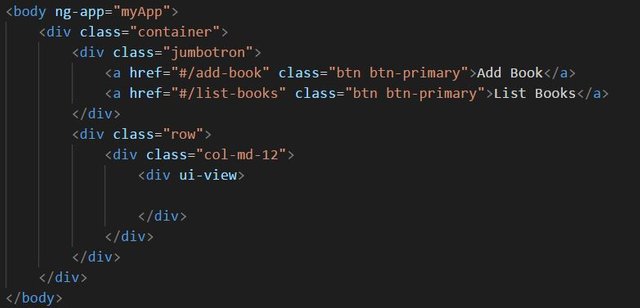
The final version of the body section of the index.html page is shown in the image below.
Thus we made the necessary adjustments for the routing operation.
Step 3
- Coding of add-book.html page.
When we click on the Add Book button, we redirect to the add-book.html page and now we code the add-book.html page.
On this page I will design the inputs for the name of the book, the name of the author and the price to print the file with the help of bootstrap.
I will also write the name of the function that will add the ng-click property of the button on the page.
In add-book.html
<div>
    <div class = "form-group">
        <label for = "Name">Name</label>
        <input type = "text" name = "Name"  id = "Name" ng-model="Name"
           placeholder = "please enter book name" class = "form-control" required>
     </div>

     <div class = "form-group">
        <label for = "Author">Author</label>
        <input type = "text" name = "Author"  id = "Author" ng-model="Author"
           placeholder = "please enter book's author name" class = "form-control" required>
     </div>

     <div class = "form-group">
        <label for = "Price">Price</label>
        <input type = "text" name = "Price"  id = "Price" ng-model="Price"
           placeholder = "please enter book's price name" class = "form-control" required>
     </div>

     <div class = "form-group">
        <button class = "btn btn-primary" id = "add-book" ng-click="AddBook()">Add</button>
     </div>
</div>
The AddBook () function will write the input values to the file. we can define this AddBook () function in the controller of this page.
Let’s define controller
In script.js
app.controller('addCtrl',function($scope){

    $scope.AddBook=function(){

        fs.appendFile(filename, $scope.Name + ',' + $scope.Author +',' + $scope.Price + '\n')

    }

  });
I used the filename variable to write the file. I will define file system and the file name at the top of the script.js file.
let fs = require('fs')
let filename = 'books'
I wrote the input datas to the files named books by putting them in a comma. I have saved a bottom line of the new entry with \n.
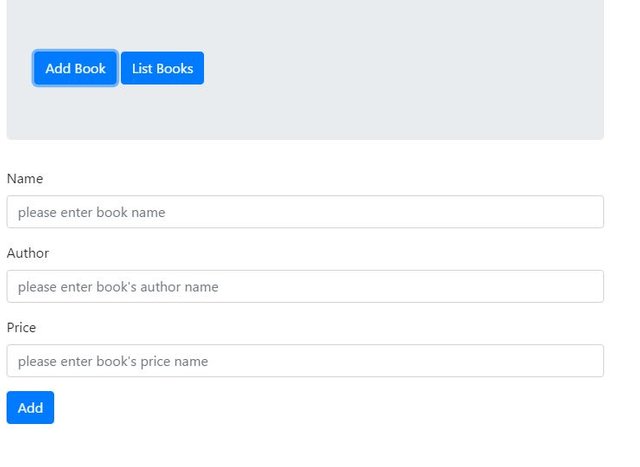
When the Add Book button is clicked, the application looks like the picture below.
Step 4
- Coding of list-books.html page.
On this page I will show the end user with the help of a table in the file.
We will read the data in the file and use the forEach function to return it in the data as it has more than one data, and we will write the data by accessing html element with angularjs.
Let's first write the table header to the page.
In list-books.html
<div>
    <table class = "table" id="table">
        <tr>
           <th class = "col-xs-2">S. No.</th>
           <th class = "col-xs-4">Name</th>
           <th class = "col-xs-4">Author</th>
           <th class = "col-xs-2">Price</th>
        </tr>
     </table>

</div>
I've added a column that is not written in the file, I'll keep the data in the sequence with sno.
Let's first define sno.
In script.js
let sno = 0
Now I define the list-books.html's controller.
In script.js
app.controller('listCtrl',function($scope){

    if(fs.existsSync(filename)) {
         let data = fs.readFileSync(filename, 'utf8').split('\n')

         data.forEach((book, index) => {
            let [ name, author,price ] = book.split(',')

            $scope.list=AddEntry(name,author,price);

            var myEl = angular.element( document.querySelector( '#table' ) );
            myEl.append($scope.list);

         })
     }

  });
First I check to see if a file is read in filename.
If there is data I read line by line and transfer this data to the data list.
I put the data array into the forEach() function and I keep each variable in the variable with the book name.
I separate each data in the book by comma.
I send the name author and price data to the function named AddEntry() to write to the screen.
Let’s coding AddEntry()
In script.js
function AddEntry(name,author,price) {
    if(name && author && price) {
       sno++
       let updateString = '<tr><td>'+sno + '</td><td>'+ name +'</td><td>'
          + author +'</td><td>'+price+'</td></tr>';
        return updateString
    }
 }
I wrote the data I sent in the form of a table line to updateString variable.
I finally append this string to the table id.
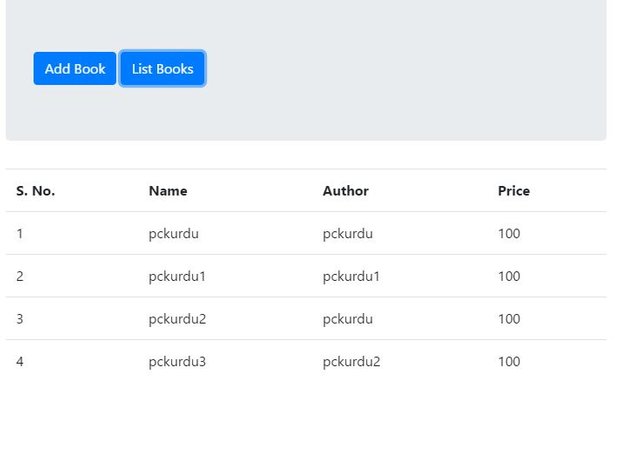
The image of the list-books.html page looks like the image below.
At the end of these operations you can now do routing with angularjs in your electron applications.
You can use the forEach function and the split function. You can read and write files with electron.
Thank you for your interest.
Curriculum
File Synchronous Operation with Electron
What are Standard Dialogs in Electron
Proof of Work Done
https://github.com/pckurdu/routing-operations-in-electron-application
Thank you for your contribution.
While I liked the content of your contribution, I would still like to extend few advices for your upcoming contributions:
Looking forward to your upcoming tutorials.
Your contribution has been evaluated according to Utopian policies and guidelines, as well as a predefined set of questions pertaining to the category.
To view those questions and the relevant answers related to your post, click here.
Need help? Write a ticket on https://support.utopian.io/.
Chat with us on Discord.
[utopian-moderator]
Hey @pckurdu
Thanks for contributing on Utopian.
We’re already looking forward to your next contribution!
Contributing on Utopian
Learn how to contribute on our website or by watching this tutorial on Youtube.
Want to chat? Join us on Discord https://discord.gg/h52nFrV.
Vote for Utopian Witness!