Control Servo motor using Joystick
In this Instructable, I are going to control a servo motor by using a joystick module. When the joystick moves in the horizontal direction, the servo will move towards right or left. Lets start this!

What we have here are the joystick module and the servo motor, the Joysticks or in some cases thumbstick are a great source of input for a project. Especially for robotics. this joystick module is similar to the ones the we find on a PS4 Controller. The X and Y axes are two ~10k potentiometers which control 2D movement by generating analog signals and also has a push button that could be used for special applications.

We will be using the servo as the components to control by joystick, servo motor has everything built-in a motor, a feedback circuit, and most important, a motor driver. It just needs one power line, one ground, and one control pin. or simply servo motors are great devices that can turn to a specified position.
COMPONENTS
CIRCUIT DIAGRAM

The parts of this project is very easy to make. First, connect the joystick module with the uno. The connections for the joystick module and the Arduino are as follows:


SOFTWARE
Before we work on our sketch, make sure to download the Arduino IDE for your specific operating system. I’ll leave a link to where you can download this software: https://www.arduino.cc/en/Main/Software

Arduino Sketch code for servo motor and joystick

Copy code here:
#include <Servo.h>
const int SW_pin = 2;
const int X_pin = A0;
const int Y_pin = A1;
Servo myservo;
int val;
void setup() {
  myservo.attach(9);
}
void loop() {
  val = analogRead(Y_pin);
  val = map(val, 0, 1023, 0, 180);
  myservo.write(val);
  delay(15);
}
Code Explanation
#include <Servo.h> included the library for the servo motor which will help us with making the code easier.
const int SW_pin = 2;initialized the pins we have connected the horizontal pins on the joystick module and also the signal pins on the servos
const int X_pin = A0;
const int Y_pin = A1;
int val; variable to read the value from the analog pin(Y_pin)
myservo.attach(9); attaches the servo on pin 9 to the servo object
val = analogRead(Y_pin); reads the value of the Y_pin (value between 0 and 1023)
val = map(val, 0, 1023, 0, 180); scale it to use it with the servo (value between 0 and 180)
myservo.write(val);sets the servo position according to the scaled value
delay(15); delay time of the servo to get there.
Time to test if itds going to work, and here it is..

view diagram in fullsize so thats it! I hope that this little arduino project would help, thank you for stopping by, please follow me @pakganern
Posted on Utopian.io - Rewarding Open Source Contributors
Great post bud thanks for sharing ,extremely informative going to try and replicate it on my end.
Thank you:)
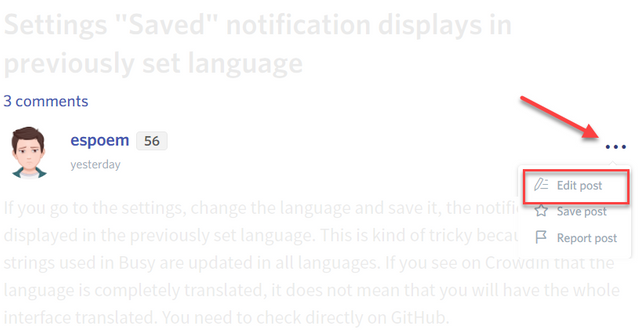
Your contribution cannot be approved yet. See the Utopian Rules. Please edit your contribution to reapply for approval.
You may edit your post here, as shown below:
You can contact us on Discord.
[utopian-moderator]
done sir!
Thank you for the contribution. It has been approved.
You can contact us on Discord.
[utopian-moderator]
Hey @pakganern I am @utopian-io. I have just upvoted you!
Achievements
Suggestions
Get Noticed!
Community-Driven Witness!
I am the first and only Steem Community-Driven Witness. Participate on Discord. Lets GROW TOGETHER!
Up-vote this comment to grow my power and help Open Source contributions like this one. Want to chat? Join me on Discord https://discord.gg/Pc8HG9x