7-Segment counter 0-9 with push buttons up and down
What Will I Learn?
Today i this instructable we will learn how to make a counter from 0-9 using 1 Digital tube 7 segment Display and Push buttons to calibrate the number up and down, how to program arduino on desktop IDE and how to connect the components with a circuit diagram.
Requirements
Write here a bullet list of the requirements for the user in order to follow this tutorial.
- 7 segment display

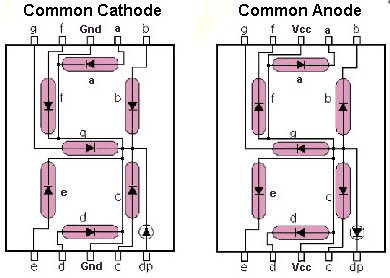
In this tutorial we will use the common cathode type of seven segment, beacause there are 2 types of 7 segment the cathode and anode. most projects of 7 segment Displays are commonly used in timers, clock, digital clocks, calculators and watches for this tutorial we are going to use buttons to count numbers on the led display.
- Buttons
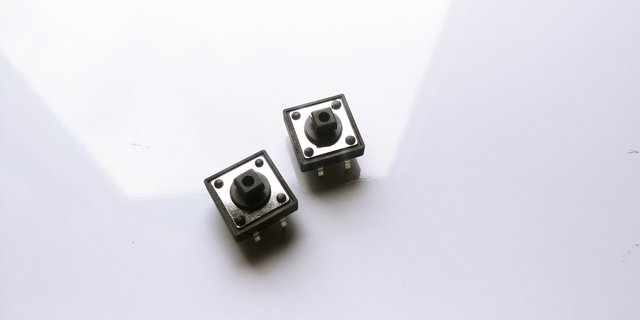
we will use the Momentary Push Button Switch a 12mm Square, These buttons gives a nice soft click every time it's pressed so you know that you've definitely activated it. Their almost instant return make them great for building your own homemade button pad. it also make a good reset switch or user feedback for a microcontroller circuit.
- Resistor

Resistors are electronic components which have a specific measured in ohms, They are passive components, meaning they only consume power it controls the amount of current that flows into the components to protect them from over volume of current that flows through the component
- Jumper wires
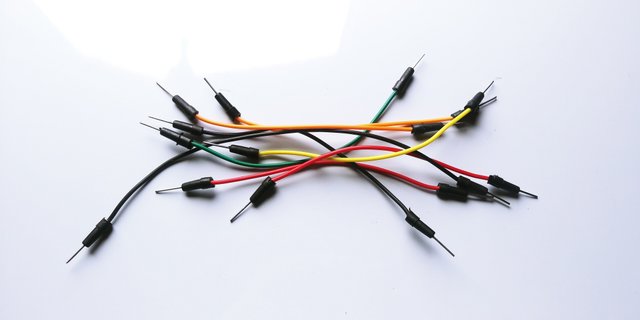
we will use jumpers to connect on a breadboard or female header connector, size and color to distinguish the different working signals. we will use the male to male jumper for 7 segment and the buttons to connect to arduino,
- Breadboard
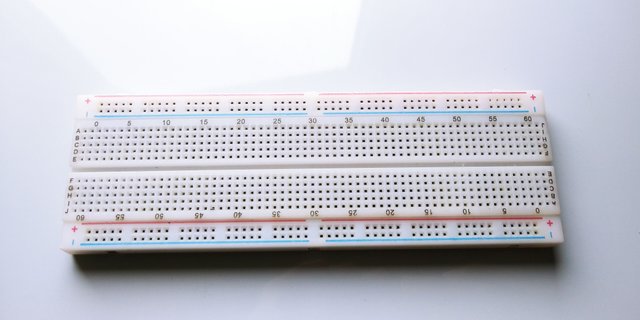
we will use a Single Panel Breadboard it is a solderless device for temporary prototype with electronics and test circuit designs. both side of the breadboard is the power rail it is horizontal lining and the middle is the vertical rail for arduino components.
- Arduino Uno R3
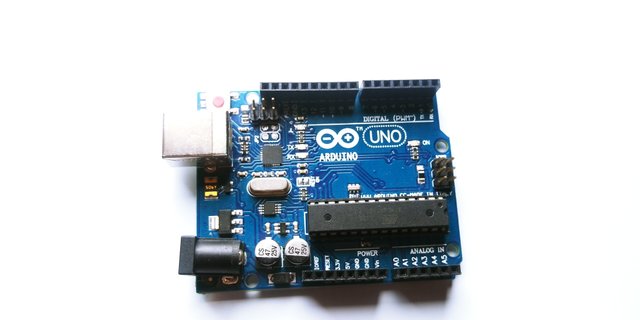
In this tutorial i am using the clone arduino r3 board,
It has 14 digital input/output pins (of which 6 can be used as PWM outputs), 6 analog inputs, a 16 MHz quartz crystal, a USB connection, a power jack, an ICSP header and a reset button.It contains everything needed to support the microcontroller components.
Difficulty
- Basic
Tutorial Contents
- SOFTWARE
we are going to use the arduino ide, to set the sketch for this, if you dont have make sure to download the Arduino IDE for your specific operating system. I’ll leave a link to where you can download this software: https://www.arduino.cc/en/Main/Software
- 7 Segment Displays and Controlling Ways
seven segment displays contain about 8-segments wherein an extra 8th segment is used to display dot. This segment is useful while displaying non integer number. Seven segments are indicated as A-G and the eighth segment is indicated as H. These segments are arranged in the form of 8 which is shown in the seven segment display circuit diagram below.
reference; https://www.elprocus.com/types-of-7-segment-displays-and-controlling-ways/
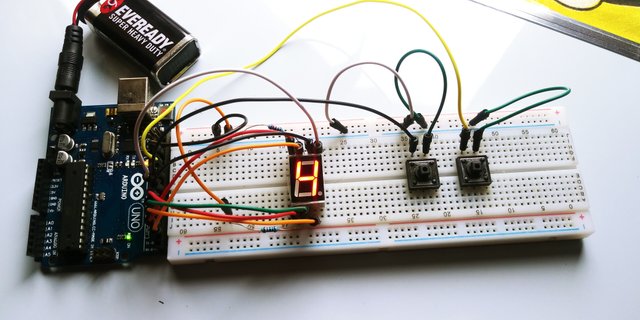
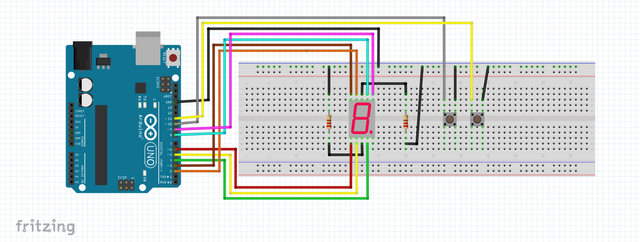
- CIRCUIT DIAGRAM
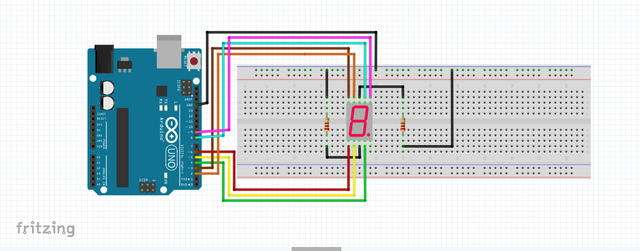
COMMON CATHODE PINOUT
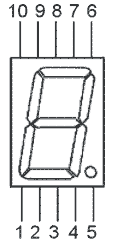
- Arduino Pin 2 to Pin 9 of 7 segment
- Arduino Pin 3 to Pin 10
- Arduino Pin 4 to Pin 4.
- Arduino Pin 5 to Pin 2..
- Arduino Pin 6 to Pin 1.
- Arduino Pin 8 to Pin 7.
- Arduino Pin 9 to Pin 6.
- Arduino pin GND to Pin 3 and Pin 8 each connected with 220 ohm resistors.
Push Button Switch DIAGRAM
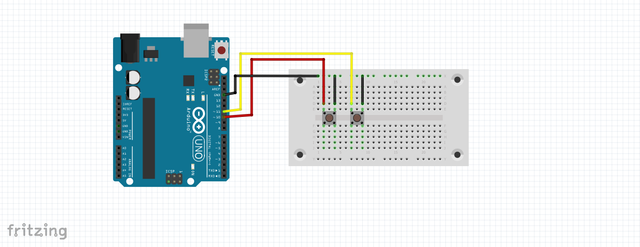
The push buttons has 4 set of legs but we will using 2 legs, both the right leg is connected to the GND pin on the arduino the Increase button Pin in connected to pwm 10 and the Decrease button Pin 11.
- 7-Segment counter with push button Circuit diagram
- Connect the arduino uno board to your computer using the Type B usb cable included in the package. open the arduino Desktop IDE locate the TOOLS verify the type of board you are using PORT should be on the COM# and the board should be on the arduino/genuino uno if youre using the same board as mine.

- Programming a code
const int a = 8;  //For displaying segment "a"
const int b = 9;  //For displaying segment "b"
const int c = 4;  //For displaying segment "c"
const int d = 5;  //For displaying segment "d"
const int e = 6;  //For displaying segment "e"
const int f = 2;  //For displaying segment "f"
const int g = 3;  //For displaying segment "g"
bool bPress = false;
const int IncbuttonPin = 10;
const int DecbuttonPin = 11;
// Variables will change:
int buttonPushCounter = 0;   // counter for the number of button presses
int IncbuttonState = 0;         // current state of the button
int lastIncbuttonState = 0;     // previous state of the button
int DecbuttonState = 0;         // current state of the button
int lastDecbuttonState = 0;     // previous state of the button
void setup() {
  // put your setup code here, to run once:
  pinMode(a, OUTPUT);  //A
  pinMode(b, OUTPUT);  //B
  pinMode(c, OUTPUT);  //C
  pinMode(d, OUTPUT);  //D
  pinMode(e, OUTPUT);  //E
  pinMode(f, OUTPUT);  //F
  pinMode(g, OUTPUT);  //G
  pinMode( IncbuttonPin , INPUT_PULLUP );
  pinMode( DecbuttonPin , INPUT_PULLUP );
  Serial.begin(9600);
  displayDigit(buttonPushCounter);
}
void loop() {
   IncbuttonState = digitalRead(IncbuttonPin);
   DecbuttonState = digitalRead(DecbuttonPin);
   checkIncButtonPress();
   checkDecButtonPress();
  if( bPress ){
    bPress = false;
     turnOff();
     displayDigit(buttonPushCounter);
  }
   /*
  for(int i=0;i<10;i++)
 {
   displayDigit(i);
   delay(1000);
   turnOff();
 }
 */
}
void checkIncButtonPress()
{
   // compare the IncbuttonState to its previous state
  if (IncbuttonState != lastIncbuttonState) {
    // if the state has changed, increment the counter
    if (IncbuttonState == LOW) {
      // if the current state is HIGH then the button went from off to on:
      bPress = true;
      buttonPushCounter++;
      if( buttonPushCounter > 9) buttonPushCounter =0 ;
      Serial.println("on");
    } else {
      // if the current state is LOW then the button went from on to off:
      Serial.println("off");
    }
    // Delay a little bit to avoid bouncing
    delay(50);
  }
  // save the current state as the last state, for next time through the loop
  lastIncbuttonState = IncbuttonState;
}
void checkDecButtonPress()
{
   // compare the IncbuttonState to its previous state
  if (DecbuttonState != lastDecbuttonState) {
    // if the state has changed, increment the counter
    if (DecbuttonState == LOW) {
      // if the current state is HIGH then the button went from off to on:
      bPress = true;
      buttonPushCounter--;
      if( buttonPushCounter < 0) buttonPushCounter =9 ;
      Serial.println("on");
    } else {
      // if the current state is LOW then the button went from on to off:
      Serial.println("off");
    }
    // Delay a little bit to avoid bouncing
    delay(50);
  }
  // save the current state as the last state, for next time through the loop
  lastDecbuttonState = DecbuttonState;
}
void displayDigit(int digit)
{
 //Conditions for displaying segment a
 if(digit!=1 && digit != 4)
 digitalWrite(a,HIGH);
 //Conditions for displaying segment b
 if(digit != 5 && digit != 6)
 digitalWrite(b,HIGH);
 //Conditions for displaying segment c
 if(digit !=2)
 digitalWrite(c,HIGH);
 //Conditions for displaying segment d
 if(digit != 1 && digit !=4 && digit !=7)
 digitalWrite(d,HIGH);
 //Conditions for displaying segment e
 if(digit == 2 || digit ==6 || digit == 8 || digit==0)
 digitalWrite(e,HIGH);
 //Conditions for displaying segment f
 if(digit != 1 && digit !=2 && digit!=3 && digit !=7)
 digitalWrite(f,HIGH);
 if (digit!=0 && digit!=1 && digit !=7)
 digitalWrite(g,HIGH);
}
void turnOff()
{
  digitalWrite(a,LOW);
  digitalWrite(b,LOW);
  digitalWrite(c,LOW);
  digitalWrite(d,LOW);
  digitalWrite(e,LOW);
  digitalWrite(f,LOW);
  digitalWrite(g,LOW);
}
loop() runs very often. Unless you put a delay() in there it runs at many thousands times a second.

I hope you enjoy this actitvity if want to learn how arduino works, and how to make a sketch, then maybe this site http://educ8s.tv/ might help you, educ8 since im always following their project for this stuff, all images on this blog are supposedly mine excluding the with src. thank you for stopping by..
You can also check my previous posts:
Keyes KY-017 Arduino Mercury Switch alarm system
Soil Moisture Sensor with a Nokia 5110 LCD display Arduino Project
Ultrasonic Sensor HC-SR04 with IIC LCD Display (Distance Meter)
i2C Oled display and 8glib Library arduino
Control 2 servo with Potentiometer/ XOD
Controlling 2 Servo Motor with Joystick
Ultrasonic Sensor HC-SR04 alarm system
DS18B20 temperature sensor and IIC 16x2 LCD display Arduino tutorial
Ultrasonic Sensor HC SR04 distance meter with a Nokia 5110 LCD display
IIC LCD Scrolling Text with Arduino tutorial
Light sensor LDR Monitor with a LCD Nokia 5110 Tutorial
Rotary Encoder with Nokia 5110 display Tutorial
Real time clock DS1302 module and Nokia 5110 DIY lcd tutorial
How to connect nokia 5110 LCD to arduino
Posted on Utopian.io - Rewarding Open Source Contributors
Thank you for the contribution. It has been approved.
You can contact us on Discord.
[utopian-moderator]
Hey @creon, I just gave you a tip for your hard work on moderation. Upvote this comment to support the utopian moderators and increase your future rewards!
Hey @pakganern I am @utopian-io. I have just upvoted you!
Achievements
Suggestions
Get Noticed!
Community-Driven Witness!
I am the first and only Steem Community-Driven Witness. Participate on Discord. Lets GROW TOGETHER!
Up-vote this comment to grow my power and help Open Source contributions like this one. Want to chat? Join me on Discord https://discord.gg/Pc8HG9x