Routing Operations with Jquery and Sammy.js
Repository
Routing Operations with Jquery and sammy.js
What Will I Learn?
- You will learn routing with
sammy.js. - You will learn how to use the
load()function. - You will learn how to interact with the routing page.
- You will learn how to create an object and how to insert an object in this object.
Requirements
Difficulty
- Intermediate
Tutorial Contents
In this article, I will show routing with sammy.js, which performs routing with jquery.
We have the necessary code for routing operations in angularjs, but we can not mention jquery in such a code structure.
What if we want to do routing using jquery?
Sammy.js has come up to perform these operations. We upload the sammy.js code to the project and now we can do routing operations.
There are not many sources on the internet that describe sammy.js codes. While the codes show only overwriting after routing. If we are going to route to a separate page, and if we are going to interact with that page, what should we do?
In this article I will route to a another page and explain it to interact with that page.
I have prepared an example to perform these operations.
I'll define two pages and add employee on one page and I will list the employees on the other page. I will do the pages routing with the two buttons and place on the index.html page.
List of files that will be created at the end of the project:
- index.html
- addEmployee.html
- listEmployee.html
- bootstrap.css
- jquery.js
- sammy.js
- script.js
Project Steps:
- page design
- writing the necessary codes for routing operations
- adding an employee
- employees listing
STEP 1: page design
I need to design the index.html page. I will use bootstrap for my designs. I install bootstrap, sammy, jquery and my own custom script file on the page
<head>
    <meta charset="UTF-8">
    <meta name="viewport" content="width=device-width, initial-scale=1.0">
    <meta http-equiv="X-UA-Compatible" content="ie=edge">
    <script src="jquery.js"></script>
    <script src="sammy.js"></script>
    <script src="script.js"></script>
    <link rel="stylesheet" href="bootstrap.css">
    <title>Routing</title>

</head>
I will center the page and insert one jumbotron.
I will add two buttons to this jumbotron, in fact these buttons will be <a> tag but I will give them a button view using bootstrap.
I will add one <div> for the page after routing and set the <id> of this <div> to content.
<body>
    <div class="container">
        <div class="jumbotron">
            <div class="row">
                <div class="col-md-6">
                    <a href="#" class="btn btn-primary">Add Employee</a>
                </div>
                <div class="col-md-6">
                    <a href="#" class="btn btn-primary">Employee List</a>
                </div>
            </div>
        </div>
        <div class="row">
            <div class="col-md-12">
                <div id="content"></div>
            </div>
        </div>
    </div>
</body>
For now I set the href attribute of the <a> tags to #. I will write the necessary names for routing in the future.
Screenshot 1
STEP 2: writing the necessary codes for routing operations
Since we can code with sammy, we first need to create an application with sammy.
var app = $.sammy(function () {
});
We will write the necessary codes for routing in this field.
With the run() function, we can start our sammy code with a specific page.
app.run('#/');
With this code I started from index.html page.
We can now switch to routing.
The id of the field to be routed is determined by the this.element_selector command.
I have specified the area to be redirected on the index.html page with <div id = "content">.
this.element_selector = '#content';
Now I will perform the routing operations.
this.get('#/routing', function(context) {
          context.$element().append('<h1>Routing Operations</h1>');
});
We can do routing with the this.get() function.
We can specify the routing name with the first parameter. This name will be used for index.html <a href="#/routing">.
We can determine the operation to be done as a routing result with the second parameter. Represents the <div> tag to be redirected by $element(). With append() function we will write routing operations to the post-routing screen.
For now, let's give this routing to Add Employee button.
<a href="#/routing" class="btn btn-primary">Add Employee</a>
Screenshot 2
STEP 3: adding an employee
In this section I will design the employee addition page and I will put this page in the routing process.
When I click on the button in it, I will assign the values entered to an object and I will place that object in array.
Let's design the addEmployee.html page.
<div>
    <div class="form-group">
        <input type="text" class="form-control" id="inputName" placeholder="Enter name" \>
    </div>
    <div class="form-group">
        <input type="text" class="form-control" id="inputSurname" placeholder="Enter surname" \>
    </div>
    <div class="form-group">
        <input type="text" class="form-control" id="inputMail" placeholder="Enter e-mail" \>
    </div>
    <button type="submit" class="btn btn-primary" id="btnAdd">Submit</button>
</div>
I placed 3 input for an employee's name, surname, and email address.
We need to use the load() function to do this routing. Using the callback function of the load() function, we can interact with the html elements on the page.
create employees array
var employees=[];
Let's write our routing codes and write the input values to the employee object when the button is clicked.
this.get('#/add', function (context) {
            context.$element().load('addEmployee.html',function(){
                $('#btnAdd').click(function(){
                    var employee={
                        name:$('#inputName').val(),
                        surname:$('#inputSurname').val(),
                        mail:$('#inputMail').val()
                    }
                    employees.push(employee);
                })
            });
 });
I placed the object I created with the push() function into an array.
Finally add the routing name to the add employee button.
<div class="col-md-6">
  <a href="#/add" class="btn btn-primary">Add Employee</a>
</div>
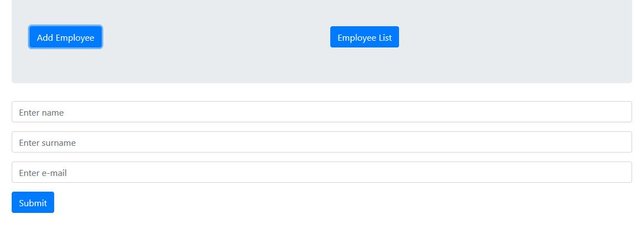
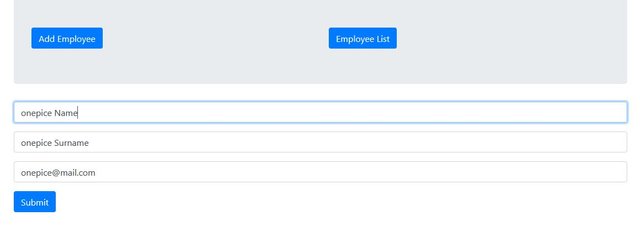
Screenshot 3
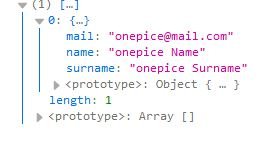
Let's print the array that is formed after the data is input.
Screenshot 4
Screenshot 5
STEP 4: employees listing
To list the employees array, let's design the listEmployee.html page. I will use the <ul> and <li> tags to make lists.
In listEmployee.html
<div>
    <ul class="list-group">

    </ul>
</div>
I'll use the load function to access the page. I will write array elements in the callback function of this function.
I will return in the array element with the for loop, and I will write the append() function and the <li> tags and the object's properties to the screen.
  this.get('#/list', function (context) {
            context.$element().load('listEmployee.html',function(){
                for (let index = 0; index < employees.length; index++) {

                    $('ul').append('<li class="list-group-item"><div class="row"><div class="col-md-4">'+
                            employees[index].name+'</div><div class="col-md-4">'+
                            employees[index].surname+'</div><div class="col-md-4">'+
                            employees[index].mail+'</div></div></li>'

                );
            }
       });
   });
Finally list the routing name to the employee list button.
<div class="col-md-6">
    <a href="#/list" class="btn btn-primary">Employee List</a>
div>
Screenshot 6
Screenshot 7
So we did an advanced routing with jQuery
Proof of Work Done
https://github.com/onepicesteem/routing-operations-with-jquery-and-sammy.js


✅ @onepice, I gave you an upvote on your post! Please give me a follow and I will give you a follow in return and possible future votes!
Thank you in advance!
Thank you for your contribution.
While I liked the content of your contribution, I would still like to extend few advices for your upcoming contributions:
Your contribution has been evaluated according to Utopian policies and guidelines, as well as a predefined set of questions pertaining to the category.
To view those questions and the relevant answers related to your post, click here.
Need help? Write a ticket on https://support.utopian.io/.
Chat with us on Discord.
[utopian-moderator]
Hey @onepice
Thanks for contributing on Utopian.
We’re already looking forward to your next contribution!
Want to chat? Join us on Discord https://discord.gg/h52nFrV.
Vote for Utopian Witness!